-
Notifications
You must be signed in to change notification settings - Fork 408
Create Connection
Follow the steps below to establish a new connection from the public part of the app:
-
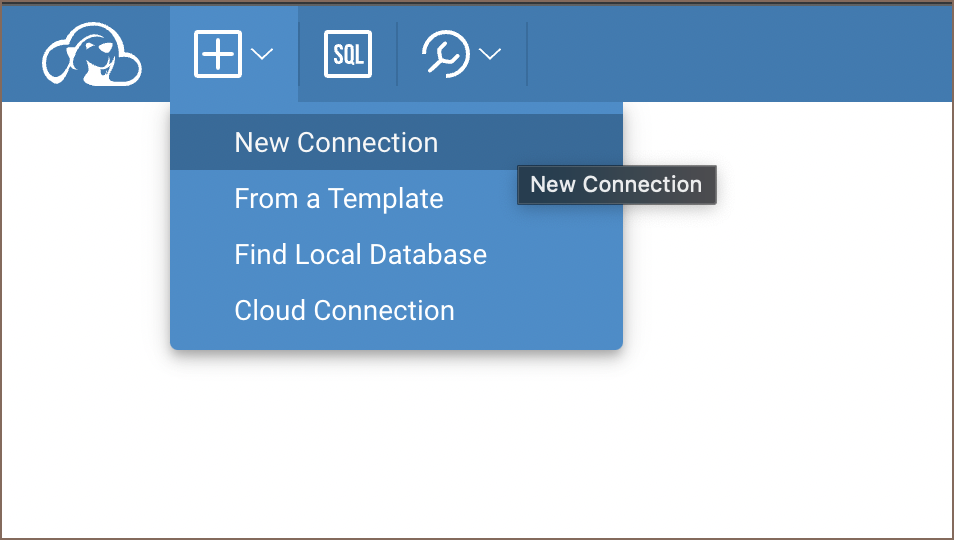
Initiate New Connection:
- Click on the
+button located in the top menu. - Select
New Connectionfrom the dropdown options.
- Click on the

-
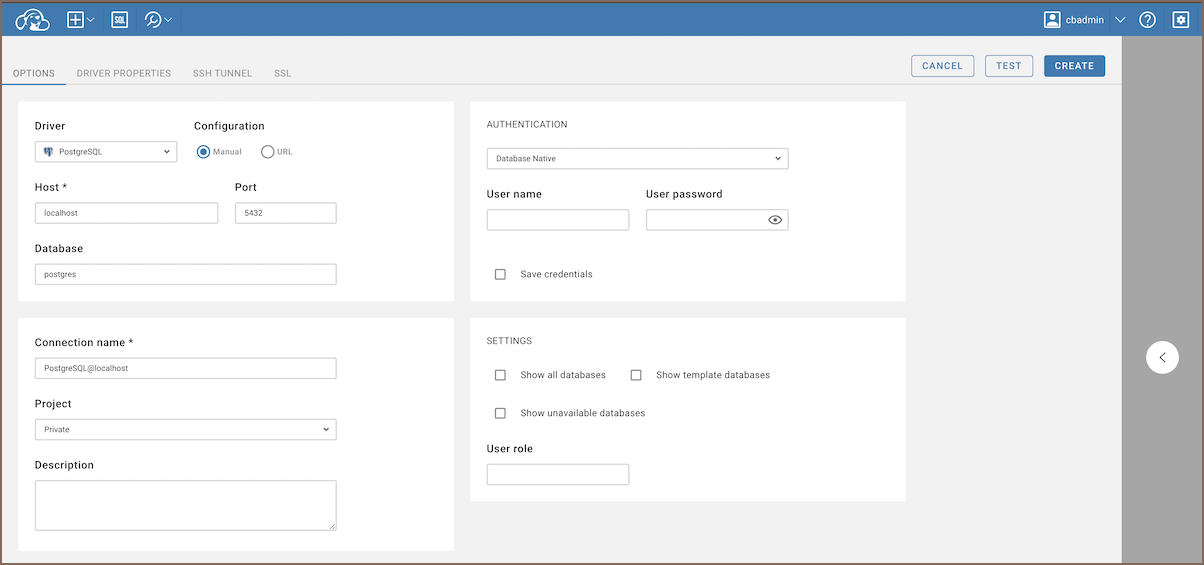
Choose a Driver:
- From the available options, select the appropriate driver.
-
Fill in Connection Details:
- A connection form will be presented.
- Input all necessary details into the form fields.

-
Set Up Advanced Settings (Optional):
- Additional settings such as SSH, SSL, and others can be adjusted.
- Navigate to the relevant tabs located at the top of the connection form to access these settings.
-
Test the Connection (Optional):
- Before finalizing the connection, you have the option to test it.
- Click the
Testbutton to ensure the connection parameters are correct.
-
Finalize and Create the Connection:
- Once all details are in place, click the
Createbutton.
- Once all details are in place, click the
-
Access and Modify Connection:
- The newly created connection will be visible in the connection navigator menu.
- To edit the connection details:
- Click on the context button next to the connection name.
- Select
Edit Connectionfrom the dropdown menu.
By following these steps, users can successfully create and modify connections in the app.
If you have admin permissions, you'll have the capability to manage connection's permissions.
When working with a shared connection, you will notice an Access tab. This is where you can manage who has access to the connection.
Before proceeding with the creation of a template, ensure that you have the necessary administrative permissions.
- You must have admin permissions to access this feature.
The steps are similar to connection creation; the only difference is that it must be done in the administration part, under the "Connection Templates" tab. You can learn more about creating connection templates here.
In our product you can create Private and Shared project(Team edition)
Private projects are exclusive spaces owned by an individual user. They operate as personal projects, safeguarding sensitive information and allowing for undisturbed individual work.
Shared projects are collaborative hubs where multiple users have access to contribute and edit content. These projects foster teamwork.
The choice between shared and private projects hinges on the project's nature and objectives. Whether opting for the autonomy of a private project or embracing the teamwork in a shared project, understanding these differences empowers individuals and teams to align their project management strategies with their specific needs.
- Application overview
-
License Management

- Demo Server
- Supported databases
- Administration
- Server configuration
- Create Connection
- Network configuration settings
- Connection Templates Management
- Access Management
-
Authentication methods
-
Local Access Authentication

- Anonymous Access Configuration
- Reverse proxy header authentication
- LDAP
-
Single Sign On

-
SAML

-
OpenID

-
AWS OpenID

-
AWS SAML

-
AWS IAM

-
AWS OpenId via Okta

-
Snowflake SSO

-
Okta OpenId

-
Cognito OpenId

-
JWT authentication

-
Kerberos authentication

-
NTLM

-
Microsoft Entra ID authentication

-
Google authentication

-
Local Access Authentication
- User credentials storage
- Cloud databases configuration
-
Query Manager

-
Drivers Management

- Accessibility
- Keyboard shortcuts
- Features
- Server configuration
-
Domain manager

- Product configuration parameters
- Command line parameters
- Local Preferences
- API
- Deployment options
- Additional setup and management