Interior
The Interior recipe renders a furnished room based on a Blender parent scene created by Nextwave Multimedia.
.png)
Above, PBRT rendered the scene with the path tracing integrator.
.png)
Above, Mitsuba rendered the scene with the path tracing integrator.
The parent scene contains many objects in a closed space, so it looks brighter and more realistic when rendered with a path tracing integrator, as opposed to a direct lighting integrator. Unfortunately, path tracing integrators can take a long time to finish, and can introduce noise artifacts in the renderings. The renderings above required many minutes for Mitsuba, and over an hour for PBRT.
Use the script rtbMakeInterior.m to produce the images above.
The Interior recipe required some extra steps before I could render it with RenderToolbox. Some steps addressed the unusually large number of objects in the scene. Some steps addressed the fact that the scene was not originally intended for use with RenderToolbox.
The extra steps involved a web browser, Blender, and Matlab.
The Interior recipe started with a free Blender model from Nextwave Multimedia. Thanks to Nextwave for making lots of free Blender models available!
As of December 2012, the free Blender models are posted at the Nextwave website. The Interior scene used the model called 3D Architectural and Interior view. The download link at that site gave me a file called interior.zip. Unzipping the file gave me some folders, including interior/source/interio.blend ("interio" might be a typo for "interior". It is also Basque for "inside".).

I opened interio.blend in Blender, to see what the model looked like. It has some chairs, lights, and wall hangings inside a closed room. The Blender preview started out as an extreme closeup of a spherical hanging lamp. I moved the preview camera around using the mouse and numpad.

Blender's scene object outliner helped me with many of the steps below. This is a list of all the objects in the scene. I changed an arbitrary Blender view panel into an outliner by clicking the lower-leftmost icon in the panel and choosing "Outliner".

Note: I used Blender version 2.63. For more tips about using Blender, see Blender Cookie. In particular, see the Getting Started videos.
The camera in this parent scene uses some Blender features that interfere with RenderToolbox. I had to disable these before exporting to Collada.
First, I turned off the "AutoTrack" feature, which constrains what the camera can look at.
- In the outliner, I selected the
Cameraobject by clicking it. - In the object properties panel, I chose the "Object Constraints" tab. The icon for this tab looks like two links of chain.
- I found a constraint named "AutoTrack". I clicked the
Xto the right of the name to delete the constraint. - I save the Blender file.
At this point, the scene camera would look wherever I pointed it.

Next, I turned off camera animation, which caused the camera to move each time I opened the Blender file.
- In the outliner, I expanded the
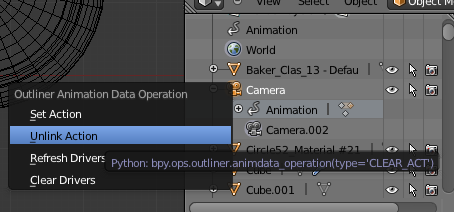
Cameraobject by clicking on the nearby+sign. - I right clicked on the item called
Animationand selected "Unlink Action". - I saved the Blender file.
Now the camera would stay where I put it, even across Blender sessions.
Finally, I positioned the camera for a good view.
- In the outliner, I selected the
Cameraobject by clicking it. - In the object properties panel, I chose the "Object" tab. The icon for this tab looks like a cube.
- I typed transformation values to move the camera. These values looked pretty good:
- Location:
- X: -30
- Y: -30
- Z: 10
- Rotation:
- X: 85
- Y: 0
- Z: -30
- Location:
- I saved the Blender file.

At this point the camera was all set.
The Interior parent scene has a few spot lights placed inside the room. These do not fully illuminate the room. Even when rendered with the path-tracing integrator that allows light to reflect among objects in the scene, renderings that use just the spot lights look dark and dominated by grainy artifacts:
.png)
.png)
Above, Mitsuba rendered the Interior scene with only spot lights inside the room. Left, direct-lighting with no reflections. Right, path-tracing with reflections and image noise.
Blender solves this problem with ambient lights that light up the whole scene. But RenderTooblox does not use ambient lights because they are unrealistic.
Instead, I added large area lights to the parent scene, like picture windows. These are outlined in orange in the Blender screenshot below:

These "area lights" are really just rectangular meshes. I could not use Blender's native area light functionality, because these do not survive the Collada export process. Instead, I just created meshes and gave them memorable names. Later, in the RenderToolbox mappings file, I "blessed" these meshes with area light functionality.
The area light on the right sits directly behind the camera, so I called it CameraLight. The other area light sits in front of an existing wall, so I called it WallLight.
In Blender, an "object" is not the same things as a "mesh". I located the mesh associated with each area light using the outliner. I made sure that both the object and the mesh had memorable names.

I also added a point light near the ceiling, in the corner of the room farthest from the camera. I called this light SneakyPoint because its light sneaks around the wall in that corner.