Installation
This document helps you install RenderToolbox4 and the Computational Image Systems Engineering toolbox (CISET) on a Mac OS and Linux system. These two toolboxes are being co-developed, though both can be useful on their own.
The installation consists of 5 steps. Please follow the instructions for your operating system (MacOS or Linux). At the end of document, we describe a few issues that you may encounter in the process of installation. Feel free to contact us about errors or to offer suggestions.
You will want to install a set of closely related toolboxes to make the most out of CISET. First create a local directory in terminal (i.e git_repo in this example) and use git to download the following repositories:
git clone https://github.com/RenderToolbox/RenderToolbox4.git
git clone https://github.com/RenderToolbox/mexximp.git
git clone https://github.com/RenderToolbox/mPbrt.git
git clone https://github.com/RenderToolbox/mMitsuba.git
git clone https://github.com/gllmflndn/JSONio    (For Cloud usage)
You will also need two functions from Mathworks Central (xml2struct and struct2xml)
https://www.mathworks.com/matlabcentral/mlc-downloads/downloads/submissions/59411/versions/1/download/zip
https://www.mathworks.com/matlabcentral/mlc-downloads/downloads/submissions/28518/versions/9/download/zip
To use CISET with RTB, also get
git clone https://github.com/iset/isetcam.git OR git clone https://github.com/isetbio/isetbio.git
git clone https://github.com/scienstanford/ciset.git
git clone https://github.com/RenderToolbox/pbrt2iset.git
Finally, we have these two additional toolboxes on our path when we use RTB, but you may not need them.
git clone https://github.com/RenderToolbox/SphereRendererToolbox.git
git clone https://github.com/Psychtoolbox-3/Psychtoolbox-3.git
You can organize the directories as you like. Just make sure they are all on your Matlab path.
In MacOS system, we use Homebrew to install assimp and openexr. If you do not yet have Homebrew installed, we suggest you get it. This is the command used to install Homebrew on MacOS
/usr/bin/ruby -e "$(curl -fsSL https://raw.githubusercontent.com/Homebrew/install/master/install)";
If you already installed Homebrew on your computer, we still recommend you to check the version of your brew and update it if it's an old version since an old version of Homebrew may let you download old versions of assimp and openexr. RenderToolBox4 may not be compatible with older versions. To check the version of Homebrew:
brew list --versions git
To update Homebrew:
brew update
Use the following command to install openexr:
brew install openexr
If you have trouble getting the mex file rtbMakeReadMultichannelEXR to compile when you get to that step below, it may be an openexr issue. This is known to work with version 2.5.2 under Mac OS Big Sur. You can use homebrew to install 2.5.2, see homebrew documentation on how to install specific versions.
Assimp is a little trickier. RTB 4 works with version 4.1.0 of Assimp, which is no longer current. We need to install that version, and the basic homebrew system is not set up to do so. The easiest way we have found to install 4.1.0 is to use the script brewv.sh, which we have included in the Admin directory of RTB 4. Download this file to your computer and open a terminal window. Change the working directory to wherever you put brewv.sh, make it executable, and run:
cd <wherever_you_put_it>
chmod a+x brewv.sh
./brewv.sh install assimp 4.1.0
If this doesn't work, an alternative is to use CMake. Here are instructions from Jenny Bosten, who got this to work:
Download cmake and used this line in readme.rst to build and install
./bootstrap && make && sudo make install
Download the source code for Assimp 4.1.0 (https://github.com/assimp/assimp/releases/tag/v4.1.0/)
Follow the INSTALL text file and run
cmake CMakeLists.txt -G 'Unix Makefiles'
make
Assimp ends up installed in a location other than that expected in makeMexximp.m
So, either change the paths in makeMexximp.m, or else move assimp to /usr/local/Cellar
We have installed on our Ubuntu Linux platform. We use the apt-get package manager to install libopenexr:
sudo apt-get install libopenexr-dev openexr
You may also need to install zlib:
sudo apt-get install zlib1g-dev
To install assimp, first you need to download the source code using:
git clone https://github.com/assimp/assimp.git
(You will need to figure out how to get version 4.1.0, which we have not done yet. The above gets the current version.)
Go to the source folder ( cd assimp/) and type the following command:
cmake CMakeLists.txt -G 'Unix Makefiles'
make
Finally, when you use 'assimp' on Linux there can be issues about finding the library. Locally at Stanford, we had added this line to our login files (.bashrc)
export LD_PRELOAD=/usr/lib/x86_64-linux-gnu/libstdc++.so.6
Download and install the community edition of Docker. The docker default memory allocation is small (2 GB and 2 CPUs). You might want to adjust it to 6 or 8 GB and 3 or 4 CPUs in the preferences page under "Advanced".

At the Stanford site, we also need to make sure that users are in the 'docker group'. See your system admin if you receive an error saying that you do not have permission to run docker!
There is a complete installation instructions to set up RenderToolbox4 here on this site. We have a shortened and simplified version here. (We should add toolboxtoolbox notes at some point.)
Open Matlab and go to the directory where you downloaded all the resources in Step 1.
Second, change into the mexximp directory (RenderToolbox4/mexximp/makeMexximp.m) and run
makeMexximp
You may get some warnings, but we think that's OK. If you have also installed a mexximp_binary toolbox (which will happen if you use ToolboxToolbox to do the install), copy the mex files you built into mexximp_binary_build as well.
Third, change into the directory (RenderToolbox4/Utilities/ReadMultispectralEXR/ReadMultichannelEXR/) and run
rtbMakeReadMultichannelEXR
If you have also installed a RenderToolbox4_binary toolbox (which will happen if you use ToolboxToolbox to do the install), copy the mex file you built into RenderToolbox4_binary/build as well.
Fourth, configure RenderToolbox4 preferences by using the template provided in the root directory of RenderToolBox 4. For many people, you can initialize by simply running
rtbLocalConfigTemplate.m
If you wish to customize, then copy rtbLocalConfigTemplate.m to rtbLocalConfig.m and run the modified version. This program will set your RenderToolbox4 preferences in your Matlab environment.
Defaults you might want to change are
- image size parameters
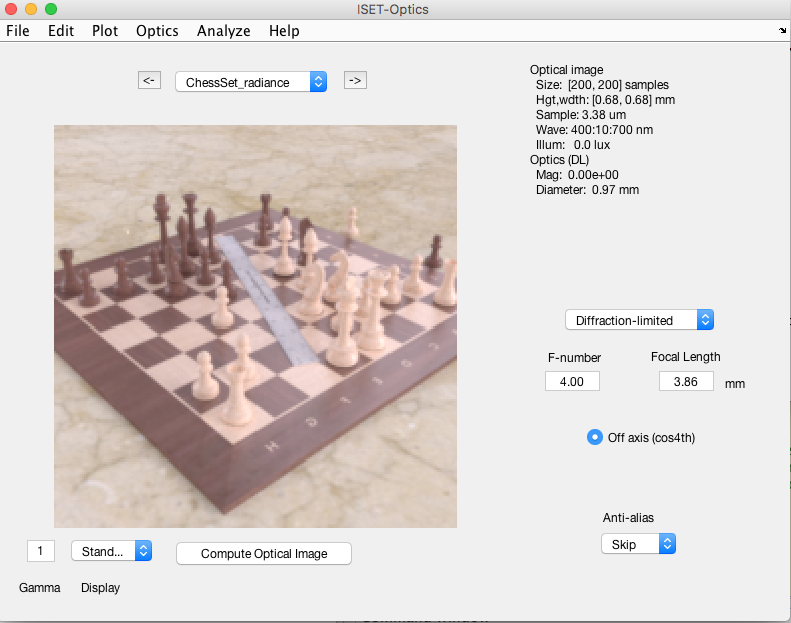
You are now ready to test the whole package. Try running
rtbMakeChessSet
When the program finishes, you should see a image as below:
The brew install had some version issues that caused Wandell trouble. The build required ilmbase version that was not installed. He tried brew uninstall ilmbase, brew upgrade, and then
 brew upgrade
 brew uninstall openexr
 brew uninstall ilmbase
 brew install openexr
Further brew issue was that brew install assimp did not create the necessary symbolic links. So, Wandell had to run brew link assimp
First, make sure you can compile mex files on your system. On the MacOS, most people install Xcode from the Apple Developers Edition. To confirm that your mex compiler works.
mex -setup
If you are running on OS X and have a version of Xcode that is not recognized by Matlab you need to edit clang_maci64.xml and clang++_maci64 in /Applications/MATLAB_R2016b.app/bin/maci64/mexopts.
In each file find a section that starts with <cmdReturns name='xcode-select -print-path'/>. The list of
SDKs below should contain the one you are working on (and that is supplied with Xcode version). If it's not there
simply add it to the list.
<dirExists name="$$/Platforms/MacOSX.platform/Developer/SDKs/MacOSX10.13.sdk" />
<dirExists name="$$/Platforms/MacOSX.platform/Developer/SDKs/MacOSX10.12.sdk" />
<dirExists name="$$/Platforms/MacOSX.platform/Developer/SDKs/MacOSX10.11.sdk" />
<dirExists name="$$/Platforms/MacOSX.platform/Developer/SDKs/MacOSX10.10.sdk" />
<dirExists name="$$/Platforms/MacOSX.platform/Developer/SDKs/MacOSX10.9.sdk" />
<cmdReturns name="find $$ -name MacOSX10.13.sdk | egrep 'MacOSX10.13.sdk'" />
<cmdReturns name="find $$ -name MacOSX10.12.sdk | egrep 'MacOSX10.12.sdk'" />
<cmdReturns name="find $$ -name MacOSX10.11.sdk | egrep 'MacOSX10.11.sdk'" />
<cmdReturns name="find $$ -name MacOSX10.10.sdk | egrep 'MacOSX10.10.sdk'" />
<cmdReturns name="find $$ -name MacOSX10.9.sdk | egrep 'MacOSX10.9.sdk'" />
(We had trouble with Matlab 2016a and Xcode, but later versions seem to be OK.) A satisfactory return on the Mac is
MEX configured to use 'Xcode with Clang' for C language compilation.
Warning: The MATLAB C and Fortran API has changed to support MATLAB
	 variables with more than 2^32-1 elements. You will be required
	 to update your code to utilize the new API.
	 You can find more information about this at:
	 http://www.mathworks.com/help/matlab/matlab_external/upgrading-mex-files-to-use-64-bit-api.html.

To choose a different language, select one from the following:
 mex -setup C++
 mex -setup FORTRAN
The situation is a little different on Linux, where mostly people use gcc. There are rarely problems with Linux and mex.