Setup SDCC developing environment with Eclipse
Eclipse is a popular JAVA IDE, with the aid of Eclipse CDT plugin, it becomes a powerful IDE for C/C++ development. Eclipse CDT comes with much more functions and flexibility than conventional embedded-system IDEs (Keil uVersion, IAR, ST Vistual Develop, e.t.c...), e.g. find usage, refactor, code navigation, integrated support for version control systems, e.t.c...
Although it is possible to let the Eclipse use the Keil C51 compiler, this approach is not recommended, since: 1. Keil C51 compiler is Windows only, 2. Lots of modern C features are not supported. Therefore, Eclipse CDT + SDCC should be preferred.
This tutorial will guide you through the setup of SDCC compiler and Eclipse CDT. (The following method only applys to Windows x86/x64, however, setting up Eclipse on Linux is similar and this article could be used as a reference).
We need the following as pre-requests:
- Java Development Kit(JDK) 1.8 64-Bit
- Eclipse 64-Bit
- Eclipse CDT
- Eclipse SDCC plugin (Patched for 64-bit Windows systems)
- MSYS
- SDCC
Eclipse SDCC plugin, SDCC and MSYS are packed in a single zip file and it is ready to use. Download is available here (Baidu Pan alternative).
-
Install Eclipse CDT (Necessary for C/C++ development) install and launch Eclipse, go to "Help" menu, then "Install New Software". Put
http://download.eclipse.org/tools/cdt/releases/9.3/in the "Work with:" textbox. Hit enter and wait for its response. CDT is massive, in this case we only need few components, so only checkCDT Main Features->C/C++ Development Toolsto minimize disk usage. Restart Eclipse after CDT installation. -
Unzip SDCC and MYSY to any folder, e.g.
D:\Software\Develop\sdcc\binandD:\Software\Develop\msys\bin. In Eclipse, go to "Windows" -> "Preference", then on left hand side, navigate through "C/C++ -> Build -> Environment", Add a new environment variable calledPATH, its value should be SDCC path plus MSYS path, e.g.:D:\Software\Develop\sdcc\bin; D:\Software\Develop\msys\bin
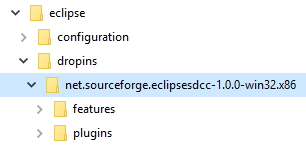
- Unzip the patched Eclipse SDCC plugin to the
dropinsfolder under Eclipse install directory, then restart Eclipse. Dev environment setup is now complete.
- Launch eclipse, go to "File -> New -> Other", choose "C Project" and select
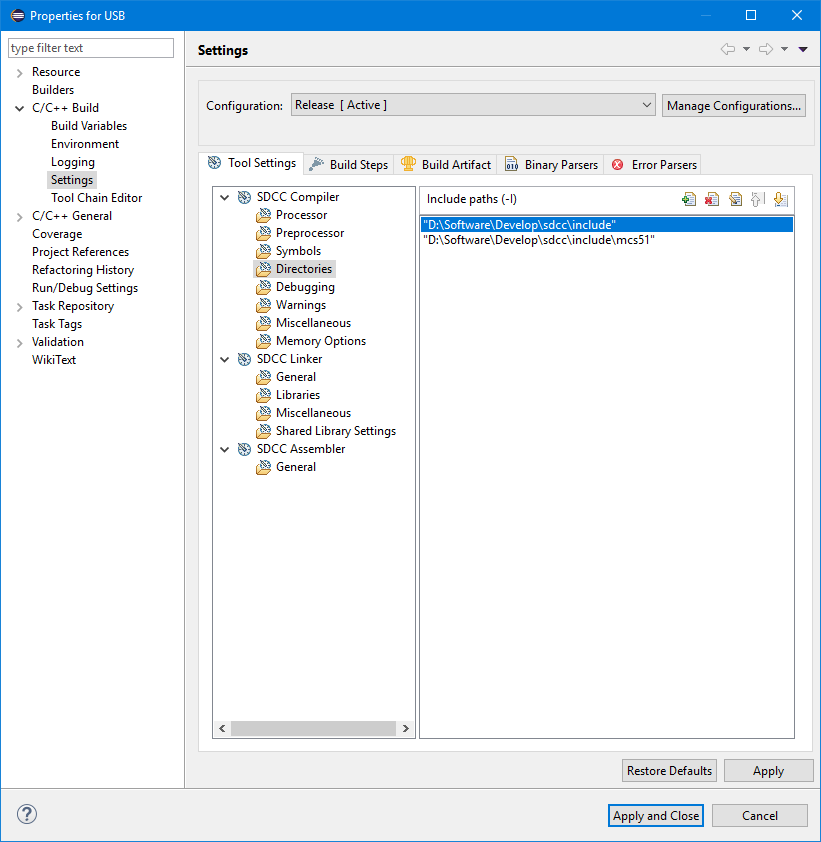
Others -> MCS51 family (SDCC)for "Project Type", then click "Finish" to close the dialog. - In "Project Explorer", right click the project and choose "Properties", click through "C/C++ Build -> Settings"
- In tab "Tool Settings", in the treeview, navigate to "SDCC Compiler -> Directories", then hit the + button, add
<sdcc path>\sdcc\include(e.g.D:\Software\Develop\sdcc\include). You may also add<sdcc path>\sdcc\include\mcs51to include headers for 8051 processors.
- Go to tab "Build Steps", type
packihx ${ProjName}.ihx > ${ProjName}.hex & makebin -p ${ProjName}.ihx ${ProjName}.binfor Post-build steps command, this tells SDCC to create .hex file and .bin file, which is required for programming the microcontroller. - Go to "C/C++ General -> Preprocessor Include Paths, Macros etc.", In tab "Entries", choose "GNU C", select "CDT User Setting Entries", then hit the "Add" button. Click the combobox on the left-top corner of the window and choose "Preprocessor Macro", in field "Name", type
__SDCCand put1for its value. Repeat same procedure for macroSDCC. This gives you a better experience when you navigating through the source code. - Click "Apply and Close", happy coding!
You don't need to perform any of the following, my zip file already contain these patches.
The original Eclipse SDCC plugin is slightly outdated and it might not work properly on the latest version of Eclipse or 64-bit Windows systems.
- Download the zip file and extract the
net.sourceforge.eclipsesdcc-1.0.0-win32.x86folder to<Eclipse Path>\dropins\net.sourceforge.eclipsesdcc-1.0.0-win32.x86. - Copy the
osfolder from<Eclipse Path>\dropins\net.sourceforge.eclipsesdcc-1.0.0-win32.x86\plugins\net.sourceforge.eclipsesdcc.win32_1.0.0to<Eclipse Path>\dropins\net.sourceforge.eclipsesdcc-1.0.0-win32.x86\plugins\net.sourceforge.eclipsesdcc_1.0.0, so that it works on 64-bit systems. (I'm not too sure why) - Replace
<Eclipse Path>\dropins\net.sourceforge.eclipsesdcc-1.0.0-win32.x86\plugins\net.sourceforge.eclipsesdcc_1.0.0\os\win32\sh.exe(the one with a weird icon) with<MSYS Path>\msys\bin\sh.exe. The originalsh.exehas lots of unwanted characters in its console and they will confuse the Eclipse SDCC plugin.
The same environment (SDCC+Eclipse) can be used for STM8 development, there's a heavily patched and experimental GDB which enables on-chip debugging for STM8. On-chip debugging is not supported on CH55x devices.