You will continue to develop your application from the point you arrived at the end of week 6. The material that follows comes with the assumption that you have done all the exercises of the previous week. In case you have not done all of them, you can take the sample answer to the previous week from the submission system.
You ran into debugger on week 2 and also got a reminder last week.
Once more: When you have problems, instead of guessing, use the debugger!
Throughout this course, the importance of using the Rails console as a development tool has been emphasized. So when you are doing something even slightly nontrivial, first test it in the console. In some cases it might be even better to do the testing in the console launched by the debugger as then you can work in exactly the context you are writing the code for. This way you can access e.g. variables params, sessions and other execution context dependent data.
Part of this week's exercises may break some of the tests from the previous weeks. You can mark the exercises done despite breaking the tests. Fixing them and GitHub Actions is optional.
You want to implement now a new functionality to sort your beer list against the different columns. Forward the information about the order you want to the controller as parameter of an HTTP request. Change the table in app/views/beers/index.html.erb like this:
<table class="table table-striped  table-hover">
  <thead>
    <tr>
      <th><%= link_to "Name", beers_path(order: "name")%></th>
      <th><%= link_to "Style", beers_path(order: "style")%></th>
      <th><%= link_to "Brewery", beers_path(order: "brewery")%></th>
      <th><%= link_to "Rating", beers_path(order: "rating")%></th>
    </tr>
  </thead>
  ...
</table>
so the table titles have now become links which point back to the same page, but in addition, they add the query parameter :order to the request, defining the new order.
What happens is that the parameter is passed along the url, attached to the end of it, separated by a question mark. For example if you click the style column, the url becomes beers?order=style
The controller can access the parameter through the params hash. As expected, the value of the parameter defining the order is params[:order].
Let's extend the beer controller so that it tests whether the request has a parameter, and if so, the beers are sorted in the right order:
def index
  @beers = Beer.all

  order = params[:order] || 'name'

  @beers = case order
           when "name" then @beers.sort_by(&:name)
           when "brewery" then @beers.sort_by { |b| b.brewery.name }
           when "style" then @beers.sort_by { |b| b.style.name }
           when "rating" then @beers.sort_by(&:average_rating).reverse
           end
end
The code defines that the table should be sorted against the names by default. It will happen like this
order = params[:order] || 'name'Normally order will get the value params[:order]. If the parameter :order hasn't been given, (so it's value is nil) the part after || will be picked as value, that is: name.
Attention 1: Ruby's command case when is used to sort the beers
@beers = case order
  when 'name' then @beers.sort_by{ |b| b.name }
  when 'brewery' then @beers.sort_by{ |b| b.brewery.name }
  when 'style' then @beers.sort_by{ |b| b.style.name }
end
and it works by default in the same way as the code below
  @beers =
  if order == 'name'
    @beers.sort_by{ |b| b.name }
  elsif orded == 'brewery'
    @beers.sort_by{ |b| b.brewery.name }
  elsif orded == 'style'
    @beers.sort_by{ |b| b.style.name }
  end
Attention 2: in the example the beers are first retrieved from the database, and then they are sorted in central memory. The beer list could also be sorted at database level:
# beers ordered by name
Beer.order(:name)

# beers ordered by brewery name
Beer.includes(:brewery).order("breweries.name")

# beers ordered by name of style of beer
Beer.includes(:style).order("style.name")Change the list page so that beer clubs can be sorted in alphabetic order against their names or cities or by their foundation year. The name order is the default one.
ATTENTION if you haven't implemented beer clubs in your application, you can do this exercise for breweries page (and assume that both active and inactive breweries are sorted the same way)
Your solutions to sort the beers list are quite good. The problem comes with performance, because after sorting it always makes a call to the server, which generates a page to show in the new order.
The sorting functionality could also be implemented with javascript on the browser. Even though this course is about server functionality, you will now see an example of how the sorting functionality could be implemented on the browser. In this solution the browser only provides a list of the beers in json form, and the browser executes the javascript code and takes care of creating the table listing the beers.
You won't overwrite the already existing beer list, the functionality of the beers page. Instead, you will create a completely new page at the address beerlist with that functionality. Make a route for the page in the file routes.rb:
get 'beerlist', to: 'beers#list'
So use the list method that is contained in the beer controller. The method doesn't need to do anything:
class BeersController < ApplicationController
  before_action :ensure_that_signed_in, except: [:index, :show, :list]
  # keep the other before_actions as they are

  def list
  end

  ...
end
Attention The method list was added to those methods that don't require executing the ensure_that_signed_in method before it, meaning that viewing the beer list generated with javascript doesn't require logging in!
Also the view views/beers/list.html.erb is minimalist:
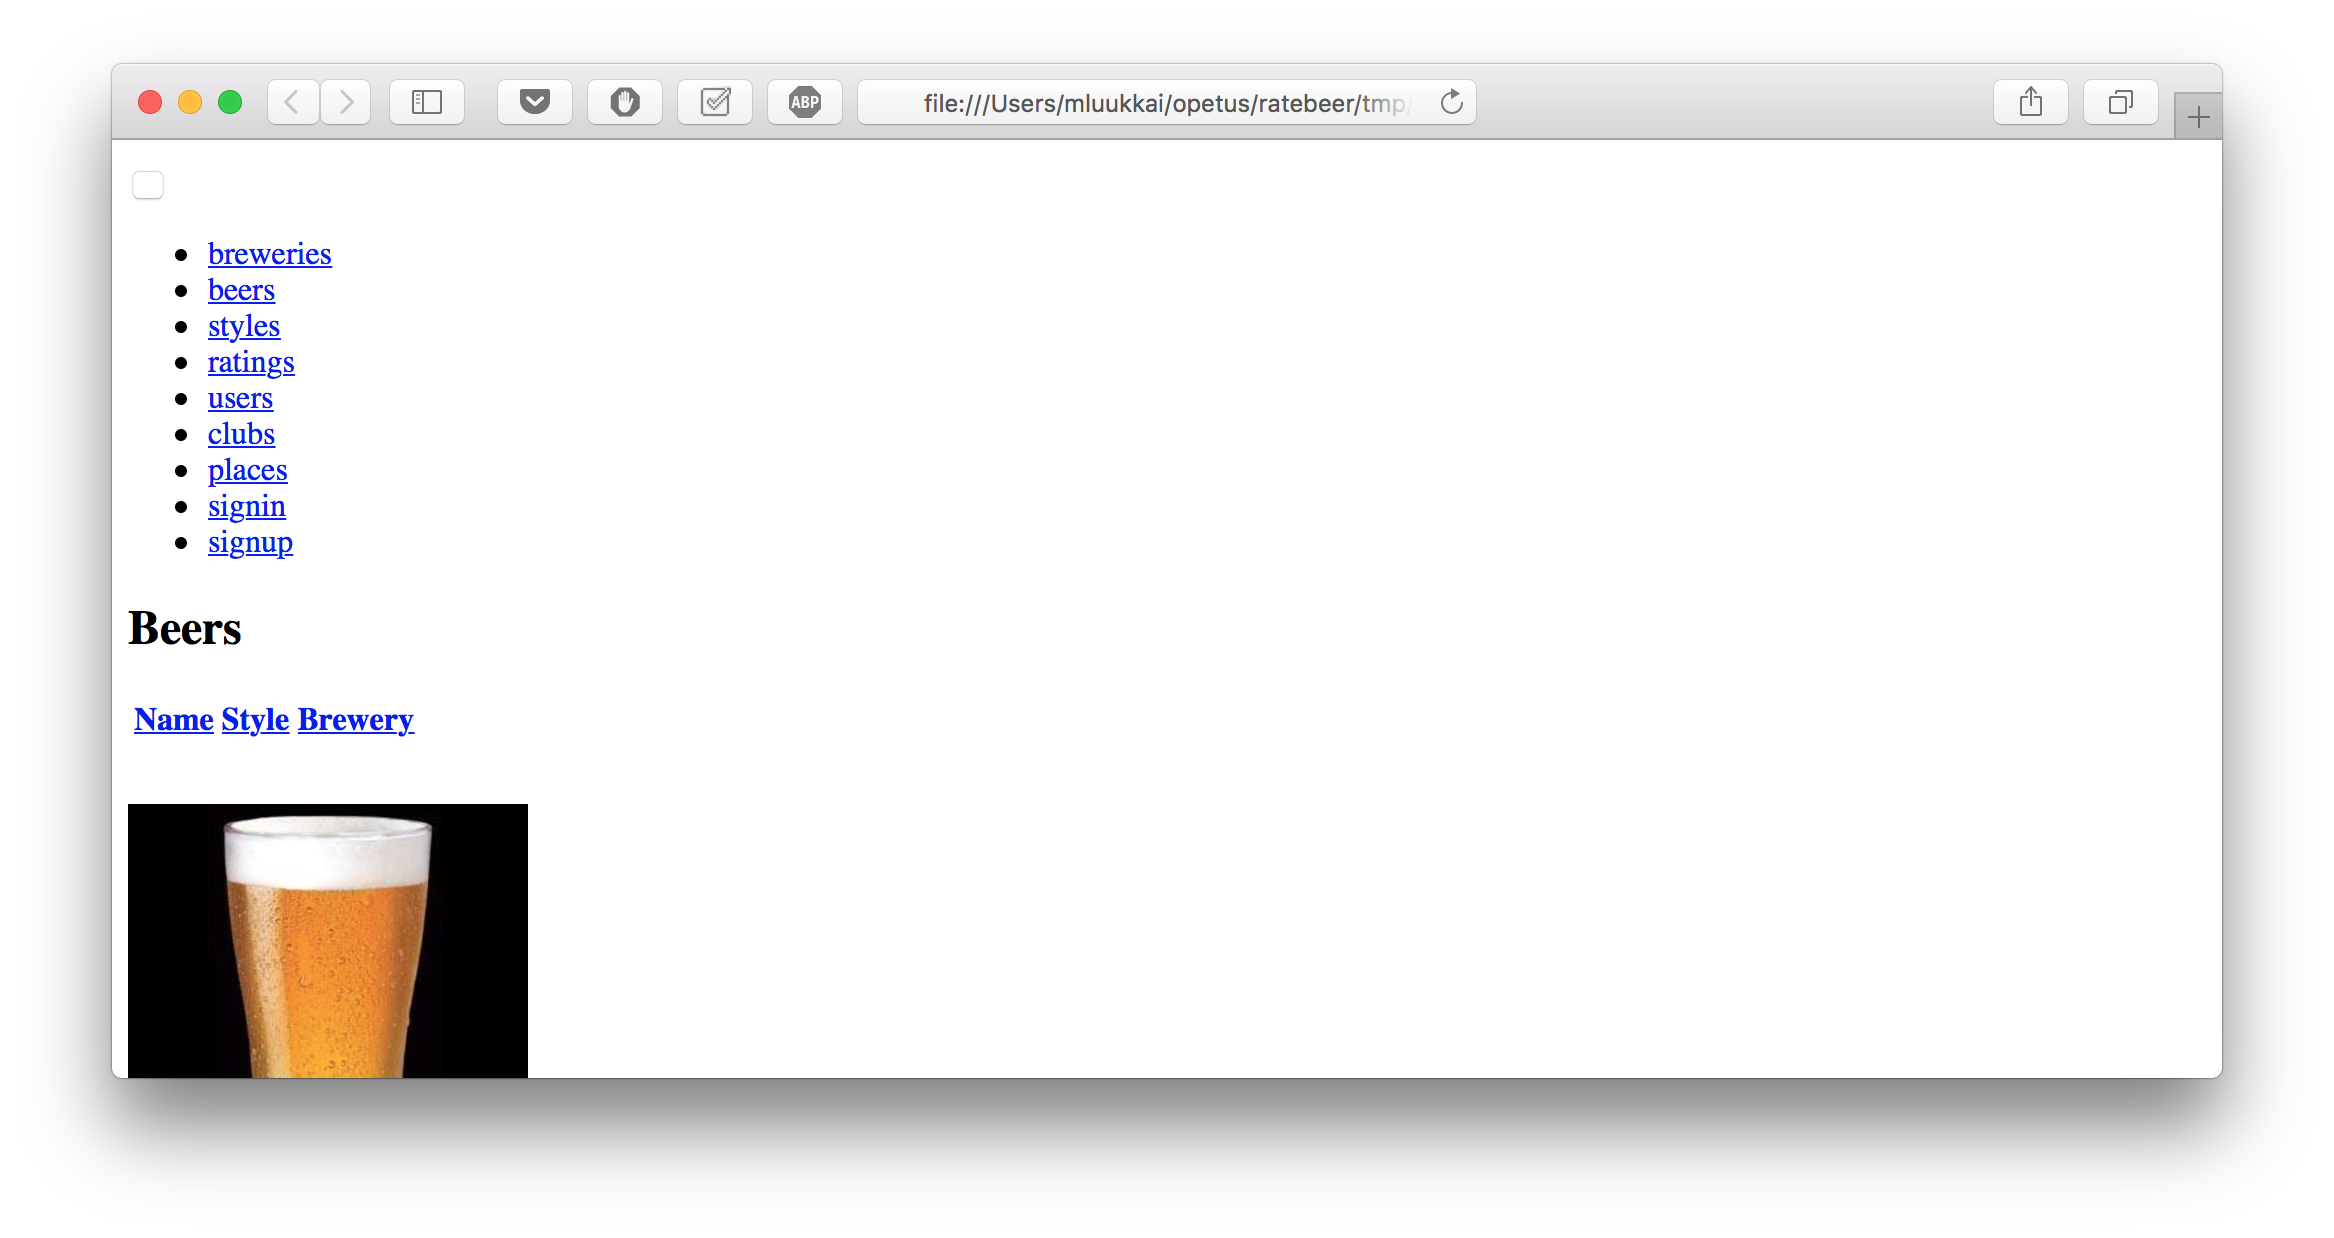
<h2>Beers</h2>

<div id="beers"></div>
So the view only places a div element on the page, and giving it "beer" as ID (that is a reference to access the element).
As expected, nothing else than a h2 element will be seen at http://localhost:3000/beerlist.
Start now to write the action logic implementation with Javascript.
The Javascript code that your Rails application needs should be placed in the folder app/javascript/custom. Create the file utils.js in the folder:
const hello = () => {
  document.getElementById("beers").innerText = "Hello from JavaScript";
  console.log("hello console!");
}

export { hello };
In addition, you need to implement the hello function into your application. Do it by adding into file app/javascript/application.js the following lines:
import { hello } from "custom/utils";

hello();
Also take javascript (located in the custom folder) into use in the application's importmap, meaning, add to config/importmap.rb file:
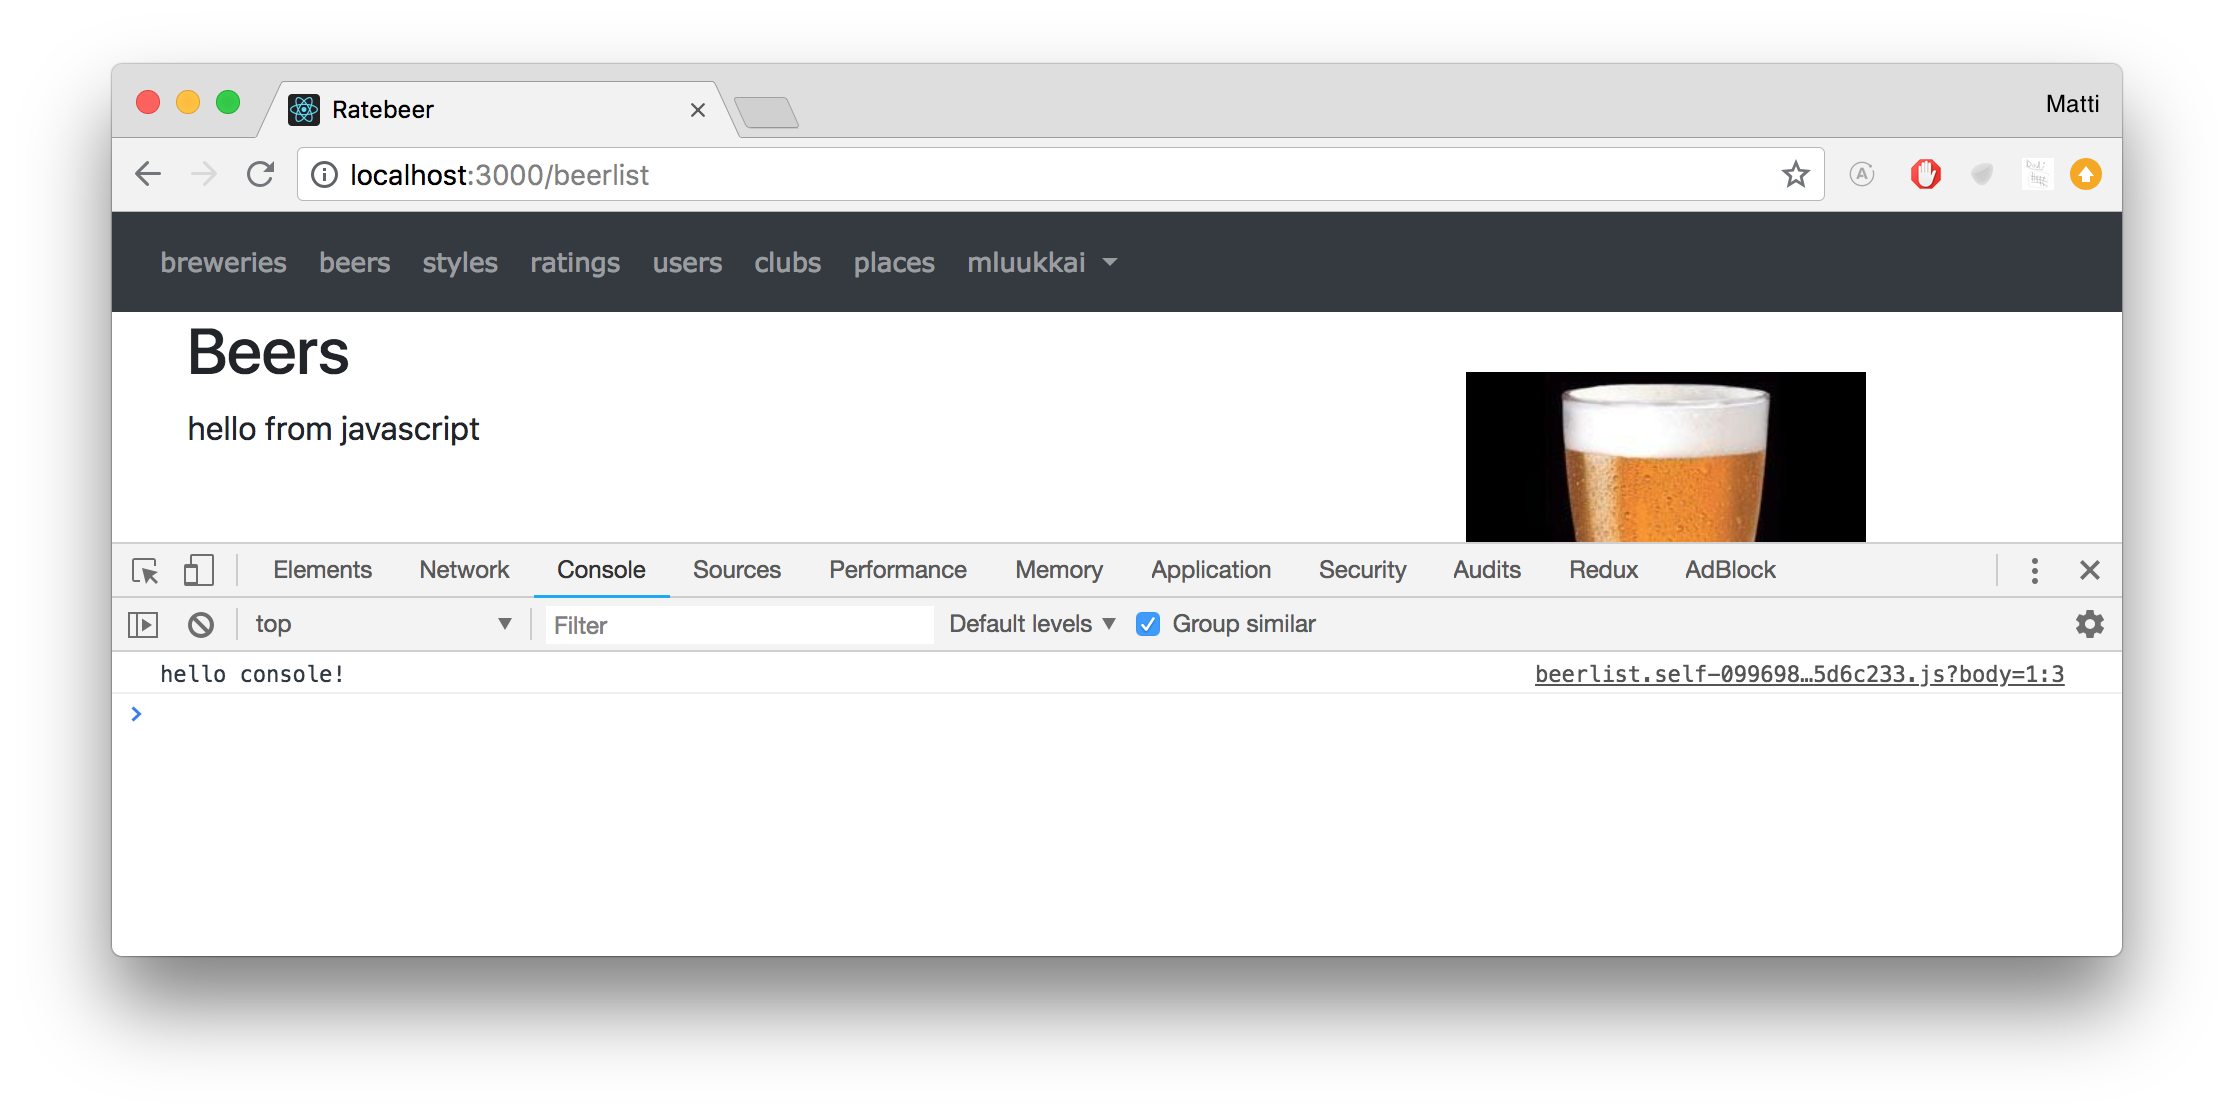
pin_all_from "app/javascript/custom", under: "custom"If you open the page again now, Javascript will first search for the element with the id beers, after which it will set up the text "hello from javascript" as its text. The next command writes the greeting to the Javascript console.
The console is an extremely important tool as far as Javascript programming in the browser is concerned. You can open the console in Chrome from the tools tap or pressing ctrl,shift,j (in linux) or alt,cmd,i (in mac):
You want to keep the console open all the time when you program with Javascript!
Javascript looks cryptic at first, because of its various anonymous functions. The code in file application.js defines that when the page is loaded the hello function in utils.js is executed.
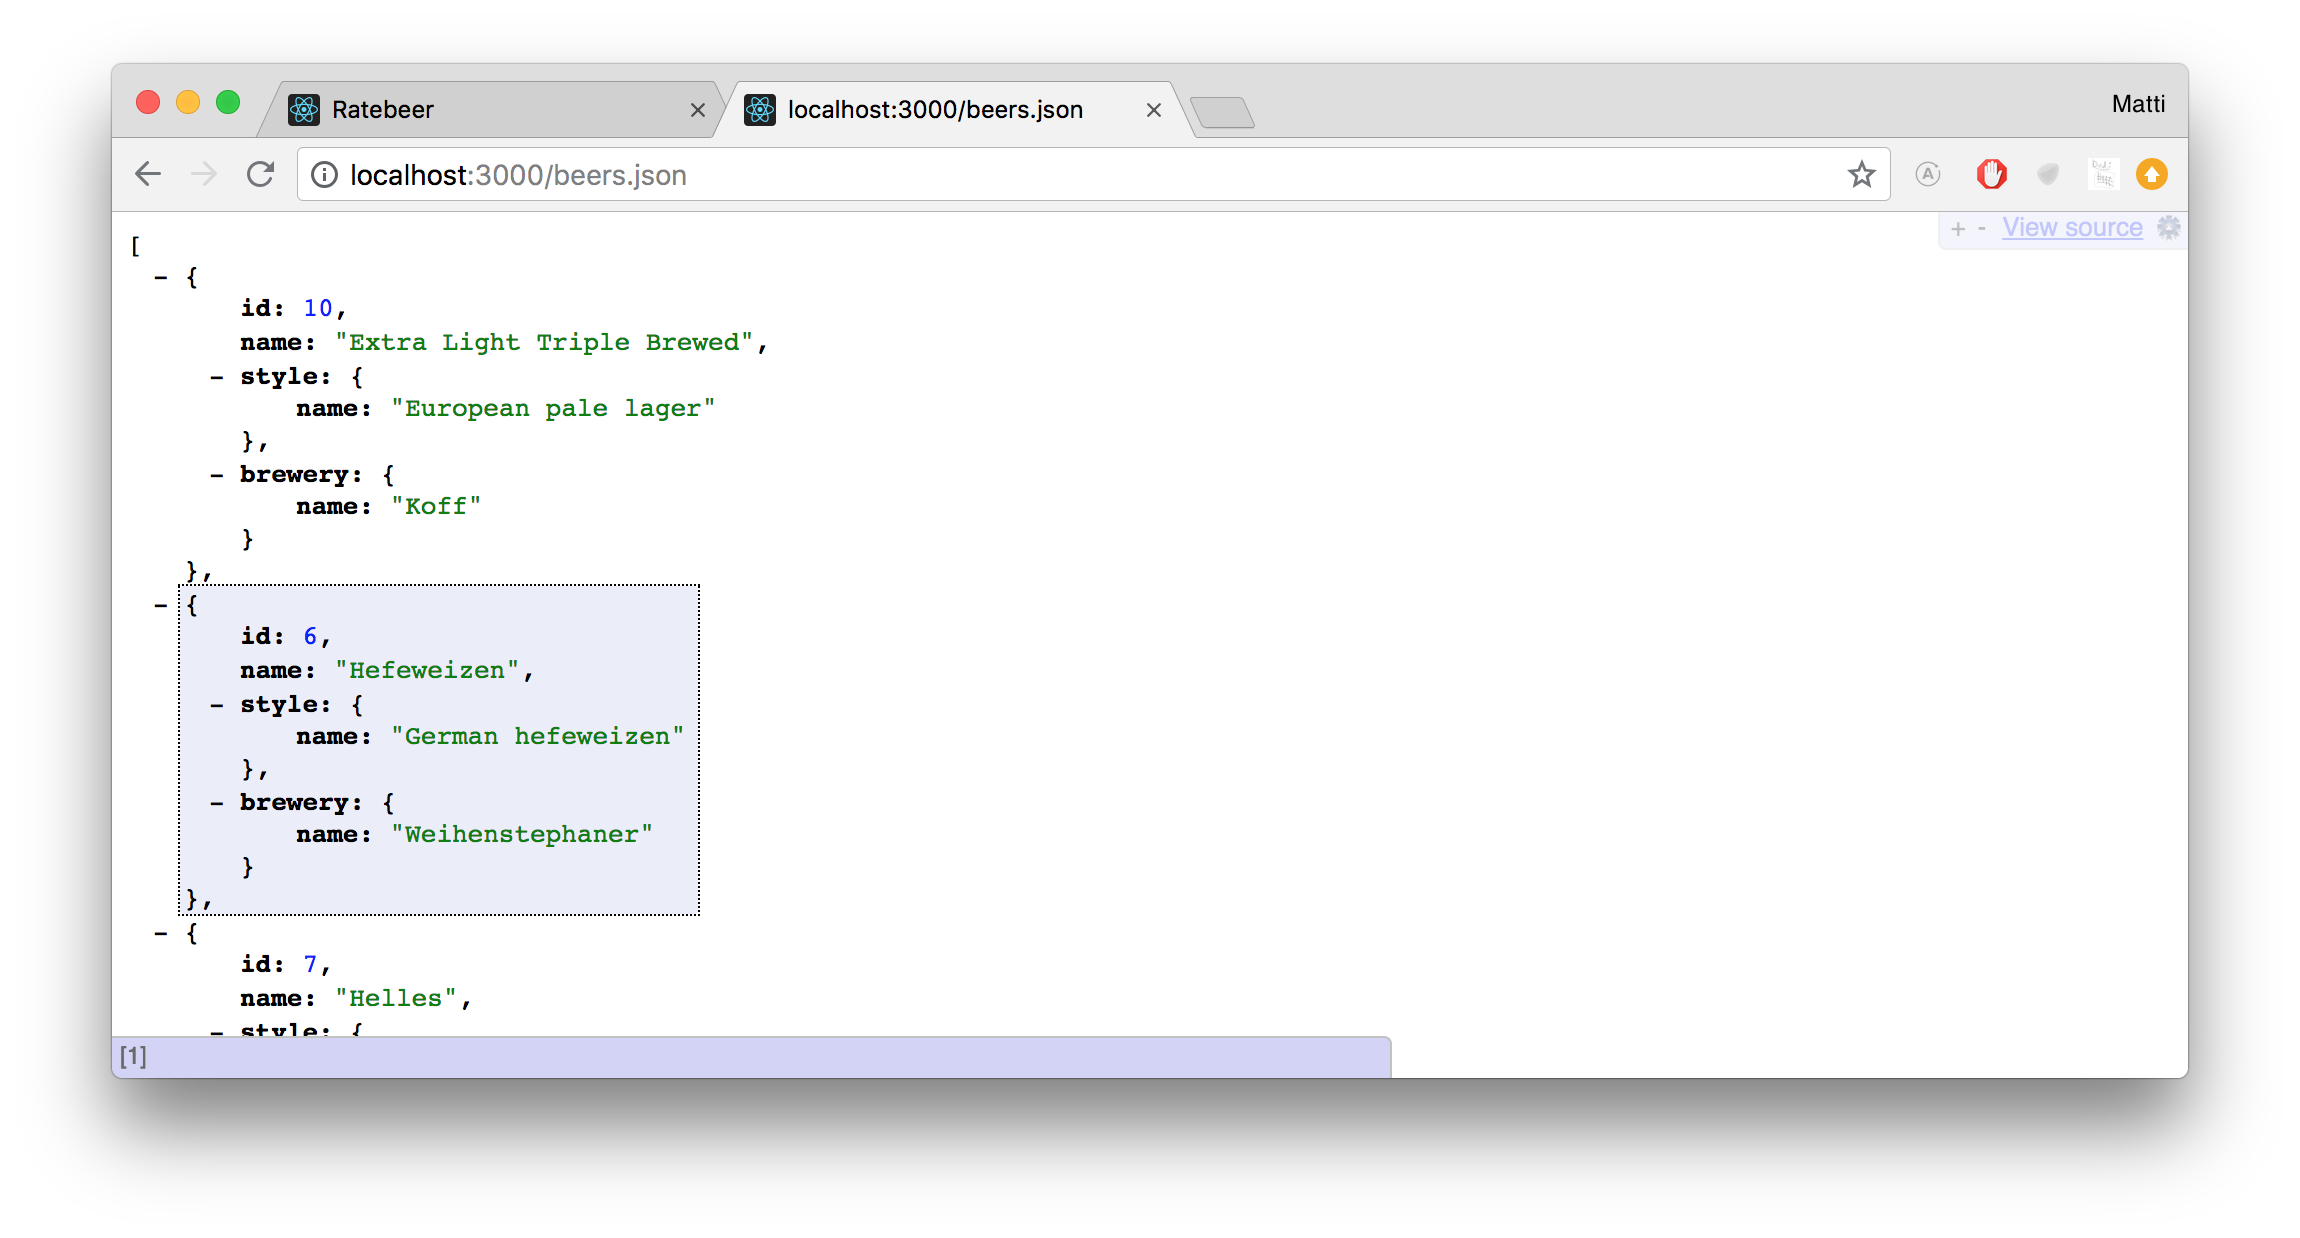
If you check the address http://localhost:3000/beers.json with your browser, you will see the beer information in a textual json form (see http://en.wikipedia.org/wiki/JSON, http://www.json.org):
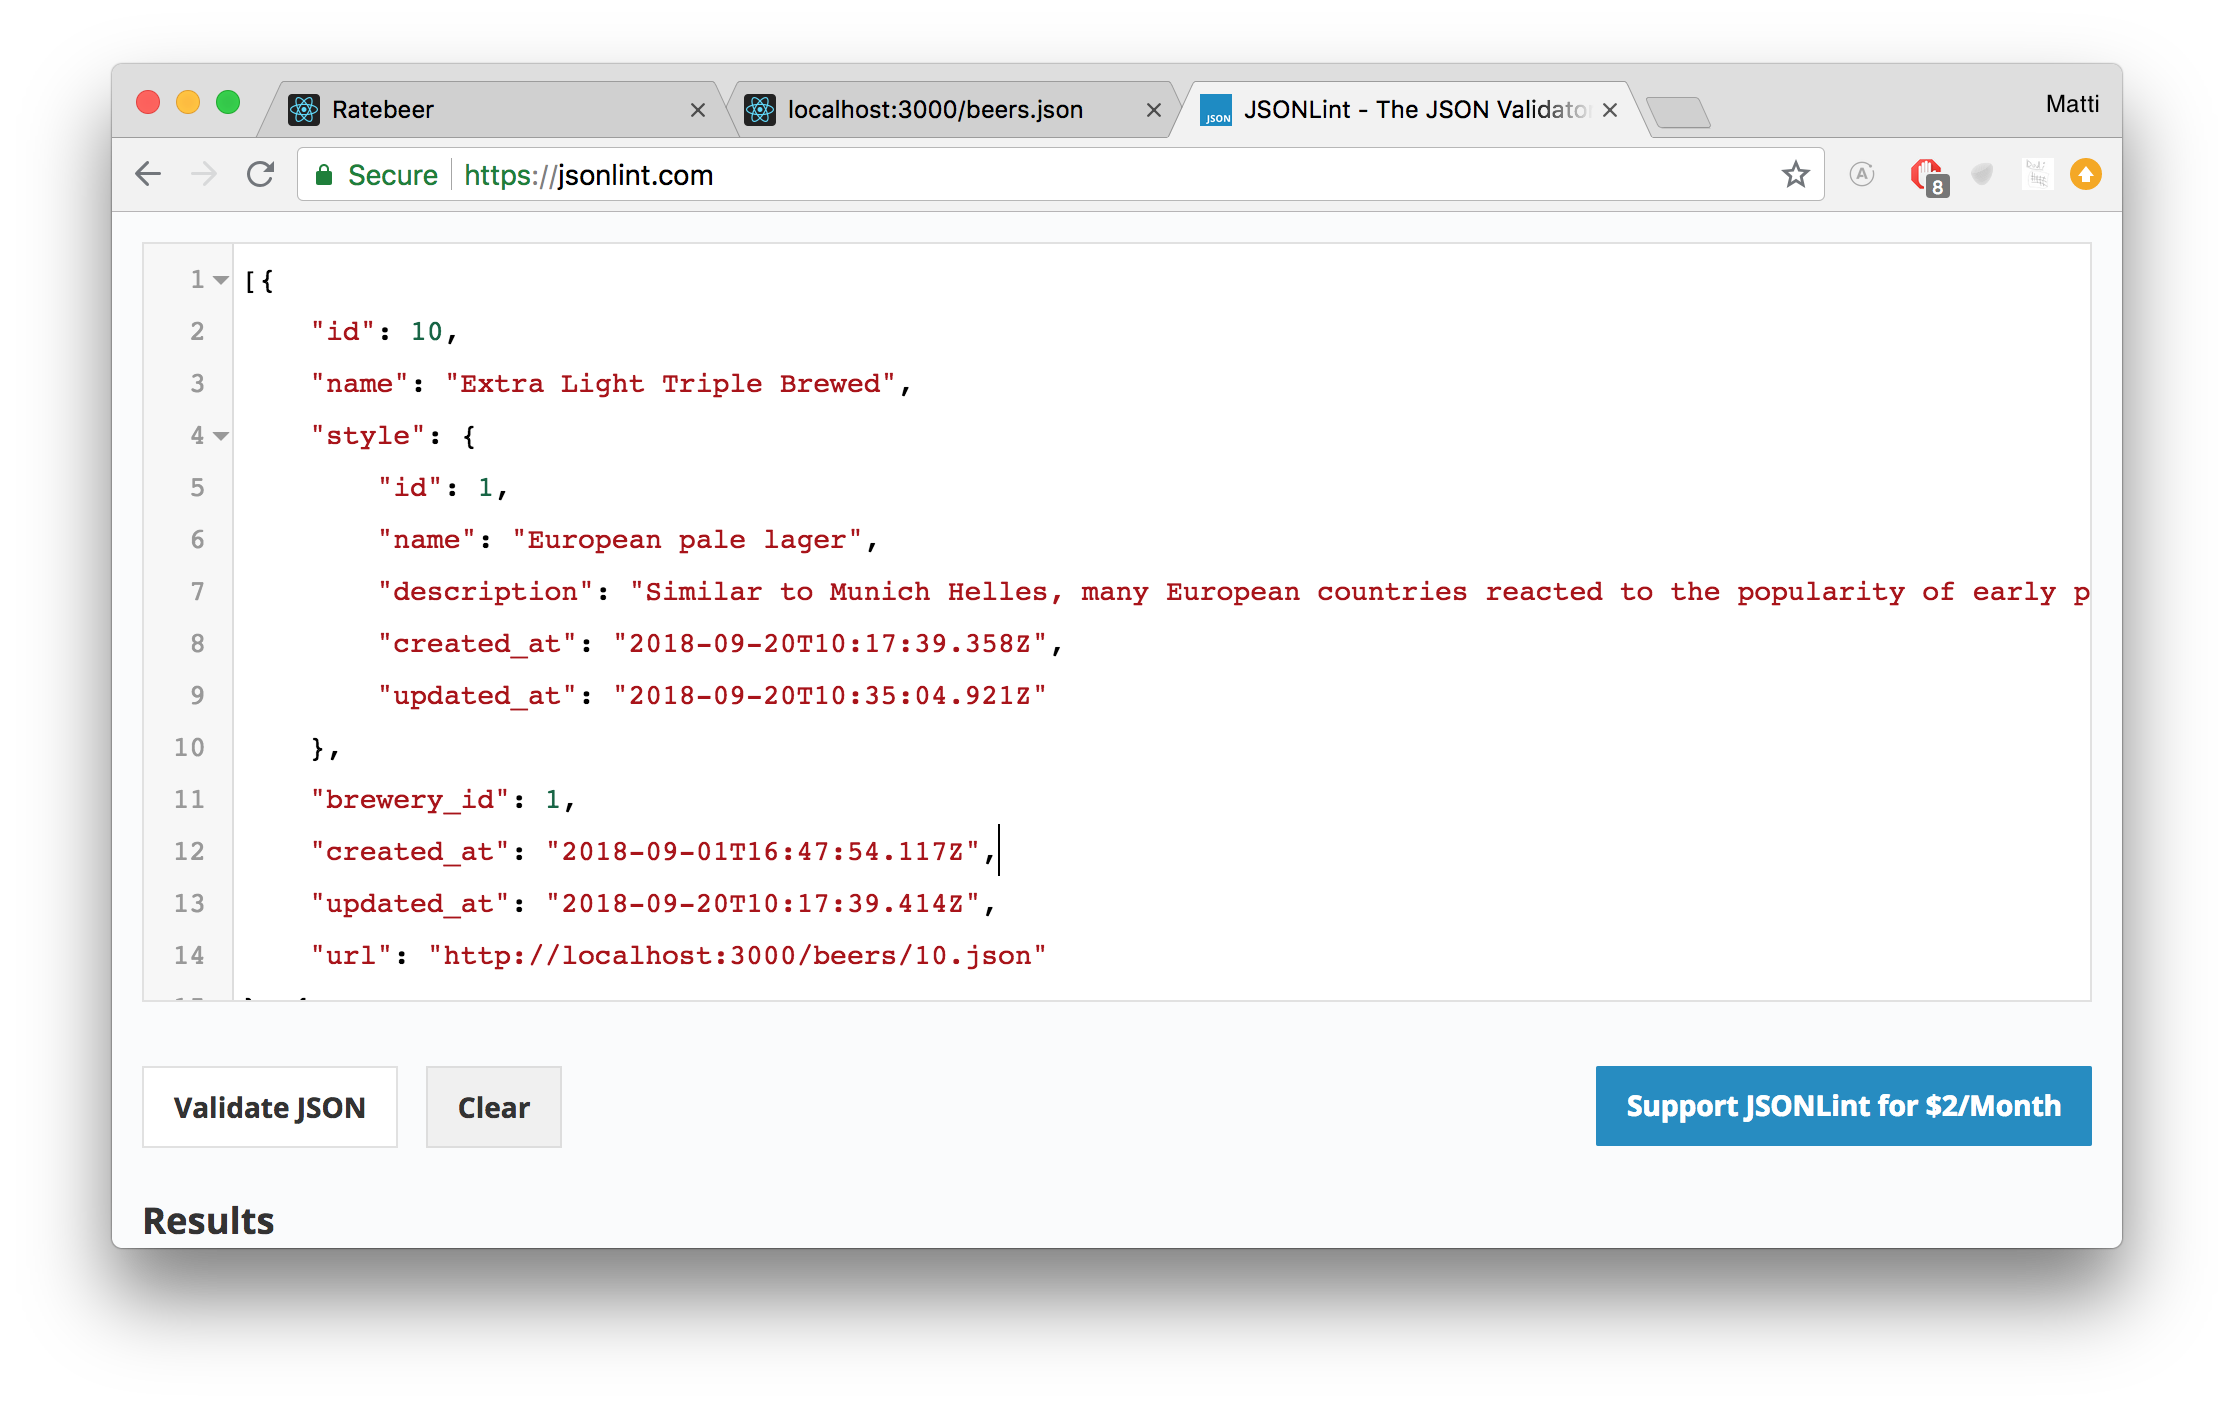
[{"id":10,"name": "Extra Light Triple Brewed","style":{"id":1,"name": "European pale lager","description": "Similar to Munich Helles, many European countries reacted to the popularity of early pale lagers by brewing their own. Hop flavor is significant and of noble varieties, bitterness is moderate, and both are backed by a solid malt body and sweet notes from an all-malt base.","created_at": "2022-09-05T10:17:39.358Z","updated_at": "2022-09-05T10:35:04.921Z"},"brewery_id":1,"created_at": "2018-09-01T16:47:54.117Z","updated_at": "2022-09-05T10:17:39.414Z","url": "http://localhost:3000/beers/10.json"},{"id":6,"name": "Hefeweizen","style":{"id":4,"name": "German hefeweizen","description": "A south German style of wheat beer (weissbier) typically made with a ratio of 50 percent barley to 50 percent wheat. Sometimes the percentage of wheat is even higher. \"Hefe\" means \"with yeast,\" hence the beer's unfiltered and cloudy appearance. The particular ale yeast used produces unique esters and phenols of banana and cloves with an often dry and tart edge, some spiciness, and notes of bubblegum or apples. Hefeweizens are typified by little hop bitterness, and a moderate level of alcohol. Often served with a lemon wedge (popularized by Americans), to cut the wheat or yeasty edge, some may find this to be either a flavorful snap or an insult that can damage the beer's taste and head retention.","created_at": "2022-09-05T10:17:39.361Z","updated_at": "2022-09-05T10:36:17.788Z"},"brewery_id":3,"created_at": "2018-09-01T16:41:53.522Z","updated_at": "2022-09-05T10:17:39.406Z","url": "http://localhost:3000/beers/6.json"},{"id":7,"name": "Helles","style":{"id":1,"name": "European pale lager","description": "Similar to Munich Helles, many European countries reacted to the popularity of early pale lagers by brewing their own. Hop flavor is significant and of noble varieties, bitterness is moderate, and both are backed by a solid malt body and sweet notes from an all-malt base.","created_at": "2022-09-05T10:17:39.358Z","updated_at": "2022-09-05T10:35:04.921Z"},"brewery_id":3,"created_at": "2018-09-01T16:41:53.525Z","updated_at": "2022-09-05T10:17:39.408Z","url": "http://localhost:3000/beers/7.json"},{"id":16,"name": "Helles","style":{"id":1,"name": "European pale lager","description": "Similar to Munich Helles, many European countries reacted to the popularity of early pale lagers by brewing their own. Hop flavor is significant and of noble varieties, bitterness is moderate, and both are backed by a solid malt body and sweet notes from an all-malt base.","created_at": "2022-09-05T10:17:39.358Z","updated_at": "2022-09-05T10:35:04.921Z"},"brewery_id":3,"created_at": "2018-09-08T10:56:52.592Z","updated_at": "2022-09-05T10:17:39.420Z","url": "http://localhost:3000/beers/16.json"},{"id":4,"name": "Huvila Pale Ale","style":{"id":2,"name": "American Pale Ale","description": "Originally British in origin, this style is now popular worldwide and the use of local or imported ingredients produces variances in character from region to region. American versions tend to be cleaner and hoppier (with the piney, citrusy Cascade variety appearing frequently) than British versions, which are usually more malty, buttery, aromatic, and balanced. Pale Ales range in color from deep gold to medium amber. Fruity esters and diacetyl can vary from none to moderate, and hop aroma can range from lightly floral to bold and pungent. In general, expect a good balance of caramel malt and expressive hops with a medium body and a mildly bitter finish. ","created_at": "2022-09-05T10:17:39.359Z","updated_at": "2018-09-22T12:07:42.742Z"},"brewery_id":2,"created_at": "2018-09-01T16:41:53.516Z","updated_at": "2022-09-05T10:17:39.396Z","url": "http://localhost:3000/beers/4.json"},{"id":9,"name": "IVB","style":{"id":1,"name": "European pale lager","description": "Similar to Munich Helles, many European countries reacted to the popularity of early pale lagers by brewing their own. Hop flavor is significant and of noble varieties, bitterness is moderate, and both are backed by a solid malt body and sweet notes from an all-malt base.","created_at": "2022-09-05T10:17:39.358Z","updated_at": "2022-09-05T10:35:04.921Z"},"brewery_id":1,"created_at": "2018-09-01T16:46:01.643Z","updated_at": "2022-09-05T10:17:39.412Z","url": "http://localhost:3000/beers/9.json"},{"id":1,"name": "Iso 3","style":{"id":1,"name": "European pale lager","description": "Similar to Munich Helles, many European countries reacted to the popularity of early pale lagers by brewing their own. Hop flavor is significant and of noble varieties, bitterness is moderate, and both are backed by a solid malt body and sweet notes from an all-malt base.","created_at": "2022-09-05T10:17:39.358Z","updated_at": "2022-09-05T10:35:04.921Z"},"brewery_id":1,"created_at": "2018-09-01T16:41:53.508Z","updated_at": "2022-09-05T10:17:39.384Z","url": "http://localhost:3000/beers/1.json"},{"id":2,"name": "Karhu","style":{"id":1,"name": "European pale lager","description": "Similar to Munich Helles, many European countries reacted to the popularity of early pale lagers by brewing their own. Hop flavor is significant and of noble varieties, bitterness is moderate, and both are backed by a solid malt body and sweet notes from an all-malt base.","created_at": "2022-09-05T10:17:39.358Z","updated_at": "2022-09-05T10:35:04.921Z"},"brewery_id":1,"created_at": "2018-09-01T16:41:53.511Z","updated_at": "2022-09-05T10:17:39.389Z","url": "http://localhost:3000/beers/2.json"},{"id":8,"name": "Lite","style":{"id":1,"name": "European pale lager","description": "Similar to Munich Helles, many European countries reacted to the popularity of early pale lagers by brewing their own. Hop flavor is significant and of noble varieties, bitterness is moderate, and both are backed by a solid malt body and sweet notes from an all-malt base.","created_at": "2022-09-05T10:17:39.358Z","updated_at": "2022-09-05T10:35:04.921Z"},"brewery_id":1,"created_at": "2018-09-01T16:45:09.037Z","updated_at": "2022-09-05T10:17:39.410Z","url": "http://localhost:3000/beers/8.json"},{"id":14,"name": "Nanny State","style":{"id":6,"name": "Low alcohol beer","description": "Low Alcohol Beer is also commonly known as Non Alcohol (NA) beer, despite containing small amounts of alcohol. Low Alcohol Beers are generally subjected to one of two things: a controlled brewing process that results in a low alcohol content, or the alcohol is removed using a reverse-osmosis method which passes alcohol through a permeable membrane. They tend to be very light on aroma, body, and flavor.","created_at": "2022-09-05T10:17:39.362Z","updated_at": "2018-09-22T12:11:57.808Z"},"brewery_id":5,"created_at": "2018-09-06T14:30:50.585Z","updated_at": "2022-09-05T10:17:39.418Z","url": "http://localhost:3000/beers/14.json"},{"id":23,"name": "Panimomestarin IPA","style":{"id":5,"name": "American IPA","description": "Today's American IPA is a different soul from the IPA style first reincarnated in the 1980s. More flavorful and aromatic than the withering English IPA, its color can range from very pale golden to reddish amber. Hops are the star here, and those used in the style tend to be American with an emphasis on herbal, piney, and/or fruity (especially citrusy) varieties. Southern Hemisphere and experimental hops do appear with some frequency though, as brewers seek to distinguish their flagship IPA from a sea of competitors. Bitterness levels vary, but typically run moderate to high. Medium bodied with a clean, bready, and balancing malt backbone, the American IPA has become a dominant force in the marketplace, influencing brewers and beer cultures worldwide.","created_at": "2022-09-05T10:17:39.361Z","updated_at": "2018-09-22T12:09:23.686Z"},"brewery_id":1,"created_at": "2018-09-22T10:33:04.353Z","updated_at": "2018-09-22T10:33:04.353Z","url": "http://localhost:3000/beers/23.json"},{"id":13,"name": "Punk IPA","style":{"id":5,"name": "American IPA","description": "Today's American IPA is a different soul from the IPA style first reincarnated in the 1980s. More flavorful and aromatic than the withering English IPA, its color can range from very pale golden to reddish amber. Hops are the star here, and those used in the style tend to be American with an emphasis on herbal, piney, and/or fruity (especially citrusy) varieties. Southern Hemisphere and experimental hops do appear with some frequency though, as brewers seek to distinguish their flagship IPA from a sea of competitors. Bitterness levels vary, but typically run moderate to high. Medium bodied with a clean, bready, and balancing malt backbone, the American IPA has become a dominant force in the marketplace, influencing brewers and beer cultures worldwide.","created_at": "2022-09-05T10:17:39.361Z","updated_at": "2018-09-22T12:09:23.686Z"},"brewery_id":5,"created_at": "2018-09-06T14:30:33.589Z","updated_at": "2022-09-05T10:17:39.416Z","url": "http://localhost:3000/beers/13.json"},{"id":22,"name": "Sink the Bismarck","style":{"id":3,"name": "Baltic Porter","description": "Porters of the late 1700's were quite strong compared to today�'s standards, easily surpassing 7 percent alcohol by volume. Some English brewers made a stronger, more robust version, to be shipped across the North Sea that they dubbed a Baltic Porter. In general, the style'�s dark brown color covered up cloudiness and the smoky, roasted brown malts and bitter tastes masked brewing imperfections. Historically, the addition of stale ale also lent a pleasant acidic flavor to the style, which made it quite popular. These issues were quite important given that most breweries at the time were getting away from pub brewing and opening up production facilities that could ship beer across the world.","created_at": "2022-09-05T10:17:39.360Z","updated_at": "2018-09-22T12:08:13.953Z"},"brewery_id":5,"created_at": "2018-09-22T10:09:59.120Z","updated_at": "2018-09-22T10:09:59.120Z","url": "http://localhost:3000/beers/22.json"},{"id":21,"name": "Trans European Lager","style":{"id":1,"name": "European pale lager","description": "Similar to Munich Helles, many European countries reacted to the popularity of early pale lagers by brewing their own. Hop flavor is significant and of noble varieties, bitterness is moderate, and both are backed by a solid malt body and sweet notes from an all-malt base.","created_at": "2022-09-05T10:17:39.358Z","updated_at": "2022-09-05T10:35:04.921Z"},"brewery_id":1,"created_at": "2022-09-05T10:42:19.312Z","updated_at": "2022-09-05T10:42:19.312Z","url": "http://localhost:3000/beers/21.json"},{"id":3,"name": "Tuplahumala","style":{"id":1,"name": "European pale lager","description": "Similar to Munich Helles, many European countries reacted to the popularity of early pale lagers by brewing their own. Hop flavor is significant and of noble varieties, bitterness is moderate, and both are backed by a solid malt body and sweet notes from an all-malt base.","created_at": "2022-09-05T10:17:39.358Z","updated_at": "2022-09-05T10:35:04.921Z"},"brewery_id":1,"created_at": "2018-09-01T16:41:53.513Z","updated_at": "2022-09-05T10:17:39.392Z","url": "http://localhost:3000/beers/3.json"},{"id":5,"name": "X Porter","style":{"id":3,"name": "Baltic Porter","description": "Porters of the late 1700's were quite strong compared to today�'s standards, easily surpassing 7 percent alcohol by volume. Some English brewers made a stronger, more robust version, to be shipped across the North Sea that they dubbed a Baltic Porter. In general, the style'�s dark brown color covered up cloudiness and the smoky, roasted brown malts and bitter tastes masked brewing imperfections. Historically, the addition of stale ale also lent a pleasant acidic flavor to the style, which made it quite popular. These issues were quite important given that most breweries at the time were getting away from pub brewing and opening up production facilities that could ship beer across the world.","created_at": "2022-09-05T10:17:39.360Z","updated_at": "2018-09-22T12:08:13.953Z"},"brewery_id":2,"created_at": "2018-09-01T16:41:53.519Z","updated_at": "2022-09-05T10:17:39.400Z","url": "http://localhost:3000/beers/5.json"}]You can improve the readability of a Json page by copying the page contents into the jsonlint service:
A better option is installing a plugin on the browser, which can understand json. A good choice is Chrome's jsonview, the plugin shapes json nicely in the browser:
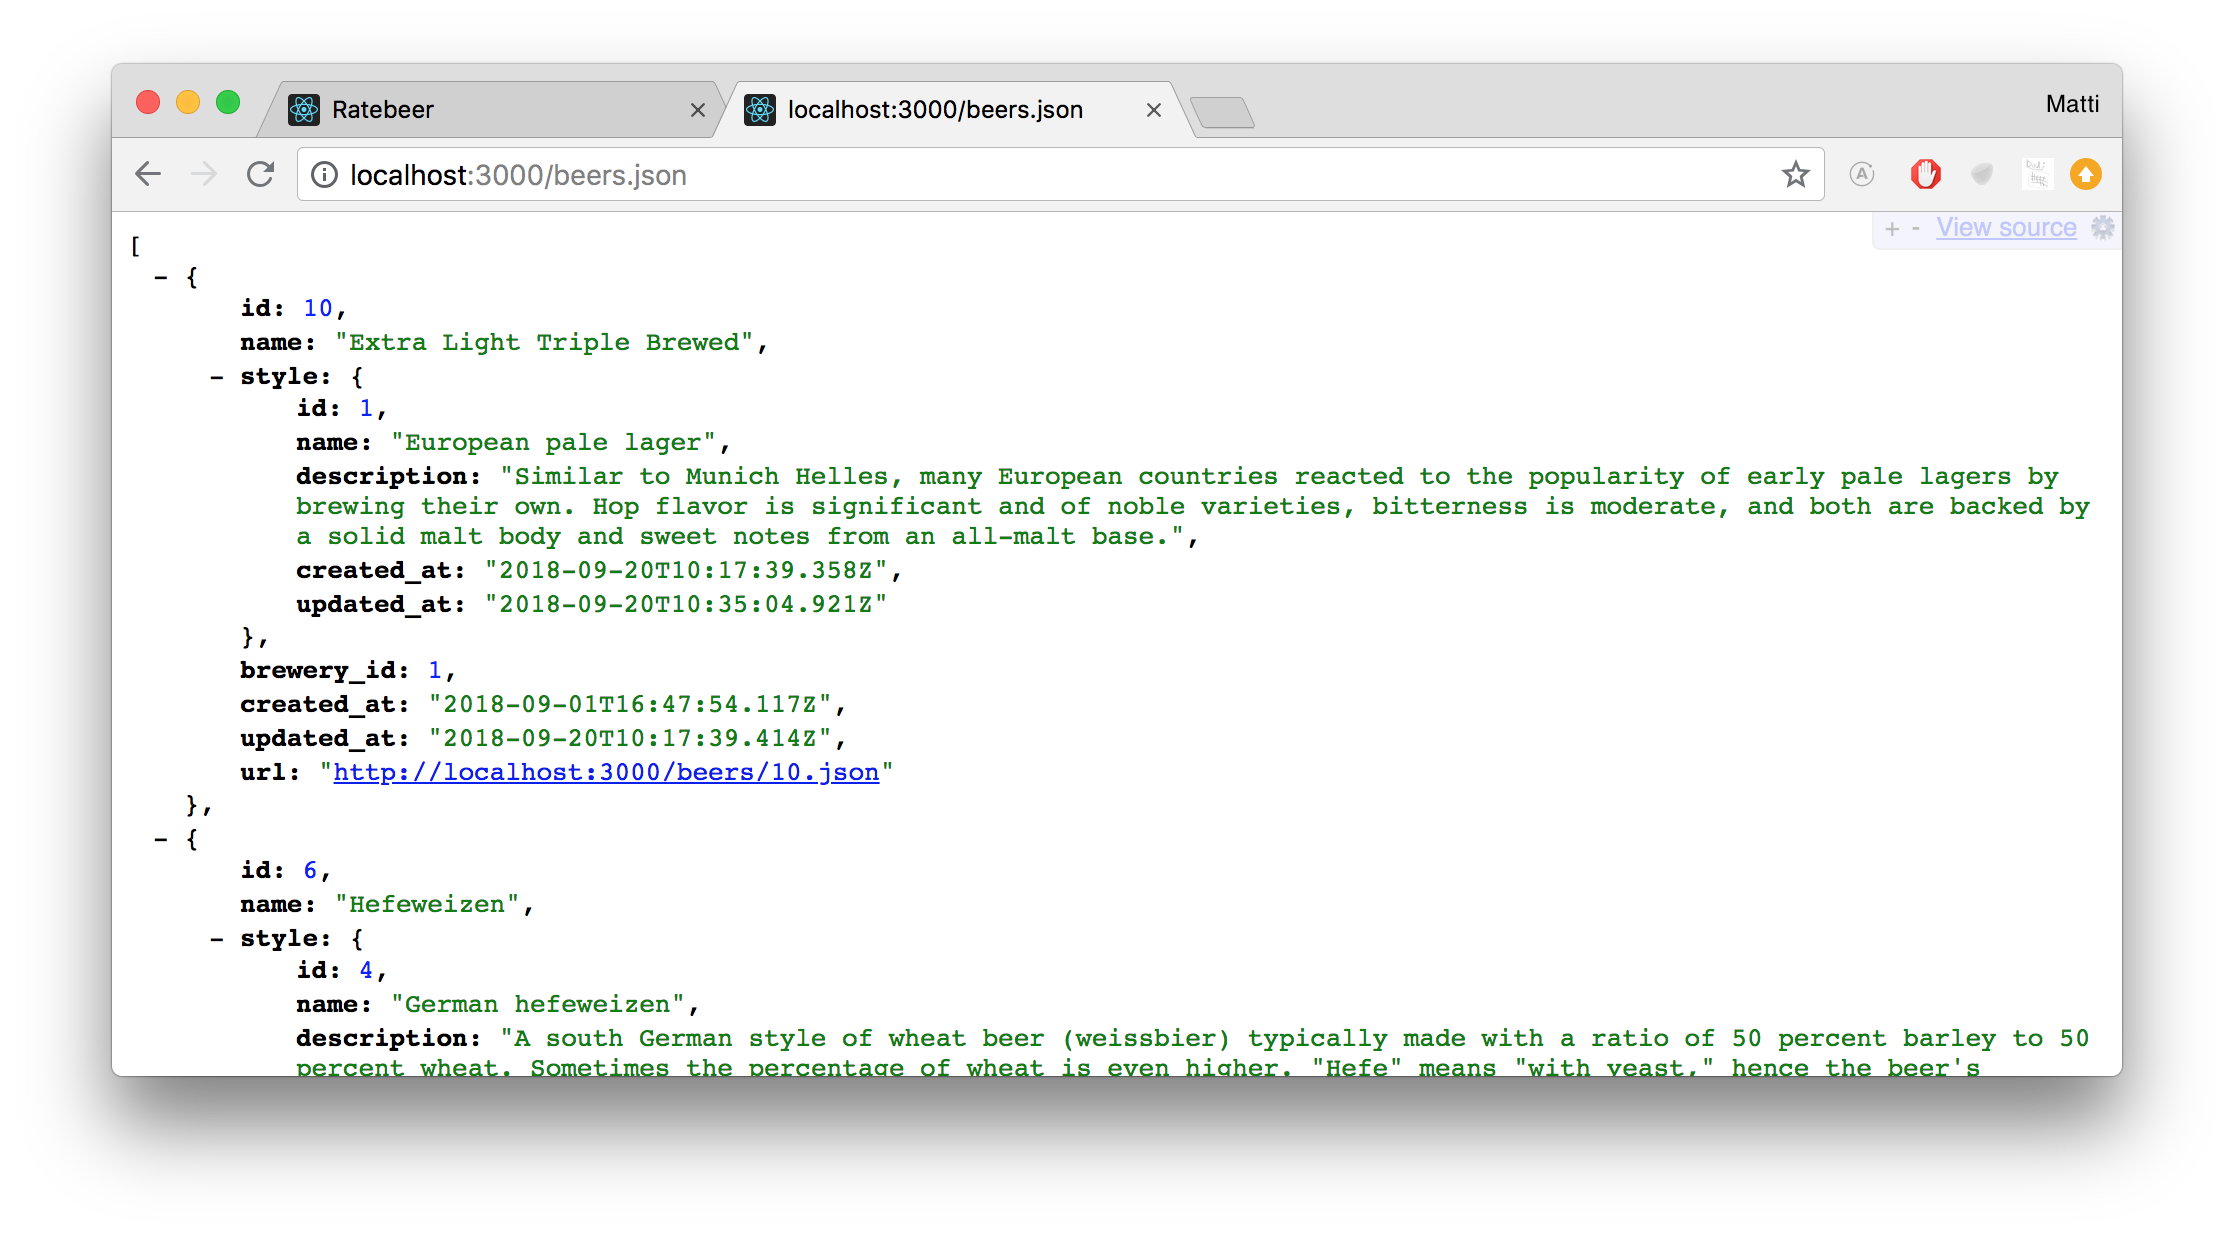
A closer look shows that each singular json beer reminds of Ruby's hash:
{
  "id":10,"name": "Extra Light Triple Brewed",
  "style":{
    "id":1,"name": "European pale lager",
    "description": "Similar to Munich Helles, many European countries reacted to the popularity of early pale lagers by brewing their own. Hop flavor is significant and of noble varieties, bitterness is moderate, and both are backed by a solid malt body and sweet notes from an all-malt base.",
    "created_at": "2022-09-05T10:17:39.358Z",
    "updated_at": "2022-09-05T10:35:04.921Z"
  },
  "brewery_id":1,
  "created_at": "2018-09-01T16:47:54.117Z",
  "updated_at": "2022-09-05T10:17:39.414Z","url": "http://localhost:3000/beers/10.json"}
How can Rails return the results in json instead of HTML when needed?
Try to get the list of all ratings in json, so try out the address http://localhost:3000/ratings.json
You'll get an error message:
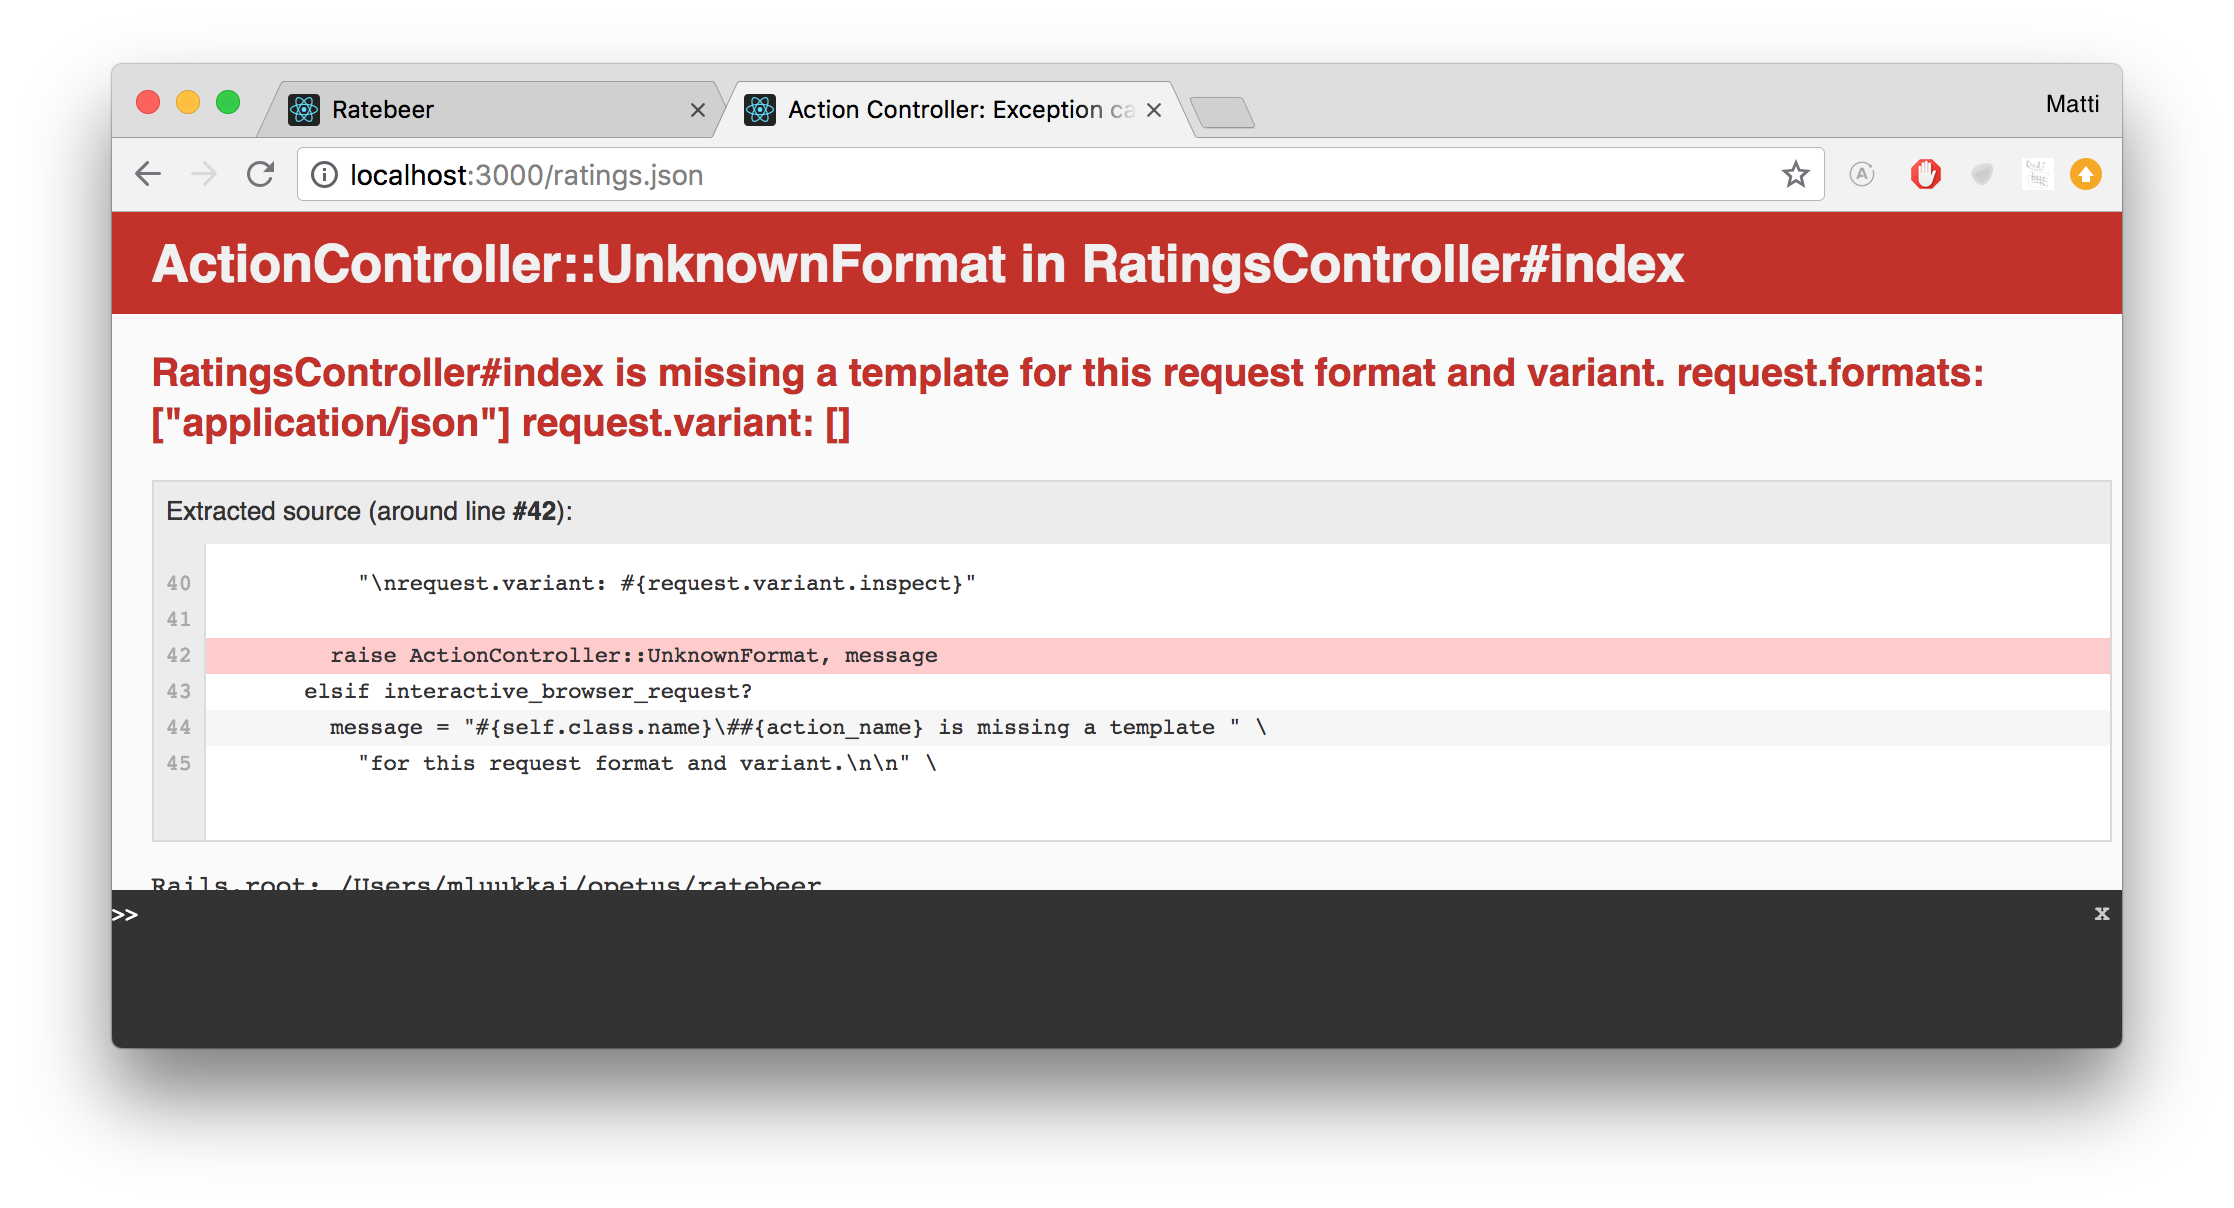
So it's not that jsons are created completely automatically, you created the whole code for the rating by hand, and as you saw in the error message, there was no suitable template for the format 'json'.
You'll see that you can find a set of templates ending in _json.jbuilder in the views folder of the resources created with scaffold, like the beer views folder. As you may have guessed, Rails makes use of them if you want the resource in json form.
Take example from the template app/views/beers/index.json.jbuilder and make the following json.jbuilder template for the ratings (the file is app/views/ratings/index.json.jbuilder):
json.array! @ratings, partial: "ratings/rating", as: :ratingAdditionally, you need a partial file for the ratings. Again, take beer template app/views/beers/_beer.json.jbuilder as an example and create file app/views/ratings/_rating.json.jbuilder
json.extract! rating, :id, :score
json.url rating_url(rating, format: :json)
and now you can get the ratings in json at the address http://localhost:3000/ratings.json
[{"id":31,"score":34},{"id":30,"score":42},{"id":27,"score":40},{"id":25,"score":12},{"id":24,"score":10}]Attention The variable @ratings is used in the jbuilder template and so must be defined in the index controller method. After last week's refactoring it is not defined anymore.
In the json.jbuilder template, you could easily define that the ratings json should also show the beer information concerning the rating:
json.extract! rating, :id, :score, :beer
json.url rating_url(rating, format: :json)
More about jbuilder at https://github.com/rails/jbuilder.
In addition to Json's jbuilder template, another way to return data in json form would be to use a respond_to command, which is used by some methods generated with scaffolds. In such case, there would be no need for the json jbuilder template, and the controller would look like below
def index
  @ratings = Rating.all

  respond_to do |format|
    format.html { } # render default template
    format.json { render json: @ratings }
  end
end
Using Jbuilder templates is definitely a better choice, in this case, creating the json "view" – that is the resource representation – is done completely separately from the controller. It is not among the controller's tasks to form the response outlook, whether it was a json or an HTML response.
Go back now to the beers page. When you create the page in javascript, the idea is to fetch the beers in json form from the server in fact, and to render them as you want with the help of javascript.
Change your javascript code as below:
const handleResponse = (data) => {
  document.getElementById("beers").innerText = `found ${data.length} beers`;
};

const beers = () => {
  fetch("beers.json")
    .then((response) => response.json())
    .then(handleResponse);
};

export { beers };
The hello function is renamed as beers (remember to change the name also in export and application.js import!).
The beers function uses the fetch method available for the browser to fetch the json form beers from the address beers.json. The data returned by fetch is accessible by calling the method twice. The first call causes that the beers are parsed separately into json format from the data returned to the browser. The second call asks the function handleResponse to handle the data. The handleResponse adds the number of beers to the page. You can combine text and variables in javascript, like you can in Ruby, except that in javascript you use the dollar symbol and ` instead of normal apostrophes.
Behind the slightly odd looking syntax then is the fact that the function fetch returns a so called promise and the actual returned data must be taken from the promise with the then function.
So after getting the beers from the server, the function should generate the HTML code for listing them and add it to the page.
Change the javascript code now to list only the beer names at first:
const handleResponse = (beers) => {
  const beerList = beers.map((beer) => `<li>${beer.name}</li>`);

  document.getElementById("beers").innerHTML = `<ul> ${beerList.join("")} </ul>`;
};
The code defines the local table variable beerList and goes through the list beers that it received as parameter. By using the map function, you can create a new table directly from the return value of the function. For each beer an HTML element is returned into beerList. The element is like this:
<li>Extra Light Triple Brewed</li>At the end, ul tags are added to the beginning and the end of the list, and the list elements are joined with the join method. The HTML code generated from this is added to the element with the beers ID.
In this way you have got a simple list of the names of the beers on the page.
What if you wanted to sort the beers? To make this happen, refactor first the code as follows:
const BEERS = {};

const handleResponse = (beers) => {
  BEERS.list = beers;
  BEERS.show();
};

BEERS.show = () => {
  const beerList = BEERS.list.map((beer) => `<li>${beer.name}</li>`);

  document.getElementById("beers").innerHTML = `<ul> ${beerList.join("")} </ul>`;
};
You defined now the object BEERS, that receives the beer list from the server in the attribute BEERS.list. The method BEERS.show creates an HTML list of BEERS.list objects and places them in the view.
In this way, the beer list from the server remains "in memory" in the browser variable BEERS.list and the list can be resorted when needed, and it can be shown to users in new orders without that Web page needing to communicate with the server.
Add a clickable text to the page, allowing to sort the beers on the page in reversed order:
<p id="reverse">reverse!</p>
<div id="beers"></div>
Then add a click handler to the link in javascript, to sort the beers in descending order when the link is clicked and to show them in the beers elements in the page:
BEERS.reverse = () => {
  BEERS.list.reverse();
};

const beers = () => {
  document.getElementById("reverse").addEventListener("click", (e) => {
    e.preventDefault();
    BEERS.reverse();
    BEERS.show();
  });

  fetch("beers.json")
    .then((response) => response.json())
    .then(handleResponse);
};

export { beers };
The click handler of the text is defined in the page's beers function. So when the document has been loaded, the click handler is registered to the element with the id "reverse".
When the link is clicked the event handler first calls the method e.preventDefault. This method prevents the "normal" function, that is, accessing a (now nonexistent) link.
After that, methods reverse and show are called to render the beers on the screen in reverse order.
You'll now understand the basics well enough to implement the real functionality.
Change the view as follows:
<h2>Beers</h2>

<table id="beertable" class="table table-hover">
  <thead>
    <tr>
      <th> <span id="name">Name</span> </th>
      <th> <span id="style">Style</span> </th>
      <th> <span id="brewery">Brewery</span> </th>
    </tr>
  <thead>
  <tbody>
    <div id="beerlist"></div>
  </tbody>
</table>
So the three column names have been made into elements that click listeners will be registered to. The table was given the ID beertable.
Change the show method defined in the javascript so that it adds the beer names to the table:
const createTableRow = (beer) => {
  const tr = document.createElement("tr");
  const beername = tr.appendChild(document.createElement("td"));
  beername.innerHTML = beer.name;

  return tr;
};

BEERS.show = () => {
  const table = document.getElementById("beertable");

  BEERS.list.forEach((beer) => {
    const tr = createTableRow(beer);
    table.appendChild(tr);
  });
};
So first the code sets a reference to the table in the variable table. After this, with the help of the createTableRow helper function, some tr elements are created. The cells of the table, td, are placed inside these elements. The row is returned to the forEach loop where it is set as the table's "child" by using the appendChild method.
Expand the method to show all information of the beer. You'll notice however that in the json-format beers list at http://localhost:3000/beers.json the only information about a beer's brewery is the brewery object's id. You would like to see the brewery's name. The beer style's information is already completely available in the json.
This is luckily easy to fix by editing the json-jbuildertemplate that generates the beer list. The template now looks like this:
json.array! @beers, partial: 'beers/beer', as: :beerThe template defines that for each beer a json-format depiction is created with the help of _beer.json.jbuilder. The file contents are:
json.extract! beer, :id, :name, :style, :brewery_id, :created_at, :updated_at
json.url beer_url(beer, format: :json)
The file defines that the fields id, name and brewery_id as well as style should be contained in the json form for each beer; also, style refers to the Style object of the beer. The style object has to be rendered completely in the json form of the beer. You will also get the brewery json form in the same beer json listing if you replace brewery_id with brewery, in the template. So change the template taking care of rendering a single beer json:
json.extract! beer, :id, :name, :style, :brewerythe last line was deleted, which would have added an URL to the beer's own json form. The timestamp fields were also removed.
Now the table can be generated after adding the next lines into the createTableRow function:
const createTableRow = (beer) => {
  const tr = document.createElement("tr");
  tr.classList.add("tablerow");
  const beername = tr.appendChild(document.createElement("td"));
  beername.innerHTML = beer.name;
  const style = tr.appendChild(document.createElement("td"));
  style.innerHTML = beer.style.name;
  const brewery = tr.appendChild(document.createElement("td"));
  brewery.innerHTML = beer.brewery.name;

  return tr;
};
The beers list in json form will contain also a lot of useless information, because at the same time, the brewery json forms of each beer brewery and style are rendered completely. You could optimize the single beer json template so that the beer brewery and style would follow the json form only as far as their name is concerned:
json.extract! beer, :id, :name
json.style do
  json.name beer.style.name
end
json.brewery do
  json.name beer.brewery.name
end
Now the json-form list sent by the server is much more compact:
The links have to be set up now with the event listeners that execute the sorting (you find the final javascript code below):
const BEERS = {};

const handleResponse = (beers) => {
  BEERS.list = beers;
  BEERS.show();
};

const createTableRow = (beer) => {
  const tr = document.createElement("tr");
  tr.classList.add("tablerow");
  const beername = tr.appendChild(document.createElement("td"));
  beername.innerHTML = beer.name;
  const style = tr.appendChild(document.createElement("td"));
  style.innerHTML = beer.style.name;
  const brewery = tr.appendChild(document.createElement("td"));
  brewery.innerHTML = beer.brewery.name;

  return tr;
};

BEERS.show = () => {
  document.querySelectorAll(".tablerow").forEach((el) => el.remove());
  const table = document.getElementById("beertable");

  BEERS.list.forEach((beer) => {
    const tr = createTableRow(beer);
    table.appendChild(tr);
  });
};

BEERS.sortByName = () => {
  BEERS.list.sort((a, b) => {
    return a.name.toUpperCase().localeCompare(b.name.toUpperCase());
  });
};

BEERS.sortByStyle = () => {
  BEERS.list.sort((a, b) => {
    return a.style.name.toUpperCase().localeCompare(b.style.name.toUpperCase());
  });
};

BEERS.sortByBrewery = () => {
  BEERS.list.sort((a, b) => {
    return a.brewery.name
      .toUpperCase()
      .localeCompare(b.brewery.name.toUpperCase());
  });
};

const beers = () => {
  document.getElementById("name").addEventListener("click", (e) => {
    e.preventDefault;
    BEERS.sortByName();
    BEERS.show();
  });

  document.getElementById("style").addEventListener("click", (e) => {
    e.preventDefault;
    BEERS.sortByStyle();
    BEERS.show();
  });

  document.getElementById("brewery").addEventListener("click", (e) => {
    e.preventDefault;
    BEERS.sortByBrewery();
    BEERS.show();
  });

  fetch("beers.json")
    .then((response) => response.json())
    .then(handleResponse);
};

export { beers };
While calling the event listeners, the newly sorted elements of the BEERS.list will be appended to the table after the already existing ones. This was fixed by adding a line to the start of the BEERS.show function. In this line the pre-existing rows of the class tablerow are retrieved and deleted.
Your Javascript code is linked to each application page. The unfortunate result is that on any site you visit, the Javascript will execute the beers function. The application also tries to register the event listeners to every page even though it makes sense to do so only on the page with the beer list.
Refine your Javascript code so that the beers function code is executed only if you are on a page with the table beertable:
const beers = () => {
  if (document.querySelectorAll("#beertable").length < 1) return;

  //...

  var request = new XMLHttpRequest();

  request.onload = handleResponse;

  request.open("get", "beers.json", true);
  request.send();
};
If the page doesn't contain a element with the id beertable, the function execution won't continue. While developing, remember that the id should be unique, no application should contain two identical ids!
The current trend tells us we should move more and more of a Web pages functionality to the browser. The advantage is that you'll make your Web applications remind more and more of desktop applications.
The code of the page you implemented with Javascript to list the beers was decent structure-wise. However, if compared to Rails fluency and effortless coding style, what you wrote was quite heavy and full of annoying and rutine-like details, at times. If the amount of browser executable code keeps growing, it is easy to end up with a messy code base which is hard to read and even harder to expand.
Javascript frontend development frameworks come to the rescue. For a long while, the most popular solution for frontend development has been React which is developed by Facebook. React is a vast subject, in which you can immerse yourself on the Full Stack Web Development course offered by the department. It is ongoing as an open university course.
Follow the examples above, and use Javascript to implement the page listing all breweries http:localhost:3000/brewerylist
The page displays the name and founding year of the brewery, number of beers made by the brewery and whether the brewery is active or not. The page does not need to separate the expired breweries in their own table.
Sorting of the breweries will be done in the next exercise.
Remember to keep the Javascript console open the whole time while you proceed with the exercise! You can debug by printing to the Javascript console with the command
console.log()ATTENTION: due to the changes you did last week, the breweries json list http://localhost:3000/breweries.json does not work, because the breweries#index controller is not given the list of all breweries in the variable
@breweriesany more. Fix the situation.ATTENTION2: Do this exercise little by little, as was done with the beers list in the previous example. Debugging Javascript might be challenging and the surest way to get overwhelmingly frustrated is to try to do this exercise quickly by copy-pasting the beer list code.
Expand the brewery list so that they can be ordered alphabetically by name, by founding year, or by the amount beers made by the brewery.
Make some tests with rspec/capybara for the Javascript beers list. Your starting point is the following file, spec/features/beerlist_page_spec.rb:
require 'rails_helper'

describe "Beerlist page" do
  before :all do
    Capybara.register_driver :selenium do |app|
      Capybara::Selenium::Driver.new(app, :browser => :chrome)
    end
  end

  before :each do
    @brewery1 = FactoryBot.create(:brewery, name: "Koff")
    @brewery2 = FactoryBot.create(:brewery, name: "Schlenkerla")
    @brewery3 = FactoryBot.create(:brewery, name: "Ayinger")
    @style1 = Style.create name: "Lager"
    @style2 = Style.create name: "Rauchbier"
    @style3 = Style.create name: "Weizen"
    @beer1 = FactoryBot.create(:beer, name: "Nikolai", brewery: @brewery1, style:@style1)
    @beer2 = FactoryBot.create(:beer, name: "Fastenbier", brewery:@brewery2, style:@style2)
    @beer3 = FactoryBot.create(:beer, name: "Lechte Weisse", brewery:@brewery3, style:@style3)
  end

  it "shows one known beer" do
    visit beerlist_path
    expect(page).to have_content "Nikolai"
  end
end
Execute the test with the command rspec spec/features/beerlist_page_spec.rb. You will receive an error message:
  1) Beerlist page shows one known beer
     Failure/Error: expect(page).to have_content "Nikolai"
       expected to find text "Nikolai" in "breweries beers styles ratings users clubs places signin signup\nyou should be signed in\nSign in\nusername password"
     # ./spec/features/beerlist_page_spec.rb:18:in `block (2 levels) in <top (required)>'

Finished in 21.17 seconds (files took 5.33 seconds to load)
1 example, 1 failure
It looks like that the page does not contain any beers list at all. Check this out with the command save_and_open_page that you should put right before the expect command. This will open the browser page where capybara has navigated to
(see https://github.com/mluukkai/WebPalvelinohjelmointi2023/blob/main/english/week4.md#capybara).
And the beer table to show on the page is empty as expected:
You find the reason for this from Capybara documentation https://github.com/jnicklas/capybara#drivers.
By default, Capybara uses the :rack_test driver, which is fast but limited: it does not support JavaScript, nor is it able to access HTTP resources outside your Rack application, such as remote APIs and OAuth services. To get around these limitations, you can set up a different default driver for your features.
Fixing this is simple, too. The Javascript tests only need to be added a parameter, and they will be executed with the help of Selenium, a test driver which knows Javascript:
it "shows the known beers", js:true doRun the tests. You'll run in an error message again:
1) Beerlist page shows one known beer
    Failure/Error: visit beerlist_path

    WebMock::NetConnectNotAllowedError:
      Real HTTP connections are disabled. Unregistered request: GET http://127.0.0.1:52187/__identify__ with headers {'Accept'=>'*/*', 'Accept-Encoding'=>'gzip;q=1.0,deflate;q=0.6,identity;q=0.3', 'User-Agent'=>'Ruby'}

      You can stub this request with the following snippet:

      stub_request(:get, "http://127.0.0.1:52187/__identify__").
        with(
          headers: {
        'Accept'=>'*/*',
        'Accept-Encoding'=>'gzip;q=1.0,deflate;q=0.6,identity;q=0.3',
        'User-Agent'=>'Ruby'
          }).
        to_return(status: 200, body: "", headers: {})

      ============================================================
The reason is that you started to use the WebMock gem in week 5, blocking the test code HTTP connections by default. The Javascript beer list tries to fetch the beers list in json form from the server, in fact. You get over this if you allow the connections, for instance by editing the before :all code chunk (which initializes the tests):
before :all do
  Capybara.register_driver :selenium do |app|
    Capybara::Selenium::Driver.new(app, :browser => :chrome)
  end
  WebMock.allow_net_connect!
end
The tests work finally.
When you create page contents with Javascript, these contents do not appear on the page together with the HTML base, but only later on, when the execution of the Javascript return call function. So if you look at the page contents right after navigating to the page, the Javascript won't have managed to form the final page outlook yet. For instance, the following save_and_open_page may open a page, that does not contain any beers yet:
it "shows a known beer", js:true do
  visit beerlist_path
  save_and_open_page
  expect(page).to have_content "Nikolai"
end
As the page https://github.com/jnicklas/capybara#asynchronous-javascript-ajax-and-friends says, Capybara is able to wait for asynchronous Javascript calls till the page elements required for the tests have loaded.
It's known that the Javascript should add rows to the page table. You will get the page to look correct by adding the command find('table').find('tr:nth-child(2)') at its beginning. This looks for a table in the page and for the second line inside the table (the table first line is already the table title in the page template):
it "shows a known beer", :js => true do
  visit beerlist_path
  find('table').find('tr:nth-child(2)')
  save_and_open_page
  expect(page).to have_content "Nikolai"
end
Capybara will now wait, moving to the command to open the page only when the table is loaded (to be more precise, only two lines of the table will be ready for sure).
Executing the test in a real browser is quite slow. You can make them faster by using Chrome's Headless mode, the "UIless version". You can implement the Headless browser by changing the before :all into:
before :all do
  Capybara.register_driver :chrome do |app|
    Capybara::Selenium::Driver.new app, browser: :chrome,
      options: Selenium::WebDriver::Chrome::Options.new(args: %w[headless disable-gpu])
  end

  Capybara.javascript_driver = :chrome
  WebMock.disable_net_connect!(allow_localhost: true)
end
After these configuration changes, executing on a normal browser is possible by clearing the contents of Options.new().
Implement a test to check that the beers are sorted alphabetically by their name in the beerlist page by default.
The test can be implemented by using the
findselector to find the table rows and making sure that each line has the right contents. Because the table has one row for the header, the first actual row can be found like this:find('#beertable').first('.tablerow')The row contents can be tested as usually with the expect and have_content methods. Capybara command find returns a Node type object. See the link for instructions on how to handle Node.
Test the following pieces of functionality
- clicking on the column 'style', the beers are sorted alphabetically by style name
- clicking on the column 'brewery', the beers are sorted alphabetically by brewery name
The Javascript and style files (and pictures) of Rails applications are managed with the so-called Asset pipeline, see http://guides.rubyonrails.org/asset_pipeline.html
The idea is that the application developer places the Javascript files in the folder app/assets/javascripts and the style files in app/assets/stylesheets. Both can be placed in various different files and subfolders, if needed.
When the application is in the development mode, Rails links all the Javascript and style files (which are defined in the so called Manifest file) together in to the application. If you check the application with the view source property of your browser, you will notice that a large amount of Javascript and style files are linked together there.
The Javascript files to link in to the application are defined in the file app/assets/javascripts/application.js, whose contents look like this now
//= require jquery3
//= require popper
//= require bootstrap-sprockets
import "@hotwired/turbo-rails";
import "controllers";
import { beertable } from "custom/utils";

beertable();
Even though the require statements look as if they were comments, they are actually "real" commands of the sprockets compiler that takes care of asset pipeline. They help define the Javascript files that have to be linked in the application. The file tells to take jquery3, popper, and bootstrap-sprockets. These are all set up in the application through gems.
For execution performance reasons, it is usually better to avoid using too many Javascript and style files in production-use applications. When the application is started in production mode, Sprockets links all the application Javascript and style files into singular, optimised files. You'll notice this if you look at application HTML source code in Fly.io: for instance https://ratebeer22.fly.dev/, it contains now only one js and one css files, and especially the js file readability is weak for a human.
More about asset pipeline and for instance Javascript linking in Rails applications, at:
- http://railscasts.com/episodes/279-understanding-the-asset-pipeline
- http://railsapps.github.io/rails-javascript-include-external.html
Anyone can join as beer club member in your application, so far. Change your application now, so that the membership has to be confirmed by old members before new ones can join.
Some notes
- the best way to implement an unconfirmed membership is that the Membership model is added the boolean field confirmed
- When a club is created, the user who created it should automatically become that club's member
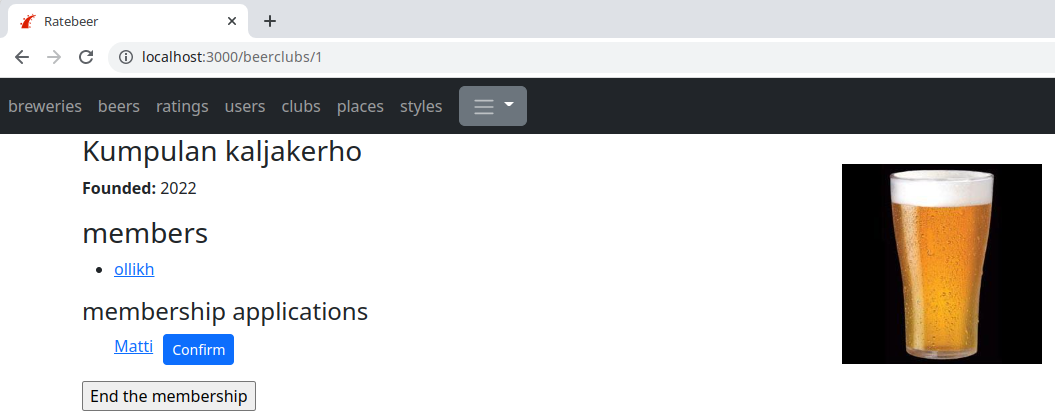
- Show a list of the membership applications which haven't been confirmed on the club page
- Membership status change can be managed for instance with its own [custom route](https://github.com/mluukkai/WebPalvelinohjelmointi2023/blob/main/english/week6.md#route-for-changing-the-brewery-status).
The exercise may be a bit challenging. Active Record Associations guide section 4.3.3 Scopes for has_many provides a good tool to make the exercise. Of course, the exercise can also be solved in different ways.
Section 4.3.2.3 :class_name might be useful as well.
At the end of the exercise, your application can look something like this. The beer club page shows a list of the membership applications, if the signed-in user is already that beer club's member:
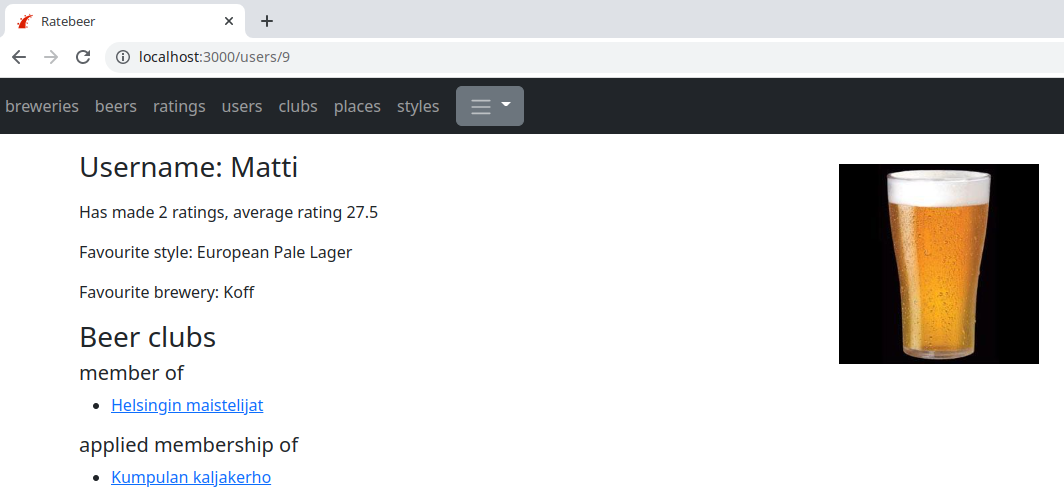
Users' personal pages show the applications which haven't been confirmed yet:
When the user signs in the system, the session controller executes an operation to retrieve the user object from the database against the username:
class SessionsController < ApplicationController
  def create
    user = User.find_by username: params[:username]

     # ...
  end

end
In order to execute the operation, the database has to go through the whole users table. Searches by the object ID are faster, because each table has been indexed against their ID. The index works as with hash tables, providing access to the required database row in "O(1)" time.
Database tables can be added other indexes if needed. Add an index to the users table, making the search against username faster.
Create a migration for the index
rails g migration AddUserIndexBasedOnUsername
The migration is the following:
class AddUserIndexBasedOnUsername < ActiveRecord::Migration[5.2]
  def change
    add_index :users, :username
  end
end
Execute the migration with the command rails db:migrate and the index is ready!
The bad thing about this is that when the system is added a new user or an existing user is deleted, the index has to be edited and this requires time, obviously. Adding an index is a tradeoff on what operation you want to optimize, then. In most cases database reading operations happen so much more often than writing operations that the benefits of indexes far outweigh the extra work caused by upkeeping them.
The controller to show all beers is simple. The beers are fetched from the database, sorted according to what the parameter of the HTTP call defines, and are assigned to a variable for the template:
def index
  @beers = Beer.all

  order = params[:order] || 'name'

  @beers = case order
            when 'name' then @beers.sort_by(&:name)
            when 'brewery' then @beers.sort_by{ |b| b.brewery.name }
            when 'style' then @beers.sort_by{ |b| b.style.name }
            end
end
The template shows a table where the beers are listed:
<% @beers.each do |beer| %>
  <tr>
    <td><%= link_to beer.name, beer %></td>
    <td><%= link_to beer.style, beer.style %></td>
    <td><%= link_to beer.brewery.name, beer.brewery %></td>
  </tr>
<% end %>
</table>
Simple and stylish... but not too efficient.
You could take a look at your log file log/development.log to see what happens when users go to the beers page. You will have access to the same piece of information in a fairly better form through the miniprofiler gem (see https://github.com/MiniProfiler/rack-mini-profiler and http://samsaffron.com/archive/2012/07/12/miniprofiler-ruby-edition)
Getting started with Miniprofiler is easy, you only need to add the following line to your Gemfile
gem 'rack-mini-profiler'
Execute bundle install and restart your Rails server. When you go to the address http:localhost:300/beers next time, you'll see a timer will have appeared on the upper side of the page. This measures the time used to execute the HTTP request. If you click the number, you'll find a better definition of the time frame:
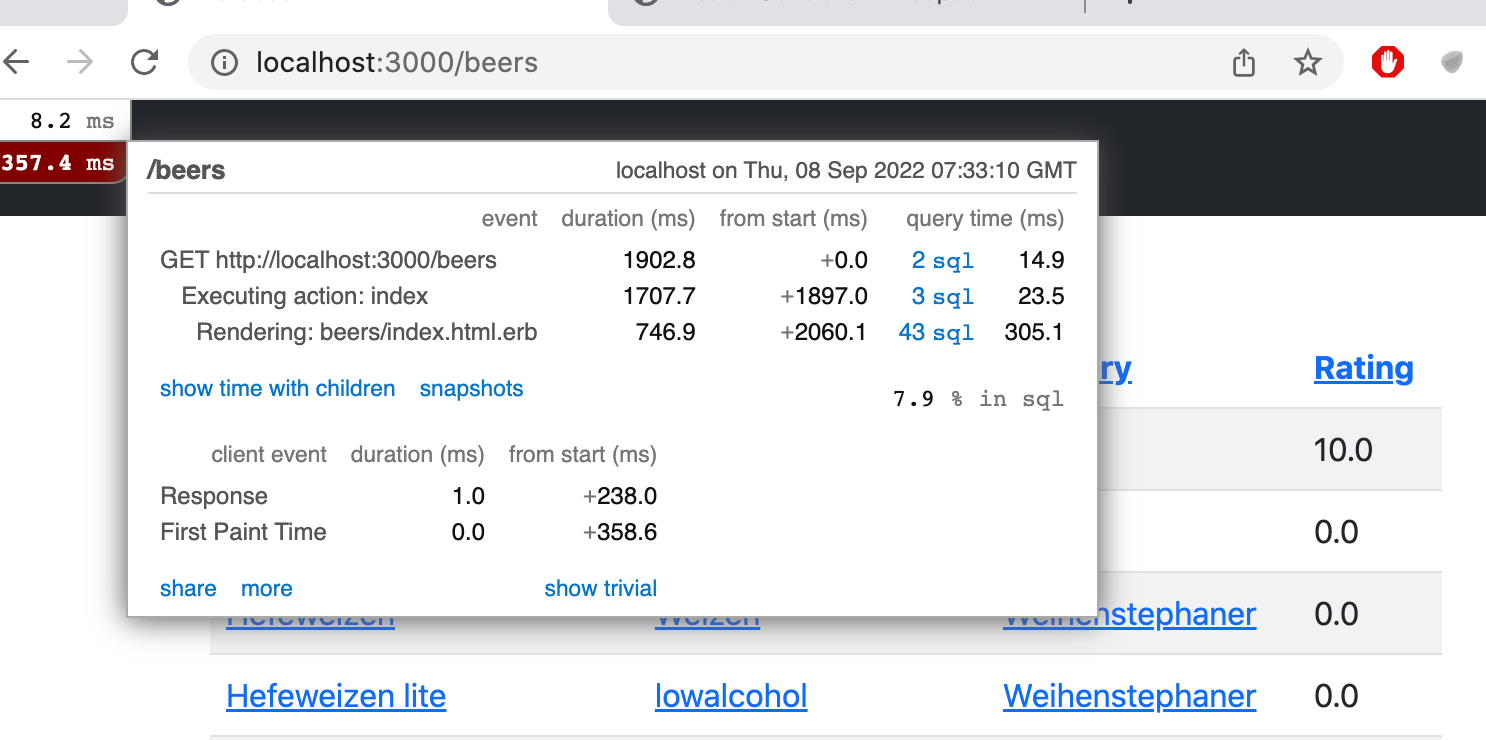
The report shows that Executing action: index – which is the controller method execution – causes one SQL request. Instead, Rendering: beers/index – which is the view template execution – causes notably more SQL requests!
Clicking on the requests you will be able to check their reason:
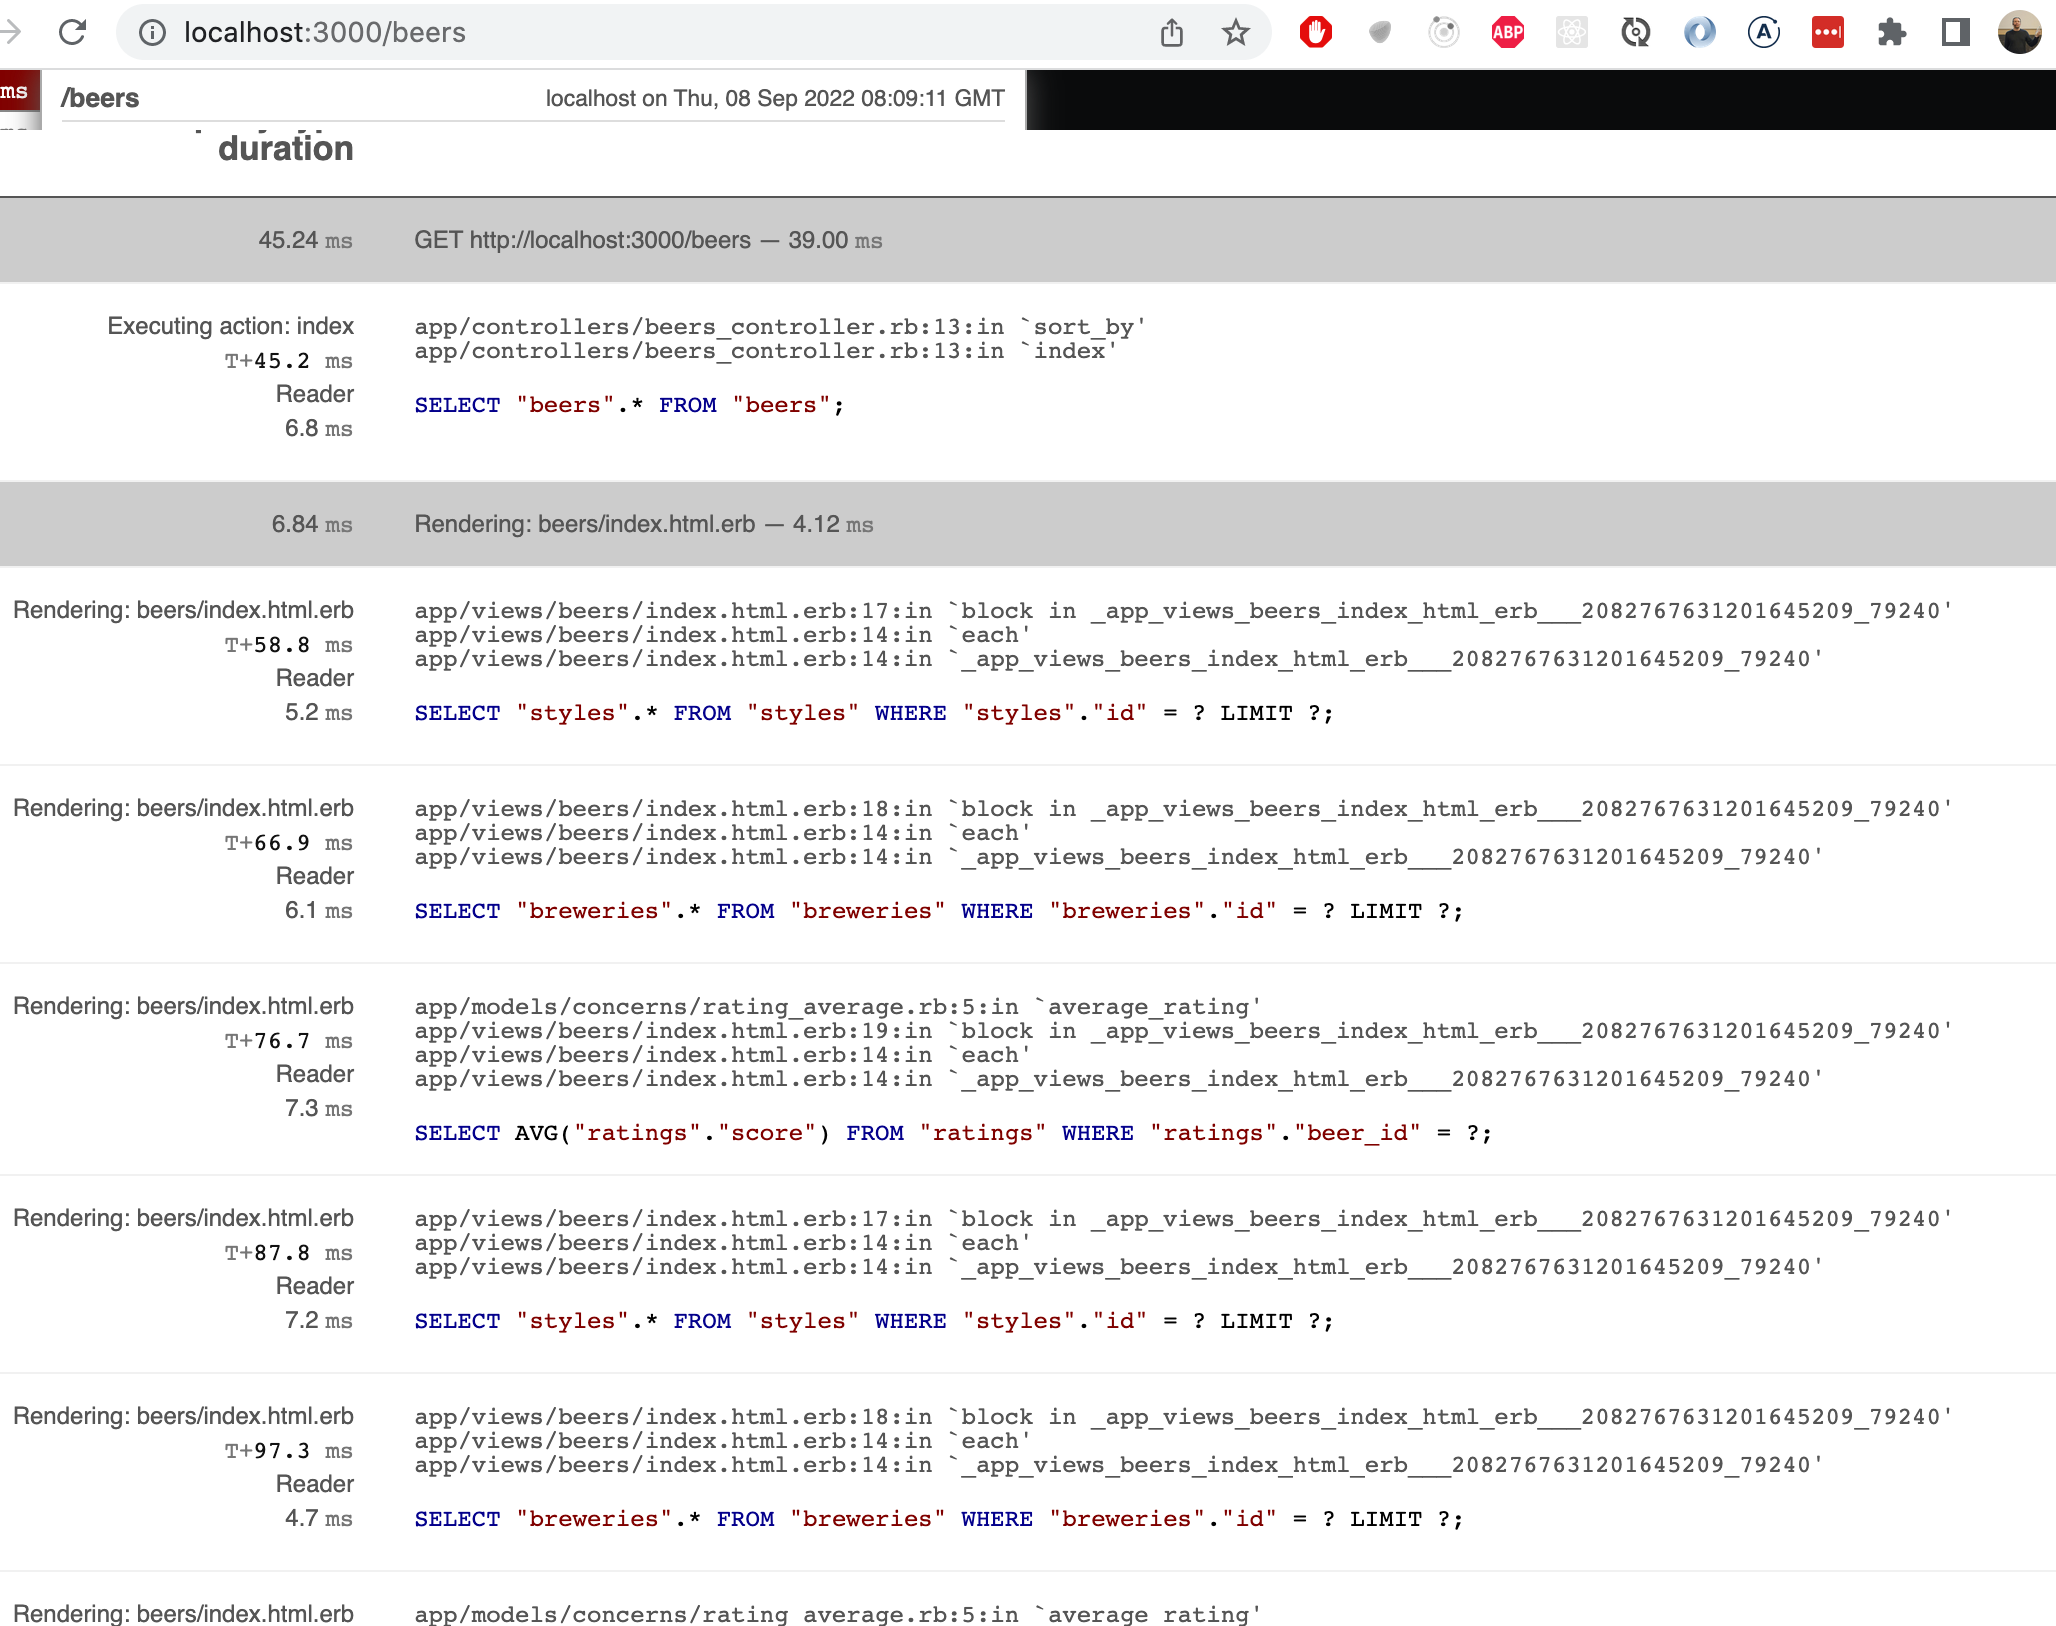
In contradiction to the earlier report, the controller makes only one request
SELECT "beers".* FROM "beers";You see that the rendering of the view template performs the following requests several times:
SELECT  "styles".* FROM "styles" WHERE "styles"."id" = ? LIMIT ?;

SELECT  "breweries".* FROM "breweries" WHERE "breweries"."id" = ? LIMIT ?;

SELECT AVG("ratings"."score") FROM "ratings" WHERE "ratings"."beer_id" = ?;
In fact, a request to the tables of both styles and breweries is made for each singular beer.
The reason is that Activerecord is set up on lazy loading by default, and an object's fields are fetched from the database only when they are referred to. This is reasonable sometimes, if an object is related to a huge amount of objects and not all of them are needed straight from the beginning. When you access the page of all beers, lazy loading is not the best idea, because you know for sure that you have to show the brewery and style names for each beer, and these pieces of information can be found only from the brewery and style database tables.
You can guide the SQL generated from the requests with ActiveRecord method parameters. For instance, the following tells that breweries associated with the beers have to be fetched from the database as well:
def index
@beers = Beer.includes(:brewery).all
# ...
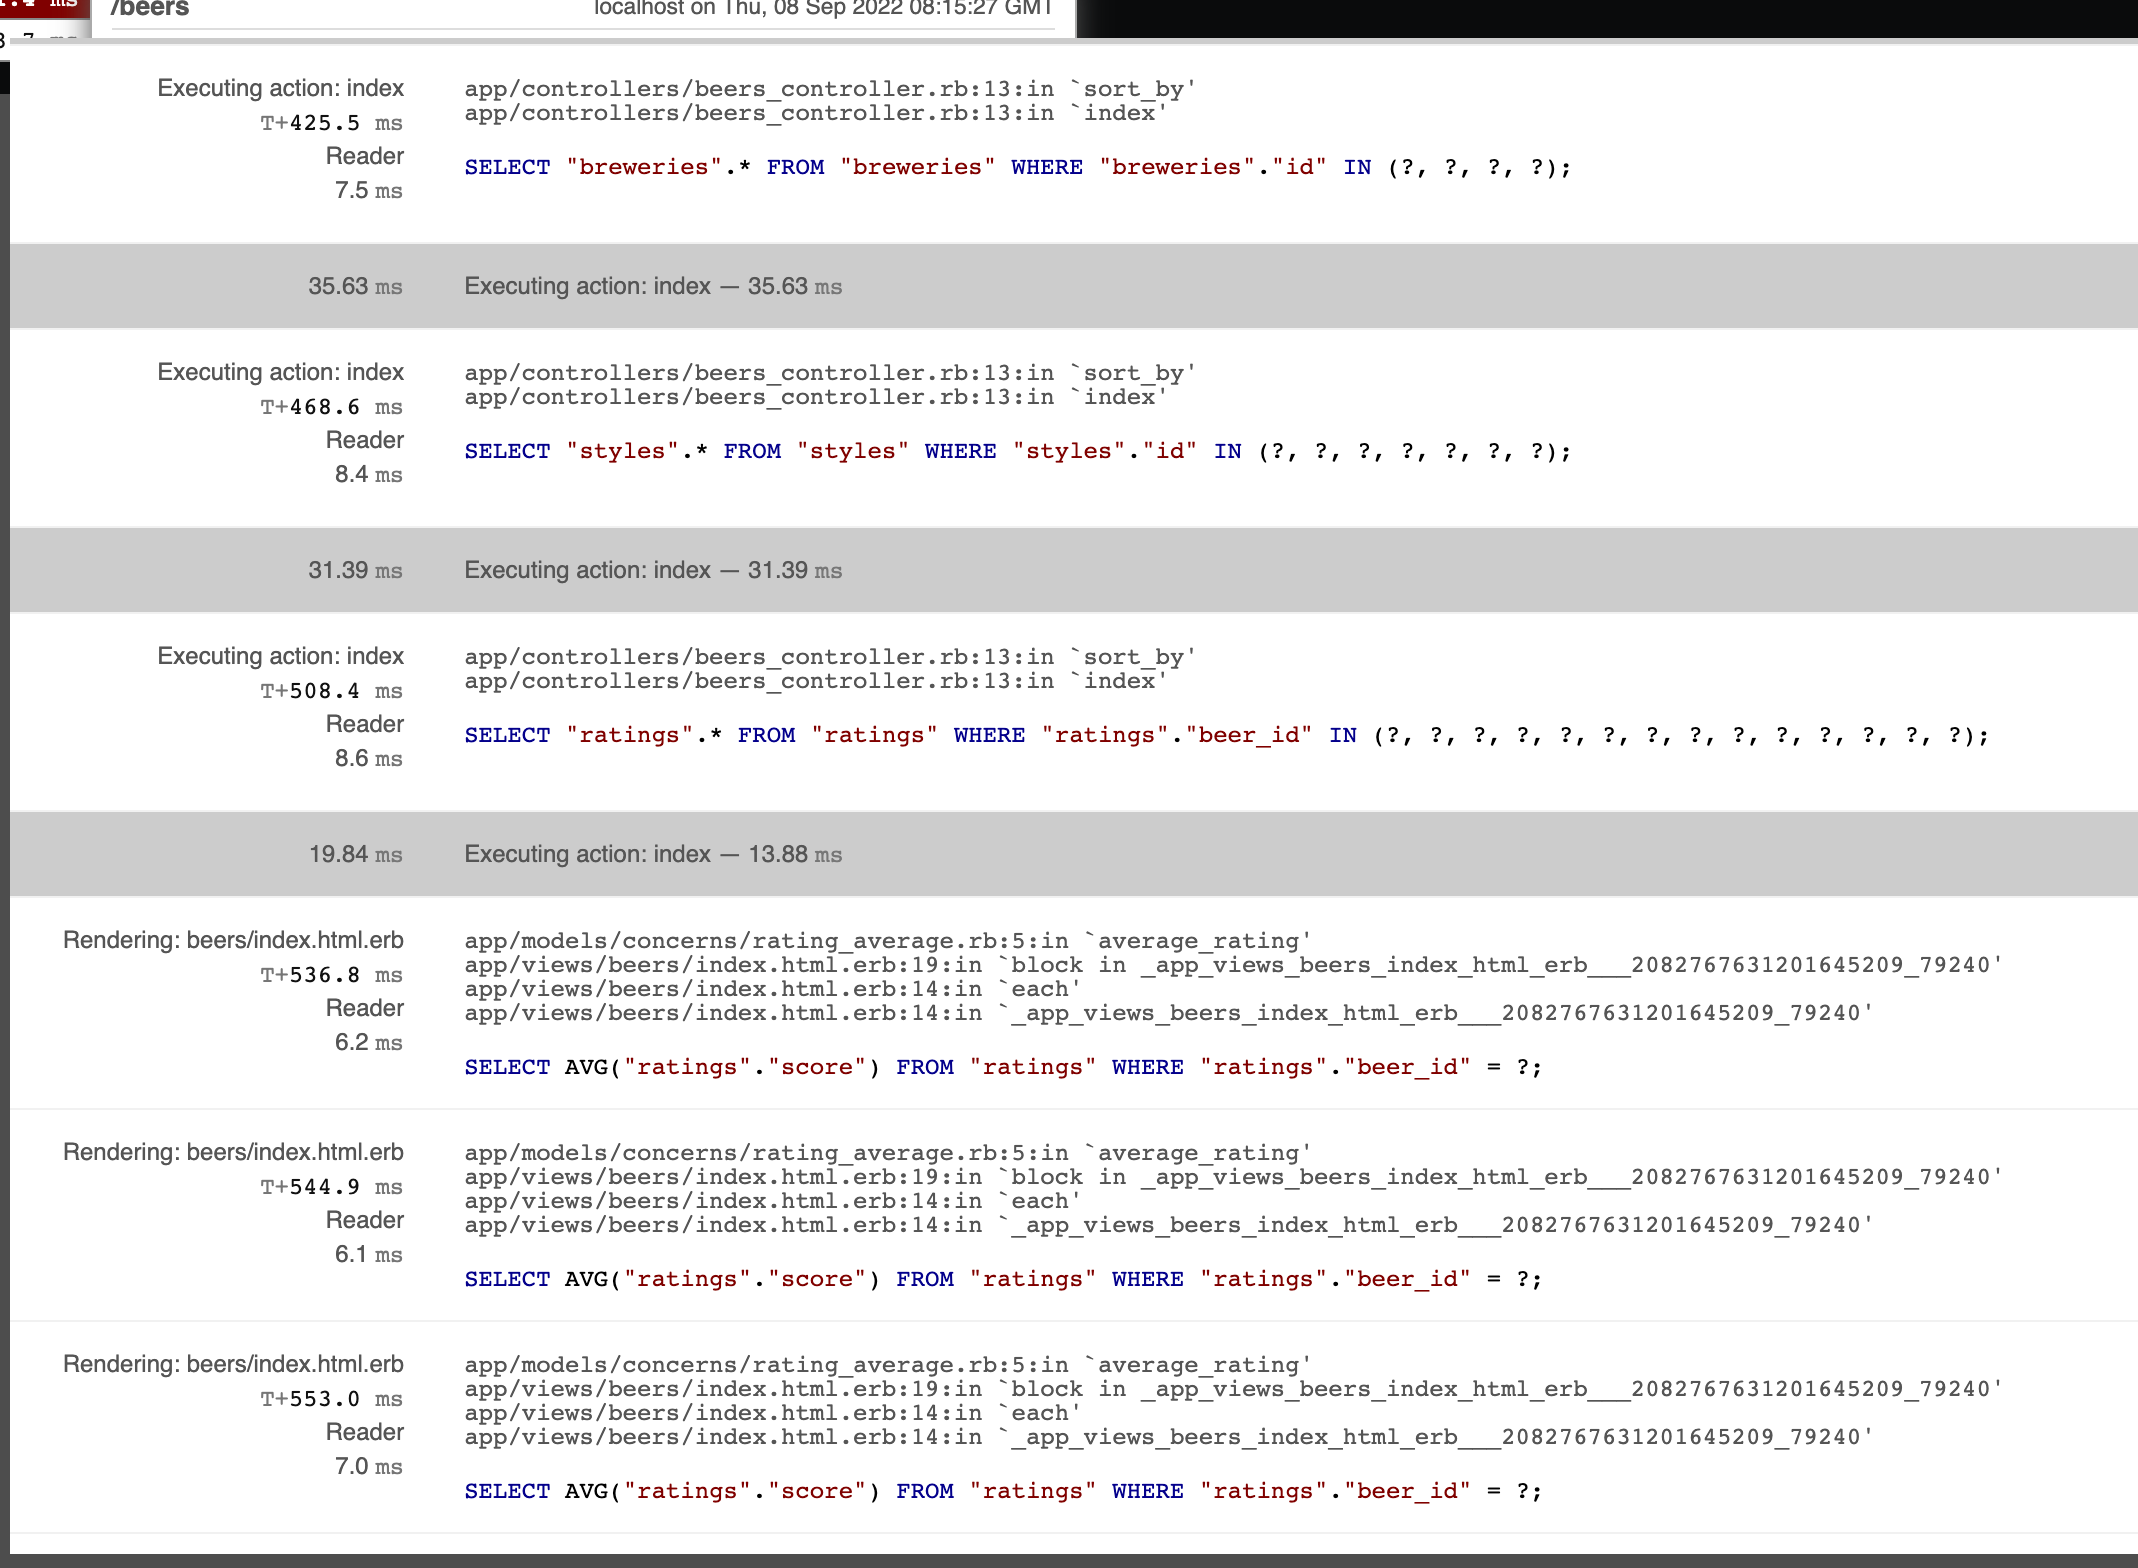
endWith the help of Miniprofiler, you'll see that the controller execution now causes two requests:
SELECT "beers".* FROM "beers";
SELECT "breweries".* FROM "breweries" WHERE "breweries"."id" IN (?, ?, ?, ?);
The view template execution causes request that are for example like this:
SELECT  "styles".* FROM "styles" WHERE "styles"."id" = ? LIMIT ?;
SELECT AVG("ratings"."score") FROM "ratings" WHERE "ratings"."beer_id" = ?;
When the view is rendered, the styles have to still be fetched from the database now, each with their own SQL request.
Optimize the controller in a way that all the styles and ratings needed are also read from the database at once:
def index
  @beers = Beer.includes(:brewery, :style, :ratings).all

  # ...
end
You notice that while the number of requests has dropped, the request for finding the beer rating average is still repeated for every beer.
This is because you have defined that calculating the average is done with SQL:
module RatingAverage
  extend ActiveSupport::Concern

  def average_rating
    # this generates SQL
    ratings.average(:score).to_f
  end
end
That means that having already fetched the ratings doesn't help here. We could make use of the beer ratings fetched with the includes command in the average calculation by making it happen in the central memory instead of in SQL:
module RatingAverage
  extend ActiveSupport::Concern

  def average_rating
    # Count and save based on the fetched ratings objects (associated to a beer)
    rating_count = ratings.size

    return 0 if rating_count == 0
    ratings.map{ |r| r.score }.sum / rating_count
  end
end
The controller execution now triggers fewer requests and rendering the view only a single one.
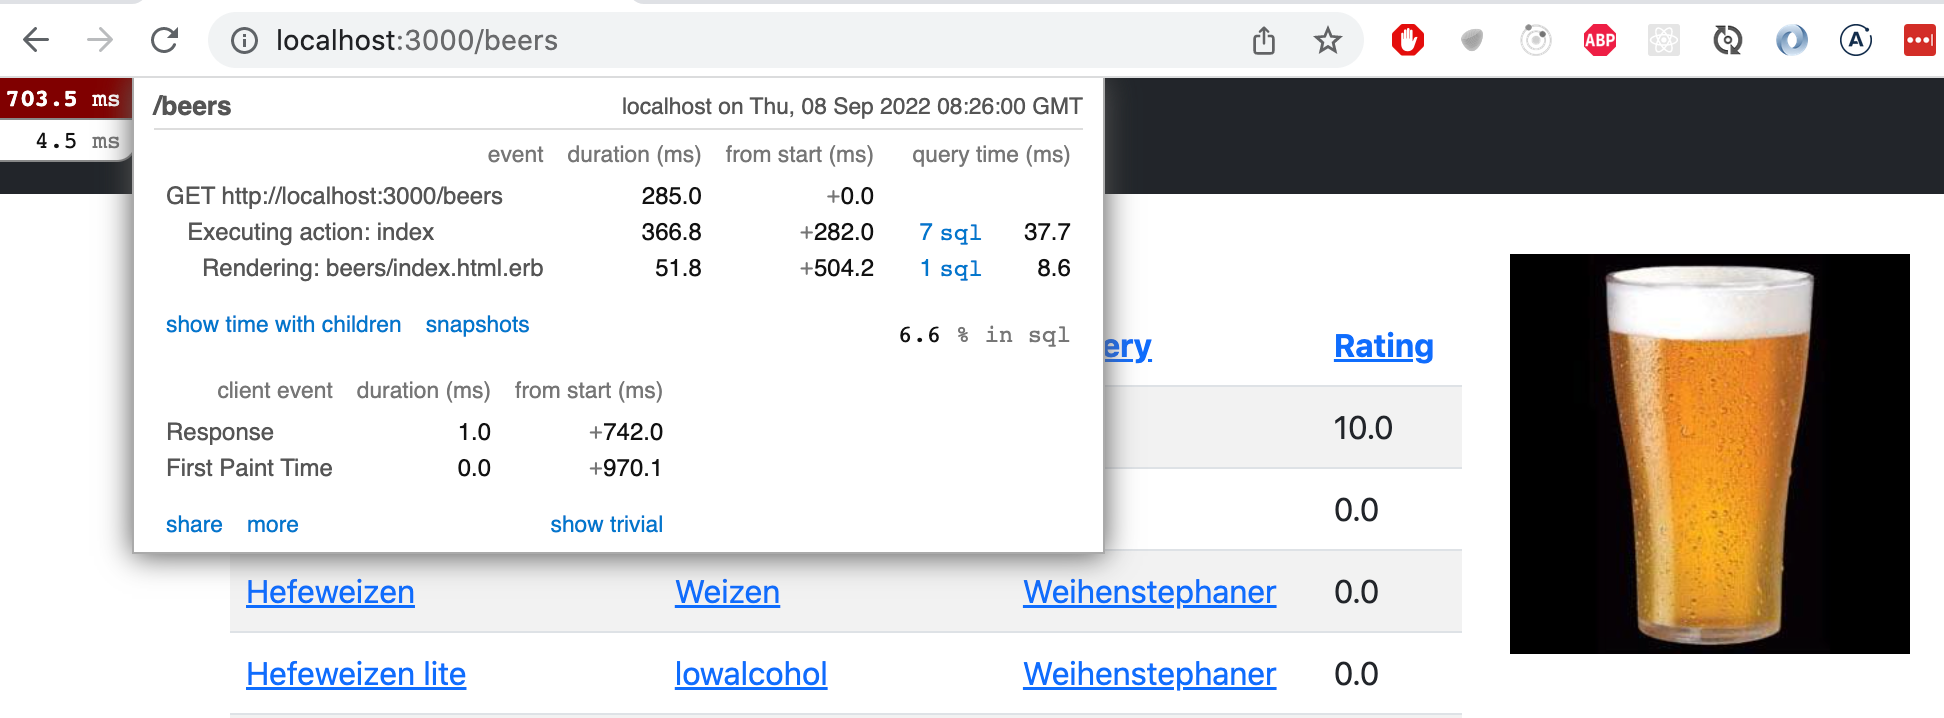
Miniprofiler shows that the request is
SELECT "users".* FROM "users" WHERE "users"."id" = ? LIMIT 1and the reason is
app/controllers/application_controller.rb:7:in `current_user'that is, the reference to the signed-in user made with the current_user variable by the view. This isn't really a problem though.
You managed to optimise the number of SQL requests and thus the loading time of the page! Decreasing the number on SQL requests is nice in the sense that it is constant and doesn't depend on the number of beers in the system.
What you just experienced is called the n+1 problem (see http://guides.rubyonrails.org/active_record_querying.html#eager-loading-associations): when fetching a list of beers with one database request, each object of the list causes a new database search, and instead of only one search, around n+1 searches actually happen.
Before the next exercise, make the user view_ views/users.html.erb_ a bit simpler:
<h1>Users</h1>

<div id="users">
  <% @users.each do |user| %>
    <p>
      <%= link_to(user.username, user) %>
      <p>Has made <%= "#{user.ratings.size}"%> ratings, average rating <%= "#{user.average_rating}" %></p>
      <% if user.closed? %>
        <span class="badge text-bg-danger">account closed</span>
      <% end %>
    </p>
  <% end %>
</div>
Note, that the if condition of if user.closed works depending on how you have named things in the code during an exercise on week 5. If necessary, you ran remove the whole condition.
There is an n+1 problem in the users page. Fix the problem eager loading the required objects when the users are fetched, like in the exercise above. Make sure that the optimisation works with miniprofiler.
Attention: if the table was added also the favourite beer column
<% if user.favorite_beer %>
  <p>Favourite beer: <%= "#{user.favorite_beer.name}"%></p>
<% end %>
the situation would be a bit harder in terms of SQL optimisation. The latest version of your method was this:
def favorite_beer
  return nil if ratings.empty?
  ratings.order(score: :desc).limit(1).first.beer
end
Now, not even eager loading will help, because the method call causes an SQL request in any case. Instead, if you implemented the beer ratings in the method central memory (as you did at the beginning of week 4):
def favorite_beer
  return nil if ratings.empty?
  ratings.sort_by{ |r| r.score }.last.beer
end
the method call would not cause any database operations if the ratings are eager loaded when the method is called.
It may also make sense to keep two versions of the method in some situations to optimise its performance, one that executes the operation at database level and the other which does it in central memory.
Create some more data in your database.
Replace the contents of file db/seeds.db with:
# if your computer is fast, you can increase the below numbers
users = 50
breweries = 50
beers_in_brewery = 50
ratings_per_user = 30

(1..users).each do |i|
  User.create! username: "user_#{i}", password: "Passwd1", password_confirmation: "Passwd1"
end

(1..breweries).each do |i|
  Brewery.create! name: "Brewery_#{i}", year: 1900, active: true
end

bulk = Style.create! name: "Bulk", description: "cheap, not much taste"

Brewery.all.each do |b|
  n = rand(beers_in_brewery)
  (1..n).each do |i|
    beer = Beer.create! name: "Beer #{b.id} -- #{i}", style: bulk, brewery: b
    b.beers << beer
  end
end

User.all.each do |u|
  n = rand(ratings_per_user)
  beers = Beer.all.shuffle
  (1..n).each do |i|
    r = Rating.new score:(1+rand(50))
    beers[i].ratings << r
    u.ratings << r
  end
end
The file uses the version with the exclamation mark (create!) to create objects instead of the normal create methods. The difference between the two is can be seen when an object cannot be created successfully. The method without exclamation mark returns nil in such cases, whereas the other throws an exception. Throwing exceptions is a better option in seeding, otherwise the unsuccessful creation will be left unnoticed.
Make a copy of the old database db/development.sqlite , so that you may return to the old situation after tuning the performance. You can take the old database into use again by changing its name again and calling it development.sqlite.
Attention: this might not be the best way to test the performance of real Rails applications, more about the topic at http://guides.rubyonrails.org/v3.2.13/performance_testing.html (the guides do not include a version updated for Rails 7.)
Execute the seeding with the command
rails db:seed
Executing the script might take a while.
Attention: if executing the script ends in an error, you'd better return to the pre-script database status after fixing the error. A possible issue about executing the script is duplicate names breaking the validation. If you change the command create! to create, the script execution will not interrupt.
Your application will have plenty data now, and loading the pages will start being slower.
Try now to see how the performance will be different if you comment out the SQL request optimisation from beers page, so if you change back the beer controller to look like this:
def index
  # @beers = Beer.includes(:brewery, :style).all
  @beers = Beer.all

  order = params[:order] || 'name'

  @beers = case order
    when 'name' then @beers.sort_by{ |b| b.name }
    when 'brewery' then @beers.sort_by{ |b| b.brewery.name }
    when 'style' then @beers.sort_by{ |b| b.style.name }
  end
end
Also have a look at the amount of SQL requests executed with and without optimisation. Once again, you'll see the result easily with miniprofiler.
After trying this out, you can return the code to its optimised form.
When the amount of data is huge, optimising the requests alone will not be enough, but you'll have to make up new strategies.
Caching will be an option.
Web application caching can be implemented both for the browser and for the server (as well as for the proxy between the two). Take a look at server caching. A couple of weeks ago, you already implemented "by hand" the caching of the information fetched from the beermapping api through Rails.cache. You'll have a look now to some more automatic Rails caching mechanism.
Caching is not on by default, when you execute your application in development mode. You might have switched it on week 5.
If the cache is on, the file tmp/caching-dev.txt can be found in your application. If there is no such file, you can switch cache on by executing the command rails dev:cache on the command line. The command should print out
Development mode is now being cached.
If it prints out
Development mode is no longer being cached.
execute the command again.
Restart your application now.
Cache how the beers list is viewed.
Fragment cache is possible if you put the part to cache of the view template into the following chunk:
<% cache 'avain', skip_digest: true do %>
  cachättävä näkymätemplaten osa
<% end %>
As you may have guessed, key is the key with which you save the view fragment to cache. The key can be either a string or an object. skip_digest: true refers to view templates versioning which won't be covered now. This means however, that the cache should be cleared (with the command Rails.cache.clear) if the view template code is changed.
Adding fragment caching to the beers list views/beers/index.html is easy, you'll cache the dynamic part of the page, the beers table:
<h1>Beers</h1>

<% cache 'beerlist', skip_digest: true do %>
  <div id="beers">
    <table class="table table-striped table-hover">
      <thead>
        <tr>
          <th><%= link_to "Name", beers_path(order: "name")%></th>
          <th><%= link_to "Style", beers_path(order: "style")%></th>
          <th><%= link_to "Brewery", beers_path(order: "brewery")%></th>
          <th><%= link_to "Rating", beers_path(order: "rating")%></th>
        </tr>
      </thead>
      <tbody>
        <% @beers.each do |beer| %>
          <tr>
            <td><%= link_to beer.name, beer %></td>
            <td><%= link_to beer.style.name, beer.style %></td>
            <td><%= link_to beer.brewery.name, beer.brewery %></td>
            <td><%= round(beer.average_rating) %></td>
          </tr>
        <% end %>
      </tbody>
    </table>
  </div>

<% end %>

<%= link_to("New beer", new_beer_path, class: "btn btn-primary") if current_user %>
If you go to the page now, the page fragment hasn't been saved to memory yet, and loading the page will take as long as it used to before adding the caching:
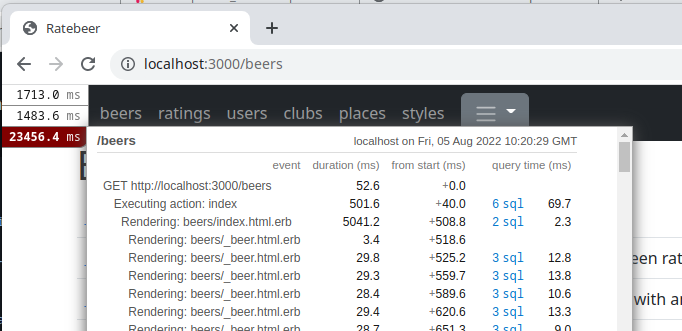
The loading time of the whole page was 234564 ms of which rendering the page (Rendering: beers/index) was 5041.2 milliseconds, in fact.
The fragment used on the page saves in cache, and opening the page the next time will be much faster:
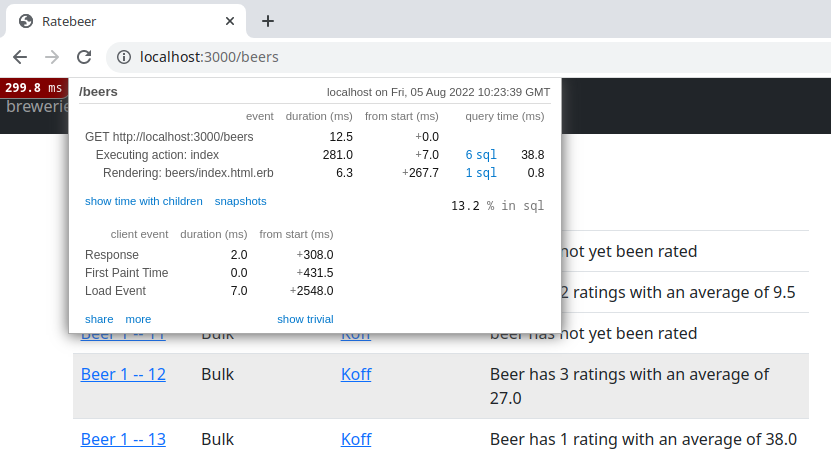
The whole page loading took 299 milliseconds of which only 6.3. ms was used for rendering the view template.
Attention: the new beer creation link should be left outside the cached fragment, because the link has to be shown only to users who signed in. The cached part of the page will be shown to everyone in the same way.
If you create a new beer now, you'll see that the page won't contain the new beer information. The reason is of course that the page fragment is still found from the cache. The outdated cache should be expired. In this case, the easiest strategy is making it expired manually from the controller.
Expiration is possible with the command expire_fragment(key). The command has to be called from the controller in the points where the beers list contents may change. These points are the controller methods create, update and destroy. The change is easy:
def create
  expire_fragment('beerlist')
end

def update
  expire_fragment('beerlist')
  # ...
end

def destroy
  expire_fragment('beerlist')
  # ...
end
After the changes the page will work as expected!
The page of all beers could still be speed up a bit. The controller now executes the database operation
@beers = Beer.includes(:brewery, :style, :ratings).alleven when the page fragment is found from cache memory. You could test whether the fragment exists with the method fragment_exist?, and execute the database operation only if the fragment does not exist:
def index
  # if fragment exist, stop the method here (i.e. render the view immediately)
  return if request.format.html? && fragment_exist?('beerlist')

  @beers = Beer.includes(:brewery, :style, :ratings).all

  order = params[:order] || 'name'

  @beers = case order
            when 'name' then @beers.sort_by(&:name)
            when 'brewery' then @beers.sort_by{ |b| b.brewery.name }
            when 'style' then @beers.sort_by{ |b| b.style.name }
            end
end
request.format.html? in the condition makes sure that all code is executed in the case that you are forming a json-format response.
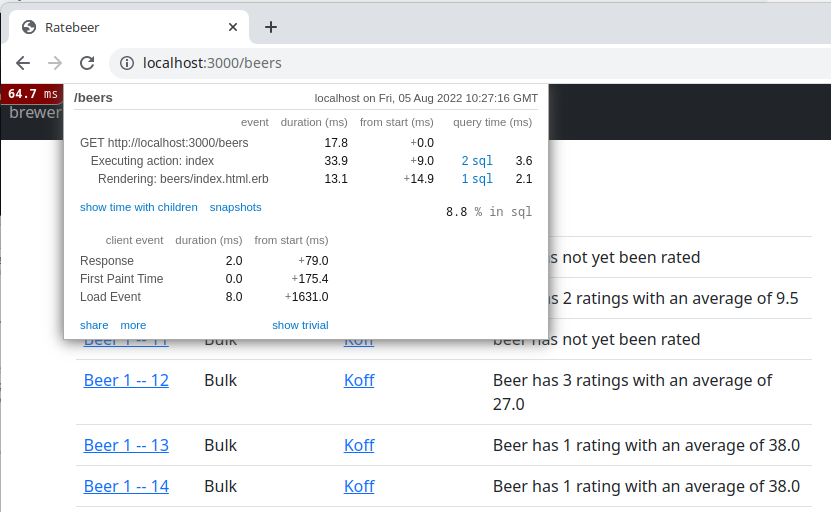
The page is now even faster:
Notice however that the page has a little problem. The beers were sorted in different orders by clicking on the columns. Caching has broken this operation!
One way to fix the functionality is adding an order to the fragment key:
<% cache "beerlist-#{@order}", skip_digest: true do %>
  taulukon html
<% end %>
The order is stored in the variable @order, in the controller. The changes required by the controller follow below:
def index
  @order = params[:order] || 'name'
  return if request.format.html? && fragment_exist?("beerlist-#{@order}")

  @beers = Beer.includes(:brewery, :style, :raings).all
  @beers = case @order
            when 'name' then @beers.sort_by(&:name)
            when 'brewery' then @beers.sort_by{ |b| b.brewery.name }
            when 'style' then @beers.sort_by{ |b| b.style.name }
            end
end
When the fragment expires, all three orders have to expire:
["beerlist-name", "beerlist-brewery", "beerlist-style"].each{ |f| expire_fragment(f) }Attention: you can call the fragment cache operation from the console:
> ActionController::Base.new.fragment_exist?('beerlist-name')
Exist fragment? views/beerlist-name (0.4ms)
=> true
> ActionController::Base.new.expire_fragment('beerlist-name')
Expire fragment views/beerlist-name (0.6ms)
=> true
> ActionController::Base.new.fragment_exist?('beerlist-name')
Exist fragment? views/beerlist-name (0.1ms)
=> nil
For the next exercise, make the brewery page http://localhost:3000/breweries display the brewery information in a table.
<h1>Listing breweries</h1>

<p> Number of active breweries: <%= @active_breweries.count %> </p>

<div id="active_breweries">
  <table class="table table-striped table-hover">
    <thead>
      <tr>
        <th>Name</th>
        <th>Founded</th>
        <th>Beers</th>
        <th>Rating</th>
      </tr>
    </thead>
    <tbody>
      <% @active_breweries.each do |brewery| %>
        <tr>
          <td><%= link_to brewery.name, brewery %></td>
          <td><%= brewery.year %></td>
          <td><%= brewery.beers.count %></td>
          <td><%= round(brewery.average_rating) %></td>
        </tr>
      <% end %>
    </tbody>
  </table>
</div>Implement fragment cache to the breweries page. Make sure that cache expires when there's a change on the page contents (brewery information, number of beers or rating average).
Implement cache expiration with a function set as before_action. This way you don't need to copy the code in to different methods.
If you wanted to cache a singular beer page, you'd better define the object itself to be cached as fragment key:
<% cache @beer do %>

  <h3>
    <%= @beer.name %>
  </h3>
  <p>
    <%= @beer.style.name %>
  </p>

  <p>
    <%= link_to "#{@beer.brewery.name}", @beer.brewery %>
  </p>

  <p>
    <% if @beer.ratings.empty? %>
      beer has not yet been rated
    <% else %>
      Beer has <%= pluralize(@beer.ratings.count, "rating") %>
      with an average of <%= @beer.average_rating %>
  <% end %>
  </p>
<% end %>

<!- uncached parts ->

<% if current_user %>
  <h4>give a rating:<h4>

  <%= form_with(model: @rating) do |form| %>
    <%= form.hidden_field :beer_id %>
    score: <%= form.number_field :score %>
    <%= form.submit "Create rating", class: "btn btn-primary" %>
  <% end %>

  <% if current_user && current_user.admin %>
    <div>
      <%= link_to("Edit this beer", edit_beer_path(@beer), class: "btn btn-primary") %>
      <%= button_to "Destroy this beer", @beer, class: "btn btn-danger", form: { data: { turbo_confirm: "Are you sure ? "} }, method: :delete if current_user %>
    </div>
  <% end %>
<% end %>

<%= link_to "Back to beers", beers_path %>
The fragment key will be a string now, which Rails generates by calling the object method cache_key_with_version. The method generates a key which specifies the object and includes a date stamp referring to when the object was last modified. If the object fields are modified, the fragment key value is also modified, meaning that the old fragment expires automatically. Below an example about a cache key that is generated automatically:
> b = Beer.first
> b.cache_key_with_version
=> "beers/1-20180924183300410080"
> b.update_attribute(:name, 'ISO 4')
> b.cache_key_with_version
=> "beers/1-20180924183314873407"
The solution is not perfect yet. If the beer is made a new rating, the object itself does not change and the fragment does not expire. The issue is easy to fix, though. Rating should be added the information that when it is created, modified, or destroyed, also its beer has to be 'touched up':
class Rating < ApplicationRecord
  belongs_to :beer, touch: true

  # ...
end
What happens is, the touch: true connected to belongs_to causes that the object field updated_at at the other end of the connection will also be updated.
For the next exercise, change the single brewery view so that it lists the brewery's beers' information, for example like
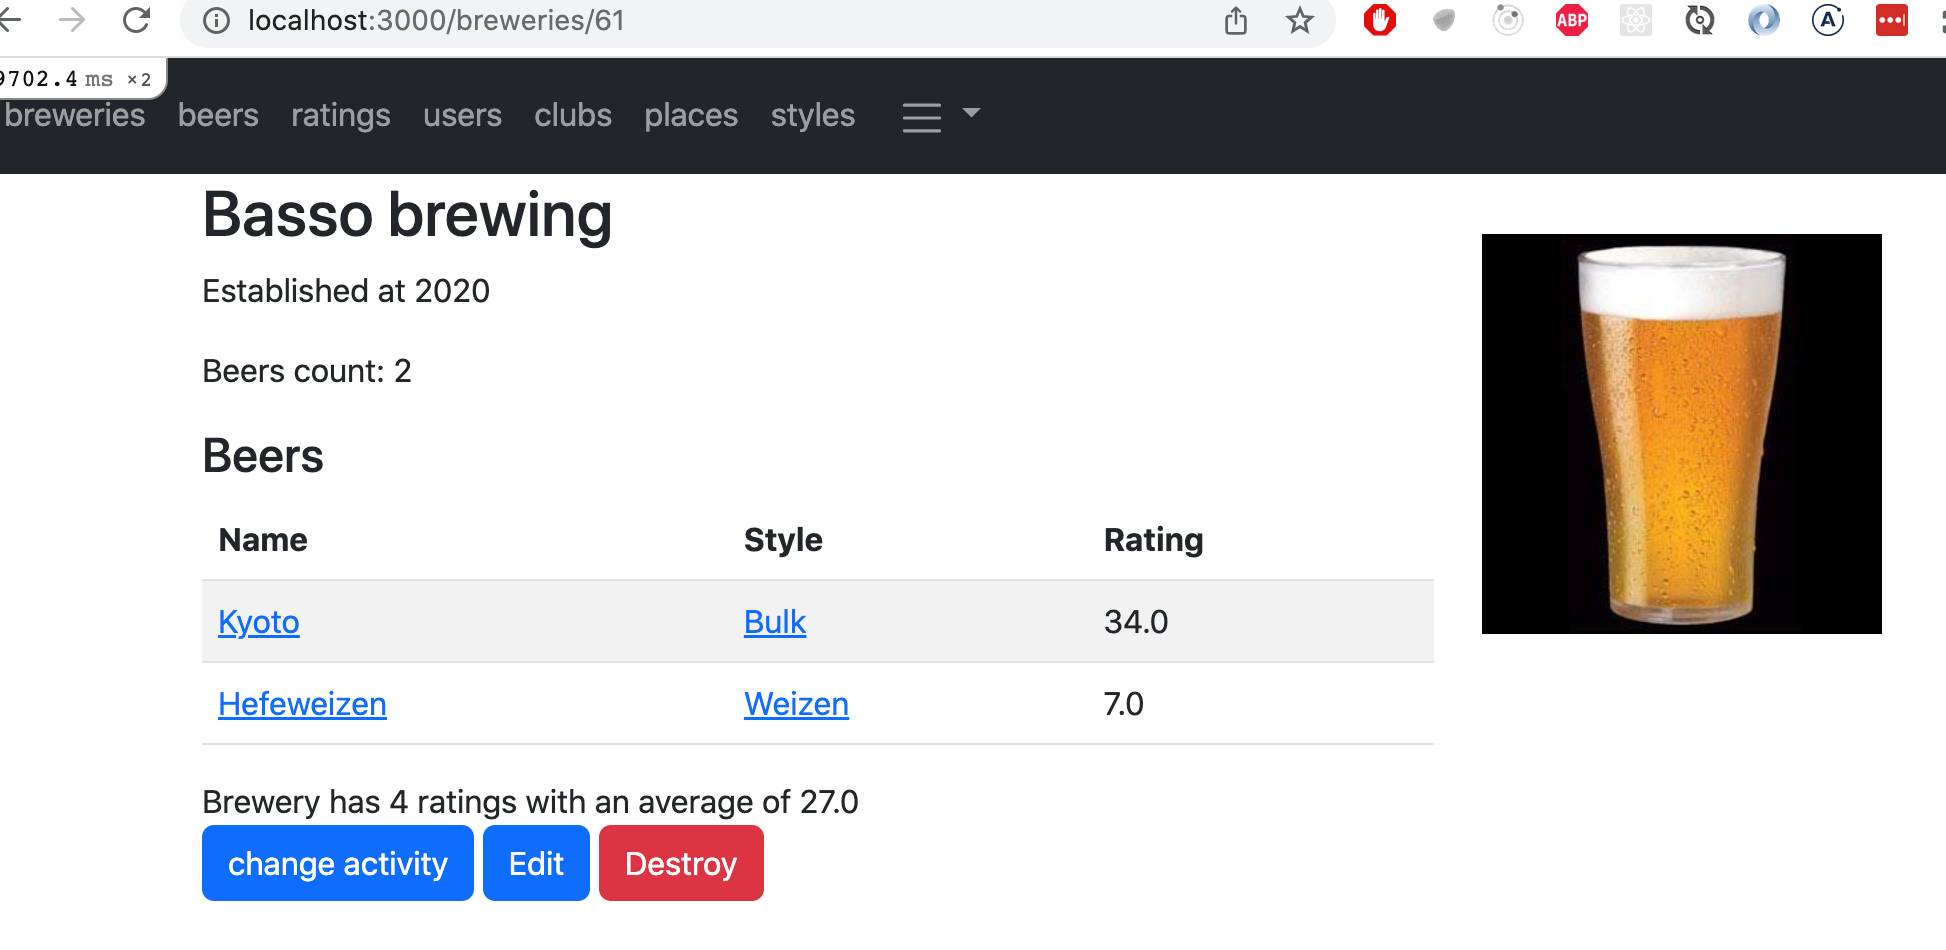
Implement fragment cache for the page of singular breweries. Notice that the brewery page fragment should expire automatically if the brewery beers are modified, like as it is in the example above.
With implementing explicit cache expiring, as it is for the page with all beers, comes the slight risk that you forget to expire the fragment in some required part of the code.
When you use straight the object as fragment key (as you did in the page of singular beers), the cache expires automatically when the object is updated. It would also be possible to make the cache of the page with all beers expire automatically. To do this, you should generate the fragment key with a suitable method; see the guide Caching with Rails: An overview.
Caching is possible at different levels, also at browser level. More information about Rails support for browser-side caching here.
It is not always essential that users see the application situation which is really up to date. For instance, it is not critical if the ratings statistics page shows a situation which is a few minute old. The important thing is that all the data coming to the system is eventually shown to users. Eventual consistency describes this not-too-strict demand for up-to-date information, which can improve the application performance notably.
Eventual consistency is easy to define in Rails by setting an expiring time to fragment cache:
<% cache 'fragment_name', expires_in:10.minutes do %>
  ...
<% end %>
This simplifies the application also because expiring the cache becomes easy, now that you don't have to take into consideration all the small parts of the code that may cause time inconsistency.
Suppose that your system really had many users and ratings happened frequently multiple times a minute. If you wanted to show completely consistent information on the ratings page, the performance would become weak, because every beer rating would change the page status, and the page would need to be expired too often. This would make caching almost useless.
SQL optimisation and caching are not yet able to make the ratings page too fast, because controller operations like User.top(3) require that nearly all the database data should be searched true, in fact. If you wanted to optimise your page better than this, you should use even more robust tools. For instance, the performance of User.top would improve dramatically if the ratings amount was saved straight in the user object, so that finding out this information wouldn't require calculating the amount of Rating objects of the user. This would also require that when a user makes a new rating, the user object should also be updated. So executing the rating operation would be slightly slower.
Another and maybe better way to accelerate the rating page would be caching the information needed by the Rails.cache controller. So the controller is this
def index
  @ratings = Rating.recent
  @beers = Beer.top(3)
  @styles = Style.top(3)
  @breweries = Brewery.top(3)
  @users = User.top(3)
end
You could do the same as you did in week 5 when you stored the brewery information into Rails cache, so the controller would look more or less like this:
def index
  Rails.cache.write("beer top 3", Beer.top(3)) if cache_does_not_contain_data_or_it_is_too_old
  @top_beers = Rails.cache.read "beer top 3"

  # ...
end
Optimising applications performance is not necessarily the easiest thing to do, because it requires solutions at different levels, and you will often have to tailor them according to the situation. Optimisation will most probably make your code less pleasant to read.
A negative part of the fact cache expires from time to time is that if you used that strategy for the ratings page, for some users it would trigger a very time-consuming operation when the data has to be generated again for the cache memory.
A better solution would be if users were always provided with data which is as updated as possible, so the controller would be like:
def index
  @top_beers = Rails.cache.read("beer top 3")

  # ...
end
The cache update could be executed as a process/thread on the background, which wakes up from time to time:
# pseudo code, does not really work...
def background_worker
  while true do
      sleep 10.minutes
      Rails.cache.write("beer top 3", Beer.top(3))
      Rails.cache.write("brewery top 3", Brewery.top(3))
      # ...
  end
end
The background processing strategy shown above is simple because the application and the thread/process executing the background processing don't need to synchronise their activity. Then again, sometimes the background processing is required by a request coming to the application. In such case, the synchronisation between the application and the background processing can be handled through message queues.
There are various options in Rails to implement background processing whether it is managed with message queues or with singular processes or threads. One option for the moment is Sidekiq.
If your application needs only a simple background operation which is executed on a set time interval, Heroku scheduler might be the simplest option. With it the background operations is defines as a Rake task which Heroku performs either once a day, once very hour or once every ten minutes. Based on some quick googling, Fly.io doesn't yet offer a fully equivalent batch run command.
As noted before, one way to perform async operations in Rails is Sidekiq. Sidekiq however requires its own process, meaning that e.g. in Fly.io and Heroku, it is not easy to run sidekiq without reserving a separate process, dyno, for it. And using that costs some dollars a month.
With Heroku services it is possible to use the Sucker Punch library.
Sucker Punch is a single-process Ruby asynchronous processing library. This reduces costs of hosting on a service like Heroku along with the memory footprint of having to maintain additional jobs if hosting on a dedicated server. All queues can run within a single application (eg. Rails, Sinatra, etc.) process.
Meaning Sucker Punch executes asynchronous jobs in the same process that the Rails application itself is run in.
Using Sucker Punch is pretty easy.
Add gem 'sucker_punch', '~> 3.0' to gemfile and run bundle install.
that is, set Rails to load the code created in the automatically generated folder.
Now create a Sucker Punch operation: in folder jobs, add a file test_job.rb containing:
class TestJob
  include SuckerPunch::Job

  def perform
    puts "running job..."
  end
end
You can now execute the operation by giving a command from the Rails console (or anywhere in the application code)
TestJob.perform_asyncThe operation prints into console running job.... Not very impressing.
It's worth noting that the operation is run asynchronously on the background, meaning the control return back to the console even before the operation has finished.
Change the operation:
class TestJob
  include SuckerPunch::Job

  def perform
    sleep 1
    puts "starting job..."
    sleep 10
    puts "job ready!"
  end
end
so now the operation takes 11 seconds. If you can the operation with the command TestJob.perform_async, you'll notice that you can access the console again immediately after executing the command (you most likely need to press enter to bring forth the command prompt). The operation is running on the background while you can execute some other code from the console if you wish.
Ypu can also execute the operations synchronously by giving the command TestJob.new.perform. Then you have to wait until the operation is finished before the console is reactivated.
The operations can also be set a timer. For example if you give the command TestJob.perform_in(10.seconds), the operation will be executed asynchronously after 10 seconds.
An async operation can start itself, so if you change the code to this:
class TestJob
  include SuckerPunch::Job

  def perform
    sleep 1
    puts "starting job..."
    sleep 10
    puts "job ready!"
    TestJob.perform_in(30.seconds)
  end
end
and give the command TestJob.perform_async, the operation will be repeatedly performed every 30 seconds until the console is shut down.
A side note: An operation on a forever loop should not be started in the test environment as e.g. GitHub Actions will stay waiting for the process to be finished.
Accelerate ratings page performance with a technique of your choice. You can assume that users are satisfied with eventual consistency.
Write a small description of your strategy to speed up the page in the
indexmethod of the ratings controller, in case it is not so clear based on the code.
You can scale your application performance only till a certain point if your application is a monolithic entity using a single database and running on a single server. The application can be optimised so that it is scaled vertically – that is, increasing the physical resources of its server.
You will have better scaling results if you scale horizontally, meaning that instead of improving the physical resources of one server, you start to use various servers, all executing your application actions at the same time. Horizontal scaling is not necessarily trivial, you'll have to change the application architecture. If your application works with only one database, you may run into troubles despite horizontal scaling, as that one database becomes a bottleneck. Especially so if that is a relational database, that is not easy to distribute and scale horizontally.
Scaling an application (and sometimes also updating and extending it) is easier if the application is made of various different services that work independently and communicate with each other for instance with an HTTP protocol. In fact, your application is already making use of another service, that is BeermappingAPI. In the same way, your application functionality could be expanded if new services were integrated.
For instance, suppose you wanted that your application created food receipt suggestions for users based on their favourite beer style and location (that you can find looking at the IP location of the user's HTTP request, see http://www.iplocation.net/). You should implement the recommendation as an independent service. Your application would communicate with the service using the HTTP protocol.
Suppose instead that you wanted your application to recommend beers to users based on their own favourite style. Separating this functionality into its own service that works on an independent server would be a bit more challenging. In fact, recommendations would depend most probably on other people's ratings. It would mean that accessing this information would require that the recommender accessed your application database. So if you wanted to implement the beers recommender as a separate service, you may need to rethink the whole structure of your application. You would need to make sure that the information about the ratings could be shared between the ratabeer application and the beer recommendation service.
Micro services, the style of compiling the application out of several small services that independently and separately perform their single task, has gained great popularity in recent years.
Relational databases have been dominating information storage for decades. Recently, we have started to see a new database frontier, and the "non-relational databases" that are known under the term NoSQL have started to gain favour.
A motivation behind NoSQL databases has been that relation database are difficult to scale to the performance required by massive Internet applications. Also, the fact some NoSQL databases are schema-less makes applications more elastic than the carefully defined database schemes of SQL databases.
There are various NoSQL databases, and their operating mechanisms are completely different from each other, for instance
- key-value databases
- document databases
- columnar databases
- graph databases
You already became familiar with Rails.cache which in fact is a simple key-value database, which enables storing an infinite amount of objects based on their key. The database search works only against objects key and the database does not support connections between objects at all.
Despite the growth of different database types, relation databases will survive still, and it is likely that bigger applications make use of various databases in parallel, and they try to select the most suitable database type according each storing need, see http://www.martinfowler.com/bliki/PolyglotPersistence.html.
In exercises 6-7 of week 6, you were told to create class methods for classes Beer, Brewery ja Style. These methods were to help controllers easily find the best breweries, beers, and beer styles based on the ratings.
The methods are exctly the same in all classes:
class Beer < ApplicationRecord
  # ...

  def self.top(how_many)
    sorted_by_rating_in_desc_order = all.sort_by{ |b| -(b.average_rating || 0) }
    sorted_by_rating_in_desc_order[0, how_many]
  end
end
In week 2 you moved identical class defined object methods into a common module.
Class methods can also be moved into a shared module. The technique is however not exactly the same as with object methods.
Refactor your code so that the method def self.top(how_many) of classes Beer, Brewery and Style is moved into a module. You can find hints eg by googling ruby module static method.
From the point of this course, the functionalities of your application are now complete. The application can however be fine tuned for example by updating applications styles and improving validations or authentication.
Improve the application in your preferred method. You can mark this exercise as done after you have spent at least 15 minutes doing it.
The course exercises are done, and it is time to give course feedback at coursefeedback.helsinki.fi.
You can give feedback after you have enrolled to the open university course (it will take about 2 hours before the enrollment status has been updated to the feedback application)
Commit all your changes and push the code to Github. Deploy to the newest version of Heroku or Fly.io, too. Remember to check with Rubocop that your code still adheres to style rules.
Mark the exercises you have done at https://studies.cs.helsinki.fi/stats/courses/rails2023.
Enroll to the open university course realisation and ask for completion in the exercise submission system.
If Rails seems interesting you could dig more into it in the following ways
- http://guides.rubyonrails.org/ A lot of good info...
- http://railscasts.com/ excellent videos focusing on one theme at a time. Unfortunately new videos haven't been published in over a year - Hopefully the page will be re-activated at some point. It seems most pay-to-see pro-episodes can be found on Youtube...
- https://www.ruby-toolbox.com/ help for finding gems
- Eloquent Ruby an excellent book on Ruby
You can also dive into week 8, upcoming addition for the course, if you want to already learn about Hotwire, Rails way of creating reactive applications with minimal Javascript.