Remember to use Rubocop to check that all your future code still follows the configured style rules.
If you are using Visual Studio Code, consider installing the ruby-rubocop plugin.
In week 2 we modified the beer creation form so that the style and the brewery of the new beer are chosen from a dropdown menu. We modified the form to use select instead of a text field:
<div>
  <%= form.label :style, style: "display: block" %>
  <%= form.select :style, options_for_select(@styles) %>
</div>

<div>
  <%= form.label :brewery_id, style: "display: block" %>
  <%= form.select :brewery_id, options_from_collection_for_select(@breweries, :id, :name) %>
</div>
the selection options of dropdown menus are sent to the form through the variables @styles and @breweries, and their values are set by the controller method new:
def new
  @beer = Beer.new
  @breweries = Brewery.all
  @styles = ["Weizen", "Lager", "Pale ale", "IPA", "Porter", "Lowalcohol"]
end
Interestingly after these changes, editing a beer information will stop working. It causes the error message undefined method `map' for nil:NilClass, which you have probably already encountered in the course:
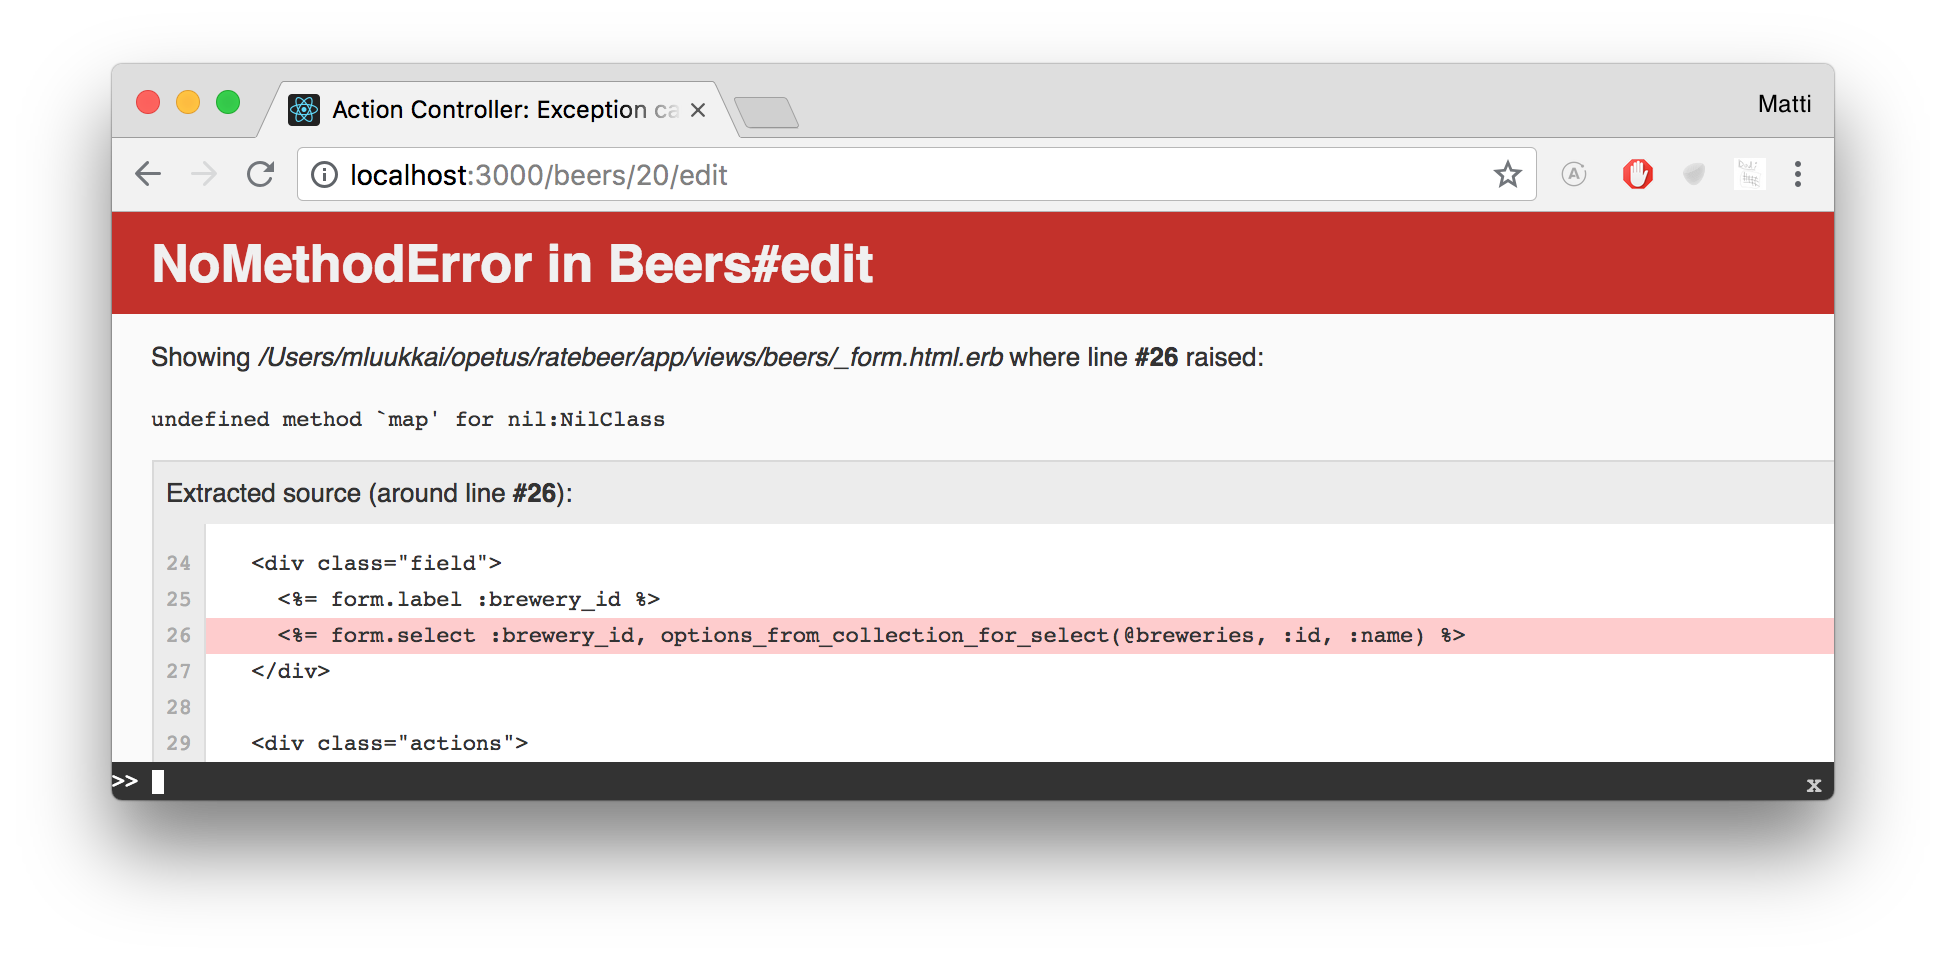
The reason for this is that creating a new beer and editing a beer require the use of the same view template to generate the form (app/views/beers/_form.html.erb). Also after the changes, the view requires that the variable @breweries contains a list of the breweries and that the variable styles contains the beers styles. You access the beer editing page by executing the edit controller method, and you will have to fix the controller like shown below, if you want to fix the issue:
def edit
  @breweries = Brewery.all
  @styles = ["Weizen", "Lager", "Pale ale", "IPA", "Porter", "Lowalcohol"]
end
You will find exactly the same problem if you try to create a beer which is not valid. In such case, the controller method create is the one which tries to render the view template which generates the form again. In fact, you will have to set a value to the variables @style and @breweries which need a template before rendering the page.
def create
  @beer = Beer.new(beer_params)

  respond_to do |format|
    if @beer.save
      format.html { redirect_to beers_path, notice: 'Beer was successfully created.' }
      format.json { render action: 'show', status: :created, location: @beer }
    else
      @breweries = Brewery.all
      @styles = ["Weizen", "Lager", "Pale ale", "IPA", "Porter"]

      format.html { render action: 'new' }
      format.json { render json: @beer.errors, status: :unprocessable_entity }
    end
  end
end
It's typical that the controller methods new, create and edit contain much of the same code, which is used to initiate the variables which view templates need. The best thing you can do is extracting the similar code into a method:
def set_breweries_and_styles_for_template
  @breweries = Brewery.all
  @styles = ["Weizen", "Lager", "Pale ale", "IPA", "Porter", "Lowalcohol"]
end
The method can be called from the controller methods new, create and edit:
def new
  @beer = Beer.new
  set_breweries_and_styles_for_template
end
or you could do it with the before_action expression, which looks even better:
class BeersController < ApplicationController
  # ...
  before_action :set_breweries_and_styles_for_template, only: [:new, :edit, :create]

  # ...
in this way, the method to set the values of the variables @styles and @breweries is executed automatically always before executing the methods new, create and edit. We might not need to set the variables values in the method create because they are needed only in case the validation fails. It might have made sense to use an explicit call in create.
Many students in the course have met problems with Heroku where sometimes an application which was working perfectly locally has caused the same old, annoying error message in Heroku, We're sorry, but something went wrong.
The thing to do right in the beginning is making sure all the code has been added from the local computer to the version management, that is git status!
Non-trivial problems are always solved using Heroku's logs. You can inspect logs through the command heroku logs for Heroku and fly logs for Fly.io, from the command line
You find the log of a typical problem (in Heroku) below:
mbp-18:ratebeer-public mluukkai$ heroku logs
2022-08-28T18:53:05.867973+00:00 app[web.1]:                   ON a.attrelid = d.adrelid AND a.attnum = d.adnum
2022-08-28T18:53:05.867973+00:00 app[web.1]:
2022-08-28T18:53:05.867973+00:00 app[web.1]:                                           ^
2022-08-28T18:53:05.867973+00:00 app[web.1]:                WHERE a.attrelid = '"users"'::regclass
2022-08-28T18:53:05.874380+00:00 app[web.1]: Completed 500 Internal Server Error in 10ms
2022-08-28T18:53:05.878587+00:00 app[web.1]: :               SELECT a.attname, format_type(a.atttypid, a.atttypmod),
2022-08-28T18:53:05.878587+00:00 app[web.1]:                                           ^
2022-08-28T18:53:05.878587+00:00 app[web.1]:
2022-08-28T18:53:05.868310+00:00 app[web.1]:
2022-08-28T18:53:05.867973+00:00 app[web.1]:                      pg_get_expr(d.adbin, d.adrelid), a.attnotnull, a.atttypid, a.atttypmod
2022-08-28T18:53:05.867973+00:00 app[web.1]:                  AND a.attnum > 0 AND NOT a.attisdropped
2022-08-28T18:53:05.868310+00:00 app[web.1]:                ORDER BY a.attnum
2022-08-28T18:53:05.878587+00:00 app[web.1]:                WHERE a.attrelid = '"users"'::regclass
2022-08-28T18:53:05.867973+00:00 app[web.1]:                 FROM pg_attribute a LEFT JOIN pg_attrdef d
2022-08-28T18:53:05.882824+00:00 app[web.1]: LINE 5:                WHERE a.attrelid = '"users"'::regclass
2022-08-28T18:53:05.882824+00:00 app[web.1]:                                           ^
2022-08-28T18:53:05.878587+00:00 app[web.1]:                      pg_get_expr(d.adbin, d.adrelid), a.attnotnull, a.atttypid, a.atttypmod
2022-08-28T18:53:05.878587+00:00 app[web.1]:                   ON a.attrelid = d.adrelid AND a.attnum = d.adnum
2022-08-28T18:53:05.874380+00:00 app[web.1]: Completed 500 Internal Server Error in 10ms
2022-08-28T18:53:05.878587+00:00 app[web.1]: ActiveRecord::StatementInvalid (PG::UndefinedTable: ERROR:  relation "users" does not exist
if you read the logs carefully, you will find the reason is the following
ActiveRecord::StatementInvalid (PG::UndefinedTable: ERROR: relation "users" does not existyou haven't executed the migrations. Fixing this will be easy:
heroku run rails db:migrate
Fly.io executes migrations automatically, so most likely you won't run into the above problem there.
You find the log of another typical error (also in Fly.io) situation below:
2022-08-28T19:32:31.609344+00:00 app[web.1]:     6:   <% @ratings.each do |rating| %>
2022-08-28T19:32:31.609530+00:00 app[web.1]:
2022-08-28T19:32:31.609530+00:00 app[web.1]:
2022-08-28T19:32:31.609530+00:00 app[web.1]:   app/views/ratings/index.html.erb:6:in `_app_views_ratings_index_html_erb___254869282653960432_70194062879340'
2022-08-28T19:32:31.609530+00:00 app[web.1]:
2022-08-28T19:32:31.609530+00:00 app[web.1]: ActionView::Template::Error (undefined method `username' for nil:NilClass):
2022-08-28T19:32:31.609344+00:00 app[web.1]:   app/views/ratings/index.html.erb:7:in `block in _app_views_ratings_index_html_erb___254869282653960432_70194062879340'
2022-08-28T19:32:31.609530+00:00 app[web.1]:     7:       <li> <%= rating %> <%= link_to rating.user.username, rating.user %> </li>
2022-08-28T19:32:31.609530+00:00 app[web.1]:     4:
2022-08-28T19:32:31.609530+00:00 app[web.1]:     6:   <% @ratings.each do |rating| %>
2022-08-28T19:32:31.609530+00:00 app[web.1]:     5: <ul>
2022-08-28T19:32:31.609715+00:00 app[web.1]:    10:
The error was ActionView::Template::Error (undefined method `username' for nil:NilClass) and it was happened while executing line 7 in file app/views/ratings/index.html.erb .
The line which caused the problem:
<li> <%= rating %> <%= link_to rating.user.username, rating.user %> </li>It seems that in the database there is a rating object whose associated user is nil. We already met this issue in week 2.
The reason behind this is either a nil value for the user_id field of a rating, or an erroneous ID. One of the ways to solve the issue is destroying the 'bad' rating objects from the console. Heroku console opens with heroku run console and Fly.io with first running fly ssh console and then /app/bin/rails c.
> bad_ratings = Rating.all.select{ |r| r.user.nil? or r.beer.nil? }
=> [#<Rating id: 1, score: 10, beer_id: 2, created_at: "2022-08-28 19:04:43", updated_at: "2022-08-28 19:04:43", user_id: nil>]
> bad_ratings.each{ |bad| bad.destroy }
=> [#<Rating id: 1, score: 10, beer_id: 2, created_at: "2022-08-28 19:04:43", updated_at: "2022-08-28 19:04:43", user_id: nil>]
> Rating.all.select{ |r| r.user.nil? or r.beer.nil? }
=> []
>
The commands above retrieve also the ratings that don't belong to any beer.
So if you have troubles with Heroku or Fly.io, find out where is the problem: logs and console will always help you out!
Sometimes you may want to cancel a migration you just executed – for instance if you create a bad scaffold, see the following section. This is possible through the command
rails db:rollback
If you want to remove the files created by the scaffold generator, you can do it with the command
rails destroy scaffold resource_name
where resource_name is the name of the resource you created with scaffold. ATTENTION: if you executed a bad scaffold migration already, you should definitely do rails db:rollback before using scaffold destroy.
So far, we have only tested our code in the browser. This is a great mistake. Every program which is supposed to last for long should include an ample range of automatic tests, otherwise expanding the program will be too risky.
You can use Rspec for tests, see http://rspec.info/, https://github.com/rspec/rspec-rails and http://betterspecs.org/
Get started with rspec-rails gem by adding the following to your Gemfile:
group :test do
  # ...
  gem 'rspec-rails', '~> 6.0.0'
end
You can set up the new gem in the familiar way, executing bundle install from the command line.
You can initialize rspec in your application running the following from command line
rails generate rspec:install
The initialization creates a folder /spec in the application and the various tests – or specs – will be placed in its subfolders.
According to Rails standard but currently less common testing framework, the tests are placed in the folder /test. The folder will be useless after taking up rspec as the only testing tool, and you can delete it.
The tests – the correct words would be specs or specifications when it comes to rspec, we will be using the word test in the future however – can be written at different levels: unit tests for models and controllers, view tests, and integration tests for controllers. In addition to these, the application can be tested using a simulated browser with the help of the capybara gem https://github.com/jnicklas/capybara.
We will be writing mostly unit tests for models as well as simulated browser-level tests with capybara.
Let's try out a couple of unit tests for the class User. You can create a test by hand or from the command line with the rspec generator
rails generate rspec:model user
The file user_spec.rb will appear in the folder /spec/models
require 'rails_helper'

RSpec.describe User, type: :model do
  pending "add some examples to (or delete) #{__FILE__}"
end
Try to run the tests from the command line using the command rspec spec (attention: you might have to restart the terminal at this point!).
The test execution runs like this:
$ rspec spec
*

Pending: (Failures listed here are expected and do not affect your suite's status)

  1) User add some examples to (or delete) /Users/mluukkai/opetus/ratebeer/spec/models/user_spec.rb
     # Not yet implemented
     # ./spec/models/user_spec.rb:4


Finished in 0.00932 seconds (files took 3.31 seconds to load)
1 example, 0 failures, 1 pending
The command rspec spec defines that you execute all the tests which are located inside spec subfolders. If you have a lot of tests, you can also run define the smaller group of tests you want to run:
rspec spec/models                # executing the tests contained in the models folder
rspec spec/models/user_spec.rb   # executing the tests defined by user_spect.rb
You can also automate the test execution to run any time a test or the code concerning it changes. The library used to do this is guard and there are numerous extensions available for it.
Let's start writing tests. First we'll create a test that tests that the constructor sets the username correctly (this in file user_spec.rb):
require 'rails_helper'

RSpec.describe User, type: :model do
  it "has the username set correctly" do
    user = User.new username: "Pekka"

    expect(user.username).to eq("Pekka")
  end
end
The test is written in the code chunk which is given to the method called it. The first parameter of the method is a string, which will act as the test's name. otherwise the test is written in similarly to e.g. jUnit, meaning that the data to test is created first, later the action to test is executed, and at the end the result will be evaluated.
Execute the test, and we see that it goes through:
$ rspec spec

Finished in 0.00553 seconds (files took 2.11 seconds to load)
1 example, 0 failures
Differently from the jUnit testing framework, Rspecs don't make use of assert commands to evaluate the result. They make use of a more particular syntax, as the last test line shows:
expect(user.username).to eq("Pekka")
In the test you have just run, you used the command new so the object was not saved in the database. Try to store the object now. You defined that User objects have a password whose length is over 4 and that contains at least one digit and one uppercase letter. So if the password is not set up, the object should not be stored in the database.
Test this:
RSpec.describe User, type: :model do

  # previously written test code...

  it "is not saved without a password" do
    user = User.create username: "Pekka"

    expect(user.valid?).to be(false)
    expect(User.count).to eq(0)
  end
end
The test goes smoothly.
The first validation in the test
expect(user.valid?).to be(false)is understandably. Thanks to rspec magic power, it can also be expressed like this.
expect(user).not_to be_validThis form is based on the fact the object user has the method valid? which returns a true-false value.
We notice that we are using two ways to check equality in tests: be(false) ja eq(0). What is the difference between the two? The matcher be can help you to check if two objects are the same. When comparing true-false values, be is a useful matcher. It will not work with strings, for instance. Try to change the comparison of the first test:
expect(user.username).to be("Pekka")the test will not go through now:
1) User has the username set correctly
    Failure/Error: expect(user.username).to be("Pekka")

      expected #<String:70322613325340> => "Pekka"
          got #<String:70322613325560> => "Pekka"

      Compared using equal?, which compares object identity,
      but expected and actual are not the same object. Use
      `expect(actual).to eq(expected)` if you don't care about
      object identity in this example.
When it is enough that the content of two objects is the same, you will have to use eq, which applies to most of the situations except when it comes to true-false values. Though, you could use eq even with true-false values, writing
expect(user.valid?).to eq(false)Make a test with a proper password
it "is saved with a proper password" do
  user = User.create username: "Pekka", password: "Secret1", password_confirmation: "Secret1"

  expect(user.valid?).to be(true)
  expect(User.count).to eq(1)
end
The first test "expectation" makes sure the new object validation is successful, so the method valid? will return true. The second expectation will make sure that there is one object in the database.
You could have used another form which can be read even more easily for the user validation:
expect(user).to be_validYou have to consider that rspec will always reset the database after running each test, so if you do a new test where you need Pekka, you have to create him again:
it "with a proper password and two ratings, has the correct average rating" do
  user = User.create username: "Pekka", password: "Secret1", password_confirmation: "Secret1"
  brewery = Brewery.new name: "test", year: 2000
  beer = Beer.new name: "testbeer", style: "teststyle", brewery: brewery
  rating = Rating.new score: 10, beer: beer
  rating2 = Rating.new score: 20, beer: beer

  user.ratings << rating
  user.ratings << rating2

  expect(user.ratings.count).to eq(2)
  expect(user.average_rating).to eq(15.0)
end
As you might have guessed, it is not smart to initiate a test object various times, and the part in common can be extracted. You can do this by adding a describe chunk for each test containing the same initialization and defining a let command at the beginning of the chunk. The command will be executed before each test and it will initialize again a user variable each time:
require 'rails_helper'

RSpec.describe User, type: :model do
  it "has the username set correctly" do
    user = User.new username: "Pekka"

    expect(user.username).to eq("Pekka")
  end

  it "is not saved without a password" do
    user = User.create username: "Pekka"

    expect(user).not_to be_valid
    expect(User.count).to eq(0)
  end

  describe "with a proper password" do
    let(:user){ User.create username: "Pekka", password: "Secret1", password_confirmation: "Secret1" }
    let(:test_brewery) { Brewery.new name: "test", year: 2000 }
    let(:test_beer) { Beer.create name: "testbeer", style: "teststyle", brewery: test_brewery }

    it "is saved" do
      expect(user).to be_valid
      expect(User.count).to eq(1)
    end

    it "and with two ratings, has the correct average rating" do
      rating = Rating.new score: 10, beer: test_beer
      rating2 = Rating.new score: 20, beer: test_beer

      user.ratings << rating
      user.ratings << rating2

      expect(user.ratings.count).to eq(2)
      expect(user.average_rating).to eq(15.0)
    end
  end
end
Initializing variables happens with the slightly peculiar looking let method. E.g.:
let(:user){ User.create username: "Pekka", password: "Secret1", password_confirmation: "Secret1" }makes it so that after the definition, the variable user refers to the User object created in the let method's code block.
Even though the variable is initialized only in one part of the code, so far, the initialization will be executed again before each method. Attention: the method let executes the object initialization only when the objec is really needed, this will have unexpected results sometimes!
Especially in older Rspec tests, you will see that the initialization happens through the before :each chunk. In such cases, the variable shared by various tests have to be defined as instance variable, like @user.
The choice of test and describe chunk names was not subject to chance. By defining the result of a test in the "documentation" format (with the -fd parameter), you will be able to print the tests results on the screen in a nice form:
$ rspec -fd spec

User
  has the username set correctly
  is not saved without a password
  with a proper password
    is saved
    and with two ratings, has the correct average rating

Finished in 0.12949 seconds (files took 1.95 seconds to load)
4 examples, 0 failures
You should aim at writing test names so that executing them will produce "specification" which can be read as easily as possible.
You can also add the line -fd to the .rspec file, which will always show the rspec tests of your project in the documentation format.
Add tests to the User class to check that no object will be stored in the database if users create a password (with the create method) which is too short or made of letters only. Also, the validation of the new object should not succeed.
Remember to name your tests in a way so that the "spec" produced will sound grammatically appropriate after you run Rspec in the document format.
Create a test base with Rspec generator (or by hand) for the class
Beerand make tests to check that
- a beer can be created, and the created beer is stored in the database if the name, brewery, and style of the beer have been set
- a beer won't be created (that is, no valid object will be brought about by create) if it is not given a name
- a beer won't be created, if its style hasn't been defined
If the last test does not go through, extend your code so that it will pass the test. Hint: A brewery id needs to be set for a beer but what if no brewery exists?
If you create the test file by hand, remember to place it in the folder spec/models
What we did before, creating the object structures for the tests by hand, might not be the best thing to do in some cases. A better way is grouping the structures for the test environment – that is to say the data to initialise the tests – in their own place, a "test fixture". Instead of using Rails standard fixture mechanism to initialise the tests, try the gem called FactoryBot, see https://github.com/thoughtbot/factory_bot and https://github.com/thoughtbot/factory_bot_rails
Add the following to your Gemfile
group :test do
  # ...
  gem 'factory_bot_rails'
end
and update the gems with the command bundle install
Create the file spec/factories.rb for your fixtures and write the following:
FactoryBot.define do
  factory :user do
    username { "Pekka" }
    password { "Foobar1" }
    password_confirmation { "Foobar1" }
  end
end
The file defines an "object factory" for creating objects of User class. There is no need to explicitly define the class of the created objects as FactoryBot deduces it directly from the name of the used fixture, user.
You can ask the defined factories to create objects in the following way:
user = FactoryBot.create(:user)Calling the factoryBot method create will create an object in the testing environment database automatically.
Modify your tests now to use FactoryBot for creating user objects.
describe "with a proper password" do
  let(:user) { FactoryBot.create(:user) } # this row changed
  let(:test_brewery) { Brewery.new name: "test", year: 2000 }
  let(:test_beer) { Beer.create name: "testbeer", style: "teststyle", brewery: test_brewery }

  it "is saved" do
    expect(user).to be_valid
    expect(User.count).to eq(1)
  end

  it "and with two ratings, has the correct average rating" do
    rating = Rating.new score: 10, beer: test_beer
    rating2 = Rating.new score: 20, beer: test_beer

    user.ratings << rating
    user.ratings << rating2

    expect(user.ratings.count).to eq(2)
    expect(user.average_rating).to eq(15.0)
  end
end
The change is yet quite minimal. Let's expand the fixtures so that we can use them to create also the rating objects used in the tests. Change file spec/factories.rb:
FactoryBot.define do
  factory :user do
    username { "Pekka" }
    password { "Foobar1" }
    password_confirmation { "Foobar1" }
  end

  factory :brewery do
    name { "anonymous" }
    year { 1900 }
  end

  factory :beer do
    name { "anonymous" }
    style { "Lager" }
    brewery # the brewery associated with beer is created with brewery factory
  end

  factory :rating do
    score { 10 }
    beer # The beer associated with rating is created with beer factory
    user # The user associated with rating is created with user factory
  end
end
On top of the factory creating ratings, fixtures for creating breweries and beers are also now defined in the file.
The factory FactoryBot.create(:brewery) creates a brewery whose name is 'anonymous' and is founded in 1900.
The factory FactoryBot.create(:beer) creates a beer whose style is 'Lager' and name 'anonymous' and a brewery is created for it. Accordingly, the factory FactoryBot.create(:rating) creates a rating which is associated with the beer and user created by the factory. Additionally, the value of the rating, field score, is set to 10.
The test can be edited to following:
describe "with a proper password" do
  let(:user) { FactoryBot.create(:user) }

  it "is saved" do
    expect(user).to be_valid
    expect(User.count).to eq(1)
  end

  it "and with two ratings, has the correct average rating" do
    FactoryBot.create(:rating, score: 10, user: user)
    FactoryBot.create(:rating, score: 20, user: user)

    expect(user.ratings.count).to eq(2)
    expect(user.average_rating).to eq(15.0)
  end
end
The test creates two ratings, other's score is 10 and the other's 20, that are associated with the user created with the help of a factory in the let command.
FactoryBot.create(:rating, score: 10, user: user)
FactoryBot.create(:rating, score: 20, user: user)
So you can ask the same factory to create various objects:
FactoryBot.create(:brewery)
FactoryBot.create(:brewery)
FactoryBot.create(:brewery)
would create three different brewery objects that would all have identical values.
You can edit the values of factory-created objects with parameters. E.g.:
FactoryBot.create(:brewery)
FactoryBot.create(:brewery, name: 'crapbrew')
FactoryBot.create(:brewery, name: 'homebrew', year: 2011)
this would create three breweries of which one would get the default name anonymous and foundation year 1900. The second brewery would get the default foundation year but the name crapbrew. The third would get both its name and year from the given parameters.
Also, the user factory could be called twice:
FactoryBot.create(:user)
FactoryBot.create(:user)
This would however raise an exception as User object validations expects that usernames are unique but the factory by default always creates users with the username "Pekka".
The following would however be okay; creating two users with different usernames, the default Pekka and additionally Vilma
FactoryBot.create(:user)
FactoryBot.create(:user, username: 'Vilma')
More instructions for using FactoryBot at https://thoughtbot.github.io/factory_bot/
Create methods for user in a test driven style (or behaviour driven, as rspec creators would say). The methods will help you find out users' favourite beers, breweries, and styles based on users ratings.
Orthodox TDD requires that you do not code anything before it is required by a minimal test. Create a test first requiring that User objects have the method favorite_beer.
it "has method for determining the favorite_beer" do
  user = FactoryBot.create(:user)
  expect(user).to respond_to(:favorite_beer)
end
The test will fail, so create the method body in the class User:
class User < ApplicationRecord
  # ...

  def favorite_beer
  end
end
The test succeeds. Next add a test to check that without ratings, users will not have a favourite beer, so the method should return nil:
it "without ratings does not have a favorite beer" do
  user = FactoryBot.create(:user)
  expect(user.favorite_beer).to eq(nil)
end
The test will pass because Ruby's methods return nil by default.
Refactor by adding a personal describe chunk to the two tests you have just written.
describe "favorite beer" do
  let(:user){ FactoryBot.create(:user) }

  it "has method for determining one" do
    expect(user).to respond_to(:favorite_beer)
  end

  it "without ratings does not have one" do
    expect(user.favorite_beer).to eq(nil)
  end
end
Add a test then to check the method is able to return the rated beer, if there is only one rating.
it "is the only rated if only one rating" do
  beer = FactoryBot.create(:beer)
  rating = FactoryBot.create(:rating, score: 20, beer: beer, user: user)

  # continues...
end
First a beer is created, then a rating. The create method of rating is given the score, beer object and user object (both created with Factorybot) as parameters. These are to be associated with the rating.
The created rating is connected to the user and is that user's only rating. In the end, the test expects that the beer associated with the rating is the user's favorite beer:
it "is the only rated if only one rating" do
  beer = FactoryBot.create(:beer)
  rating = FactoryBot.create(:rating, score: 20, beer: beer, user: user)

  expect(user.favorite_beer).to eq(beer)
end
Your test will not succeed, because your method does not do anything so far, and its return value is always nil.
Use in the spirit of TDD a "fake solution", without trying to make the final working version yet:
class User < ApplicationRecord
  # ...

  def favorite_beer
    return nil if ratings.empty?   # returns nil if there are no ratings

    ratings.first.beer             # returns the beer which belongs to the first rating
  end
end
Make another test which will force you to make a real implementation (see triangulation):
How do you most conservatively drive abstraction with tests? Abstract only when you have two or more examples. (p.153)
If two receiving stations at a known distance from teach other can both measure the direction of a radio signal, then there is enough information to calculate the range and bearing of the signal. This calculation is called Triangulation.
By analogy when we triangulate, we only generalize code when we have two examples or more... When the second example demands a more general solution, then and only then do we generalize (p.16).
I only use Triangulation when I'm really, really unsure about the correct abstraction for the calculation. Otherwise I rely on either Obvious Implementation or Fake It. (p.154)
it "is the one with highest rating if several rated" do
  beer1 = FactoryBot.create(:beer)
  beer2 = FactoryBot.create(:beer)
  beer3 = FactoryBot.create(:beer)
  rating1 = FactoryBot.create(:rating, score: 20, beer: beer1, user: user)
  rating2 = FactoryBot.create(:rating, score: 25, beer: beer2, user: user)
  rating3 = FactoryBot.create(:rating, score: 9, beer: beer3, user: user)

  expect(user.favorite_beer).to eq(beer2)
end
This creates three beers first and then ratings which belong to the beers as well as to the user object.
The test will not succeed naturally, because the implementation of the method favorite_beer was left incomplete earlier.
Modify the method implementation to look like below:
def favorite_beer
  return nil if ratings.empty?

  ratings.sort_by{ |r| r.score }.last.beer
end
So first the ratings are sorted by score, the last rating – the one with the highest score – is taken, and its beer is returned.
Because sorting was directly based on the rating attribute score, the last line of the method could have been written in a more compact form
ratings.sort_by(&:score).last.beerHow does the method work, actually? Execute the operation from the console:
> u = User.first
> u.ratings.sort_by(&:score).last.beer
  Rating Load (1.4ms)  SELECT "ratings".* FROM "ratings" WHERE "ratings"."user_id" = ?  [["user_id", 1]]
  Beer Load (0.4ms)  SELECT  "beers".* FROM "beers" WHERE "beers"."id" = ? LIMIT ?  [["id", 1], ["LIMIT", 1]]
It produces 2 SQL enquiries, where the first
SELECT "ratings".* FROM "ratings" WHERE "ratings"."user_id" = ? [["user_id", 1]]retrieves all the user ratings from the database. The ratings are sorted in the main memory. If the amount of ratings belonging to the user is extremely vast, you had better optimize the operation so that it is executed at database level.
If you look at the documentation (http://guides.rubyonrails.org/active_record_querying.html#ordering and http://guides.rubyonrails.org/active_record_querying.html#limit-and-offset) you will reach the following conclusion:
def favorite_beer
  return nil if ratings.empty?

  ratings.order(score: :desc).limit(1).first.beer
end
You can check the SQL enquiry which resulted from the operation by hand from the console (notice the method to_sql):
> u.ratings.order(score: :desc).limit(1).to_sql
=> "SELECT  \"ratings\".* FROM \"ratings\"  WHERE \"ratings\".\"user_id\" = ?  ORDER BY \"ratings\".\"score\" DESC LIMIT 1"
You should be patient when it comes to optimizing the execution capability and avoid optimizing each operation in the developing phase, if not necessary.
You must have noticed that the code to build the beers needed in tests is annoying. You could configure beers with ratings in FactoryBot. We decide to create however an auxiliary method create_beer_with_rating in the test file:
def create_beer_with_rating(object, score)
  beer = FactoryBot.create(:beer)
  FactoryBot.create(:rating, beer: beer, score: score, user: object[:user] )
  beer
end
Making use of the auxiliary method will help you to polish your test
it "is the one with highest rating if several rated" do
  create_beer_with_rating({ user: user }, 10 )
  create_beer_with_rating({ user: user }, 7 )
  best = create_beer_with_rating({ user: user }, 25 )

  expect(user.favorite_beer).to eq(best)
end
Passing the user who did the rating to the auxiliary methods is done in a somewhat peculiar way: as Ruby hash value. We could have defined that the user is passed as a normal parameter, similarly to the rating score:
def create_beer_with_rating(user, score)
  beer = FactoryBot.create(:beer)
  FactoryBot.create(:rating, beer: beer, score: score, user: user )
  beer
end
However, the previous method is more flexible in this case. It makes expanding the create_beer_with_rating method (needed in exercises 3 and 4) without breaking any test code possible.
Auxiliary method can (and should) be defined in rspec files. If the auxiliary method is needed in only in one test file, it can be place at the end of the file, for instance.
Improve again what you did before by defining another method create_beers_with_ratings, which allows to create various rated beers. The method receives as parameter a variable-length list which behaves like a table (see http://www.ruby-doc.org/docs/ProgrammingRuby/html/tut_methods.html, section "Variable-Length Argument Lists"):
def create_beers_with_many_ratings(object, *scores)
  scores.each do |score|
    create_beer_with_rating(object, score)
  end
end
If you call the method like
create_beers_with_many_ratings( {user: user}, 10, 15, 9)the parameter scores will have a collection as value, containing the numbers 10, 15, and 9. The method creates three beers (with the help of the method create_beer_with_rating). They are given a user as parameter, the user has a rating, and the ratings will be given a score based on the numbers of the scores parameter.
Again, below you find the whole code to test the favourite beer:
require 'rails_helper'

RSpec.describe User, type: :model do

  # ..

  describe "favorite beer" do
    let(:user){ FactoryBot.create(:user) }

    it "has method for determining the favorite beer" do
      expect(user).to respond_to(:favorite_beer)
    end

    it "without ratings does not have a favorite beer" do
      expect(user.favorite_beer).to eq(nil)
    end

    it "is the only rated if only one rating" do
      beer = FactoryBot.create(:beer)
      rating = FactoryBot.create(:rating, score: 20, beer: beer, user: user)

      expect(user.favorite_beer).to eq(beer)
    end

    it "is the one with highest rating if several rated" do
      create_beers_with_many_ratings({user: user}, 10, 20, 15, 7, 9)
      best = create_beer_with_rating({ user: user }, 25 )

      expect(user.favorite_beer).to eq(best)
    end
  end
end # describe User

def create_beer_with_rating(object, score)
  beer = FactoryBot.create(:beer)
  FactoryBot.create(:rating, beer: beer, score: score, user: object[:user] )
  beer
end

def create_beers_with_many_ratings(object, *scores)
  scores.each do |score|
    create_beer_with_rating(object, score)
  end
endHere we have gathered some problem cases encountered in previous years
It is good to point out that if you define the FactoryBot gem not only in the test environment but also in the development environment, like
group :development, :test do
   gem 'factory_bot_rails'
    # ...
end
if you create new resources with Rails generator, fo instance:
rails g scaffold bar name:string
a default factory will also be created:
FactoryBot.define do
  factory :bar do
    name "MyString"
  end

  # ...
end
This may put you into strange situations (if you define a factory with the same name yourself, the default one will be used instead!), so you'd better define the gem only in the test environment following the instructions of the section https://github.com/mluukkai/WebPalvelinohjelmointi2023/blob/main/english/week4.md#test-environments-or-fixtures.
Normally, rspec resets the database after each test execution. This is because rspec executes each test in a transaction by default which is rollbacked or canceled after the test execution. Tests are not saved in the database, then.
Occasionally objects can go to the database permanently during testing, however.
Suppose that you are testing the class Beer</code:
describe "when one beer exists" do
  beer = FactoryBot.create(:beer)

  it "is valid" do
    expect(beer).to be_valid
  end

  it "has the default style" do
    expect(beer.style).to eq("Lager")
  end
end
the is located outside the tests, and it is not executed it during canceling transactions!Beer object created by the test would go to your test database for good, because the command FactoryBot.create(:beer)
Therefore, you will not want to place object creation code outside the tests (except for the methods which are called by the tests). Objects should be created in the test context, either inside the method it:
describe "when one beer exists" do
  it "is valid" do
    beer = FactoryBot.create(:beer)
    expect(beer).to be_valid
  end

  it "has the default style" do
    beer = FactoryBot.create(:beer)
    expect(beer.style).to eq("Lager")
  end
end
inside the command let or let!:
describe "when one beer exists" do
  let(:beer){FactoryBot.create(:beer)}

  it "is valid" do
    expect(beer).to be_valid
  end

  it "has the default style" do
    expect(beer.style).to eq("Lager")
  end
end
or in the before chunk which you familiarize yourself with later on.
You can delete the beers which eventually ended up in the test database by starting the console in the test environment with the command rails c -e test.
The uniqueness restrictions which are defined in the validation can produce something unexpected sometimes. The User username has been defined as unique, so the test
describe "the application" do
  it "does something with two users" do
    user1 = FactoryBot.create(:user)
    user2 = FactoryBot.create(:user)

  # ...
  end
end
would cause the error message
1) User the application does something with two users
    Failure/Error: user2 = FactoryBot.create(:user)

    ActiveRecord::RecordInvalid:
      Validation failed: Username has already been taken
    # ./spec/models/user_spec.rb:77:in `block (3 levels) in <main>'
because FactoryBot tries to create two user objects now through the definition
factory :user do
  username { "Pekka" }
  password { "Foobar1" }
  password_confirmation { "Foobar1" }
end
so that 'Pekka' will be the username of both. You could solve the problem by giving another name to either of the objects which are being created:
describe "the application" do
  it "does something with two users" do
    user1 = FactoryBot.create(:user)
    user2 = FactoryBot.create(:user, username: "Vilma")

  # ...
  end
end
Another option would be defining the usernames used by FactoryBot with the help of sequences, see https://www.rubydoc.info/gems/factory_bot/file/GETTING_STARTED.md#sequences
The factory would change to:
FactoryBot.define do
  sequence :username do |n|
    "Pekka#{n}"
  end

  factory :user do
    username { generate :username }
    password { "Foobar1" }
    password_confirmation { "Foobar1" }
  end

  # ...
end
Now the names of the users created by sequential FactoryBot.create(:user) factory calls would be Pekka1, Pekka2, Pekka3 ...
However, don't change your factory to this form as it will break part of this week's tests!
Hopefully you've made a routine of using debugger. Because tests are also normal Ruby code, binding.pry can also be used in both the test code and the code to be tested. The database status of the testing environment can be surprising sometimes, as you have seen in the examples above. In case of problems you should definitely stop your test code with the debugger and check whether the state of the objects to test corresponds to what you expected.
With rspec you can also execute individual tests or describe blocks. Eg. the following would execute only the test starting from line 108 of file user_spec.rb:
rspec spec/models/user_spec.rb:108If/when you ran into problems:
- don't run all tests, limit execution to only problematic tests
- use debugger
This and the following exercise might be challenging. It is not essential that you make these two exercises if you want to continue with the material of the rest of the week, so do not get stuck here. You can also do them after you are done with the others.
Make the method
favorite_stylefor theUserobject in a TDD style. The method should return the style whose beers have received the highest average rating from the user.Add information about the user's favourite style to their page.
Do not do everything with one method (unless you solve the problem at database level with ActiveRecord or another elegantly compact solution), instead, define the suitable auxiliary methods! If you notice that you method is more than 6 lines long, you are doing either too much or something too complicated, so refactor your code. Ruby's collections have various auxiliary methods which might be useful for the exercise, see https://docs.ruby-lang.org/en/3.2/Enumerable.html
Make now the method
favorite_breweryfor theUserobject in a TDD style. The method should return the brewery whose beers have received the highest average rating from the user.Add information about the user favourite brewery to their page.
The methods
favorite_breweryandfavorite_styleare similar, and most likely more or less copy-paste. On week 5 we will have an example of cleaning up code.
We will move to program-level testing now. You are going to write automatic tests which use the application through the browser as normal users do. The de-facto solution for browser level testing with applications on Rails is Capybara https://github.com/jnicklas/capybara. The tests themselves are written in Rspec still, Capybara provides you with the browser simulation for the Rspec tests.
Capybara is by default configured into the application. Add the helper library launchy to the Gemfile (in test scope), so your test scope should look like what is written below:
group :test do
  gem 'rspec-rails', '~> 6.0.0.rc1'
  gem 'factory_bot_rails'
  gem "capybara"
  gem "selenium-webdriver"
  gem "webdrivers"
  gem 'launchy'
end
In order to set up the gems, you will have to execute the command bundle install.
You are ready now for your first browser-level test.
It is common to place the browser-level tests in the folder spec/features. Unit tests are usually organised so that the tests for each class are put in their own file. It is not always so clear how user-level tests which are executed through the browser should be organised. One option is using a file for each controller, another option is dividing the tests in different files according to the different functionalities of the system.
Get started by defining the tests for your breweries functionality, and create the file spec/features/breweries_page_spec.rb:
require 'rails_helper'

describe "Breweries page" do
  it "should not have any before been created" do
    visit breweries_path
    expect(page).to have_content 'Listing breweries'
    expect(page).to have_content 'Number of breweries: 0'
  end
end
The test will start navigating to the brewery list using the method visit. As you will see, Rails path helpers are used by Rspec tests too. After doing this, it checks whether the rendered page contains the text 'Listing breweries' and whether it tells the brewery number is 0 – the text 'Number of breweries: 0'. Capybara sets the page where the test currently is into the page variable.
While testing, there will be a (great) amount of situations where it is useful seeing the HTML source code of the page which corresponds to the page variable. This is possible adding the command puts page.html to the test.
Another option is providing the test with the command save_and_open_page, which saves and opens the page in a default browser. In Linux, you will have to define the browser using the environment variable BROWSER. For instance, you can define Chrome in the department computers with the command:
export BROWSER='/usr/bin/chromium-browser'
The definition will be enforced only in the shell where you make it. If you want to make it persistent, add it in the file ~/.bashrc
For both puts page.html and save_and_open_page command to work they need to be placed before the last line of test. In this test both could be placed even on the first line.
Now execute the test as usual with rspec spec. If you want to execute only this newest test, remember that you can limit what tests are to be run by eg.:
rspec spec/features/breweries_page_spec.rb
** The test most likely fails.** Figure out why and fix either the test or the text on the page. Using the command save_and_open_page is highly recommended!
Add a test for a situation where there are three breweries in the database:
it "lists the existing breweries and their total number" do
  breweries = ["Koff", "Karjala", "Schlenkerla"]
  breweries.each do |brewery_name|
    FactoryBot.create(:brewery, name: brewery_name)
  end

  visit breweries_path

  expect(page).to have_content "Number of breweries: #{breweries.count}"

  breweries.each do |brewery_name|
    expect(page).to have_content brewery_name
  end
end
Also add a test to make sure that you can access a brewery page by clicking a link in the page with breweries. Make use of Capybara click_link method, which helps to click on a page links.
it "allows user to navigate to page of a Brewery" do
  breweries = ["Koff", "Karjala", "Schlenkerla"]
  year = 1896
  breweries.each do |brewery_name|
    FactoryBot.create(:brewery, name: brewery_name, year: year += 1)
  end

  visit breweries_path

  click_link "Koff"

  expect(page).to have_content "Koff"
  expect(page).to have_content "Established at 1897"
end
The test wil go through if the text on the page matches the tests. In case of problems you should add the command save_and_open_page in the test and check visually the contents of the page opened by the test.
In the two last tests, the beginning is the same – you create three breweries first and then navigate to the breweries page.
You find below the refactored result, where the tests containing the same initiations are moved to their own describe chunk, where the before :each chunk has been defined to initiate them.
require 'rails_helper'

describe "Breweries page" do
  it "should not have any before been created" do
    visit breweries_path
    expect(page).to have_content 'Listing breweries'
    expect(page).to have_content 'Number of breweries: 0'

  end

  describe "when breweries exists" do
    before :each do
      # So that the variable is visible inside the it block, the name must start with @
      @breweries = ["Koff", "Karjala", "Schlenkerla"]
      year = 1896
      @breweries.each do |brewery_name|
        FactoryBot.create(:brewery, name: brewery_name, year: year += 1)
      end

      visit breweries_path
    end

    it "lists the breweries and their total number" do
      expect(page).to have_content "Number of breweries: #{@breweries.count}"
      @breweries.each do |brewery_name|
        expect(page).to have_content brewery_name
      end
    end

    it "allows user to navigate to page of a Brewery" do
      click_link "Koff"

      expect(page).to have_content "Koff"
      expect(page).to have_content "Established at 1897"
    end

  end
end
Notice that the before :each inside the describe chunk is executed once before each test defined under describe and each test starts in a situation where the database is empty.
Also note that if you must refer to variables created inside the before :each block from inside a test (i.e. it block) the variable names must start with the @ character.
Move to user functionality, create the file spec/features/users_page_spec.rb for this. Get started with a test to check whether users can log in the system:
require 'rails_helper'

describe "User" do
  before :each do
    FactoryBot.create :user
  end

  describe "who has signed up" do
    it "can signin with right credentials" do
      visit signin_path
      fill_in('username', with: 'Pekka')
      fill_in('password', with: 'Foobar1')
      click_button('Log in')

      expect(page).to have_content 'Welcome back!'
      expect(page).to have_content 'Pekka'
    end
  end
end
The test demonstrate an interaction with the form, the command fill_in looks for a text field based on the id field and inputs the parameter value. As you might have guessed, click_button searches for a button in the page and clicks on it.
Notice the before :each chunk in the test, which uses FactoryBot to create a User object before each test. Signing up would not work without the object, because the database is reset before each test execution.
More examples about various topics such as how to look for page elements using forms can be found in Capybara documentation, in the section The DSL, see https://github.com/jnicklas/capybara#the-dsl.
Implement a couple of tests more for user. The input of a wrong password should redirect back to the sign-in page:
  describe "who has signed up" do
    # ...

    it "is redirected back to signin form if wrong credentials given" do
      visit signin_path
      fill_in('username', with: 'Pekka')
      fill_in('password', with: 'wrong')
      click_button('Log in')

      expect(current_path).to eq(signin_path)
      expect(page).to have_content 'Username and/or password mismatch'
    end
  end
The tests use the method current_path which returns the path where the test execution has led to when the method is called. The method helps to make sure the user is redirected back to the sign-in page if signing in failed.
It is not always so clear to what extent you should test your application business logic through browser-level tests. At least testing the logic to find out the user object favourite beer, brewery, and beer style with unit tests is sensible.
User-level tests can be used for instance to make sure pages show the same situation that there is in the database. So for instance, in your brewery page test you generated three breweries and tested that they are all rendered in the brewery list.
It makes sense to test that you can add and remove things on the pages, too. The test below for instance will make sure when a new user registers, the number of users in the system increases by one:
it "when signed up with good credentials, is added to the system" do
  visit signup_path
  fill_in('user_username', with: 'Brian')
  fill_in('user_password', with: 'Secret55')
  fill_in('user_password_confirmation', with: 'Secret55')

  expect{
    click_button('Create User')
  }.to change{User.count}.by(1)
end
Notice that the form fields were defined in the fill_in methods slightly differently than in the sign-in form. The fields' IDs can and should always be checked by looking at the page source code choosing view page source in browser.
The test expects that clicking the Create user button will cause the number of saved users in the database to increase by one. The syntax is brilliant, but it will take some time before Rspec's strongly expressive language will start to feel familiar.
You will have to take into consideration a small detail, that is, the method expect can be given parameters in two ways.
If the method has to test a value, the value is given between brackets, like expect(current_path).to eq(signin_path). Instead, if it tests the impact of an operation (like the one above, click_button('Create User')) on the value of an application object (User.count), the operation to execute is given to expect in a code chunk.
Read more about this in Rspec documentation https://rspec.info/features/3-12/rspec-expectations/built-in-matchers/
So the last test checked whether the operation executed at browser level created an object in the database. Should you make a separate test to see whether a username can sign in the system? Maybe. After all, the previous test did not questioned whether the user object was saved in the database correctly.
The scope for testing is so wide, however, that a complete analysis is impossible and tests should be written in first place for things which might break.
Create a new test for beer rating. Create the file spec/features/ratings_page_spec.rb for the test.
require 'rails_helper'

describe "Rating" do
  let!(:brewery) { FactoryBot.create :brewery, name: "Koff" }
  let!(:beer1) { FactoryBot.create :beer, name: "iso 3", brewery:brewery }
  let!(:beer2) { FactoryBot.create :beer, name: "Karhu", brewery:brewery }
  let!(:user) { FactoryBot.create :user }

  before :each do
    visit signin_path
    fill_in('username', with: 'Pekka')
    fill_in('password', with: 'Foobar1')
    click_button('Log in')
  end

  it "when given, is registered to the beer and user who is signed in" do
    visit new_rating_path
    select('iso 3', from: 'rating[beer_id]')
    fill_in('rating[score]', with: '15')

    expect{
      click_button "Create Rating"
    }.to change{Rating.count}.from(0).to(1)

    expect(user.ratings.count).to eq(1)
    expect(beer1.ratings.count).to eq(1)
    expect(beer1.average_rating).to eq(15.0)
  end
end
The test builds its brewery, two beers and a user with the method let! instead of let which we used earlier. In fact, the version without exclamation mark does not execute the operation immediately, but only once the code refers to the object explicitly. The object beer1 is mentioned only at the end of the code, so if you had created it with the method let, you would have run into a problem creating the rating, because its beer would have not existed in the database yet, and the corresponding select element would not have been found.
The code contained in the before chunk of the test helps users to sign in the system. Most probably, the same code chunk will be useful in various different test files. You had better extract the test code needed in various different places and make a module, which can be included in all test files which need it. Create a module Helpers in a file named helpers.rb in the specs directory and put the sign-in code there:
module Helpers

  def sign_in(credentials)
    visit signin_path
    fill_in('username', with:credentials[:username])
    fill_in('password', with:credentials[:password])
    click_button('Log in')
  end
end
So the method sign_in takes a hash parameter with the user name and password.
In the file rails_helper.rb, add this line immediately after the other require commands:
require 'helpers'
Start to use the module method in your tests with the include Helpers command:
require 'rails_helper'

include Helpers

describe "Rating" do
  let!(:brewery) { FactoryBot.create :brewery, name: "Koff" }
  let!(:beer1) { FactoryBot.create :beer, name: "iso 3", brewery:brewery }
  let!(:beer2) { FactoryBot.create :beer, name: "Karhu", brewery:brewery }
  let!(:user) { FactoryBot.create :user }

  before :each do
    sign_in(username: "Pekka", password: "Foobar1")
  end
and
require 'rails_helper'

include Helpers

describe "User" do
  before :each do
    FactoryBot.create :user
  end

  describe "who has signed up" do
    it "can signin with right credentials" do
      sign_in(username: "Pekka", password: "Foobar1")

      expect(page).to have_content 'Welcome back!'
      expect(page).to have_content 'Pekka'
    end

    it "is redirected back to signin form if wrong credentials given" do
      sign_in(username: "Pekka", password: "wrong")

      expect(current_path).to eq(signin_path)
      expect(page).to have_content 'Username and/or password mismatch'
    end
  end

  it "when signed up with good credentials, is added to the system" do
    visit signup_path
    fill_in('user_username', with: 'Brian')
    fill_in('user_password', with: 'Secret55')
    fill_in('user_password_confirmation', with: 'Secret55')

    expect{
      click_button('Create User')
    }.to change{User.count}.by(1)
  end
end
Letting an auxiliary method be in charge of sign-in implementation will also improve the test clarity, and if the sign-up page functionality changes later on, maintaining the tests will be easy, because changes will be required only in one place.
Moving the previously defined methods create_beer_with_rating and create_beers_with_many_ratings (in user_spec.rb) to the Helpers module as well might be smart, especially if we'll be needing these functionalities in other places as well.
Make a test to verify that you can add a beer to the system through the www-page, if the beer name receives a valid value (meaning that it is not empty).
Also make a test to verify that the browser is redirected to the beer creation page and is shown the appropriate error message, if the beer name is not valid, and that in this case, nothing is stored in the database.
Note that the test must first create at least one brewery to make creating beers possible.
ATTENTION: your code might contain a bug in situations, when you try to create a beer with an invalid name. Check out the functionality through your browser. The cause is explained at the beginning of week, https://github.com/mluukkai/WebPalvelinohjelmointi2023/blob/main/english/week4.md#some-things-to-keep-in-mind. Fix the bug in your code.
Keep in mind you can use the command
save_and_open_pageif you run into problems!
Make a test to verify that the ratings in the database are shown in the page ratings together with their total amount. If their amount is not shown, fix this.
Hint*: one way you can make your test is creating ratings in the database with FactoryBot first. Then you can test the content of the page 'ratings' with Capybara.
Keep in mind you can use the command
save_and_open_pageif you run into problems!
Make a test to verify the user ratings are shown in their page. So the user page should to show all the user's personal ratings but not the ratings made by other users.
Remember that you will have to give
user_path(user)to thevisitmethod. This will help the method to define the path and to navigate to theuserpage. The commonly used shorter form (the object itself) does not work with Capybara.
Make a test to make sure when a user deletes their own rating, the rating will be removed from the database.
If there are various links with the same name,
click_linkwill not work. You will have to specify what link to choose, and that might not be the easiest task. Help is found from capybara documentation and here.Even if the solution itself is compact, this exercise might not be the easiest. If you get stuck, first do the rest of the week and/or ask for help in Discord.
If you did the exercises 3-4, extend the user page so that it will show the user favourite style as well as favourite brewery. Also, make capybara tests for this. Functions using complex computations do not require tests, because the unit tests ensure the functionality well enough.
The test line coverage measures the percentage of the program code lines that is executed when tests are executed. It is easy to measure the test coverage on Rails with the gem simplecov, see https://github.com/colszowka/simplecov
Get started with the gem by adding the following line to the Gemfile test scope
gem 'simplecov', require: false
Attention instead of a normal bundle install command you might have to execute the command bundle update at this point, in order to set up all the gem versions that are mutually fit.
In order to start using simplecov, you should add the following code in the first two lines of the file rails_helper.rb:
require 'simplecov'
SimpleCov.start('rails')
The run the tests (see the note above if you have problems here)
$ rspec spec
..................................

Finished in 1.25 seconds (files took 1.95 seconds to load)
34 examples, 0 failures

Coverage report generated for RSpec to /Users/mluukkai/opetus/ratebeer/coverage. 161 / 333 LOC (48.35%) covered.
The tests line coverage is 48.35 percent. You find a more detailed report opening the file coverage/index.html with your browser. As it is shown by the picture, there are still large parts of the program which are tested poorly, especially as far as the controllers are concerned:
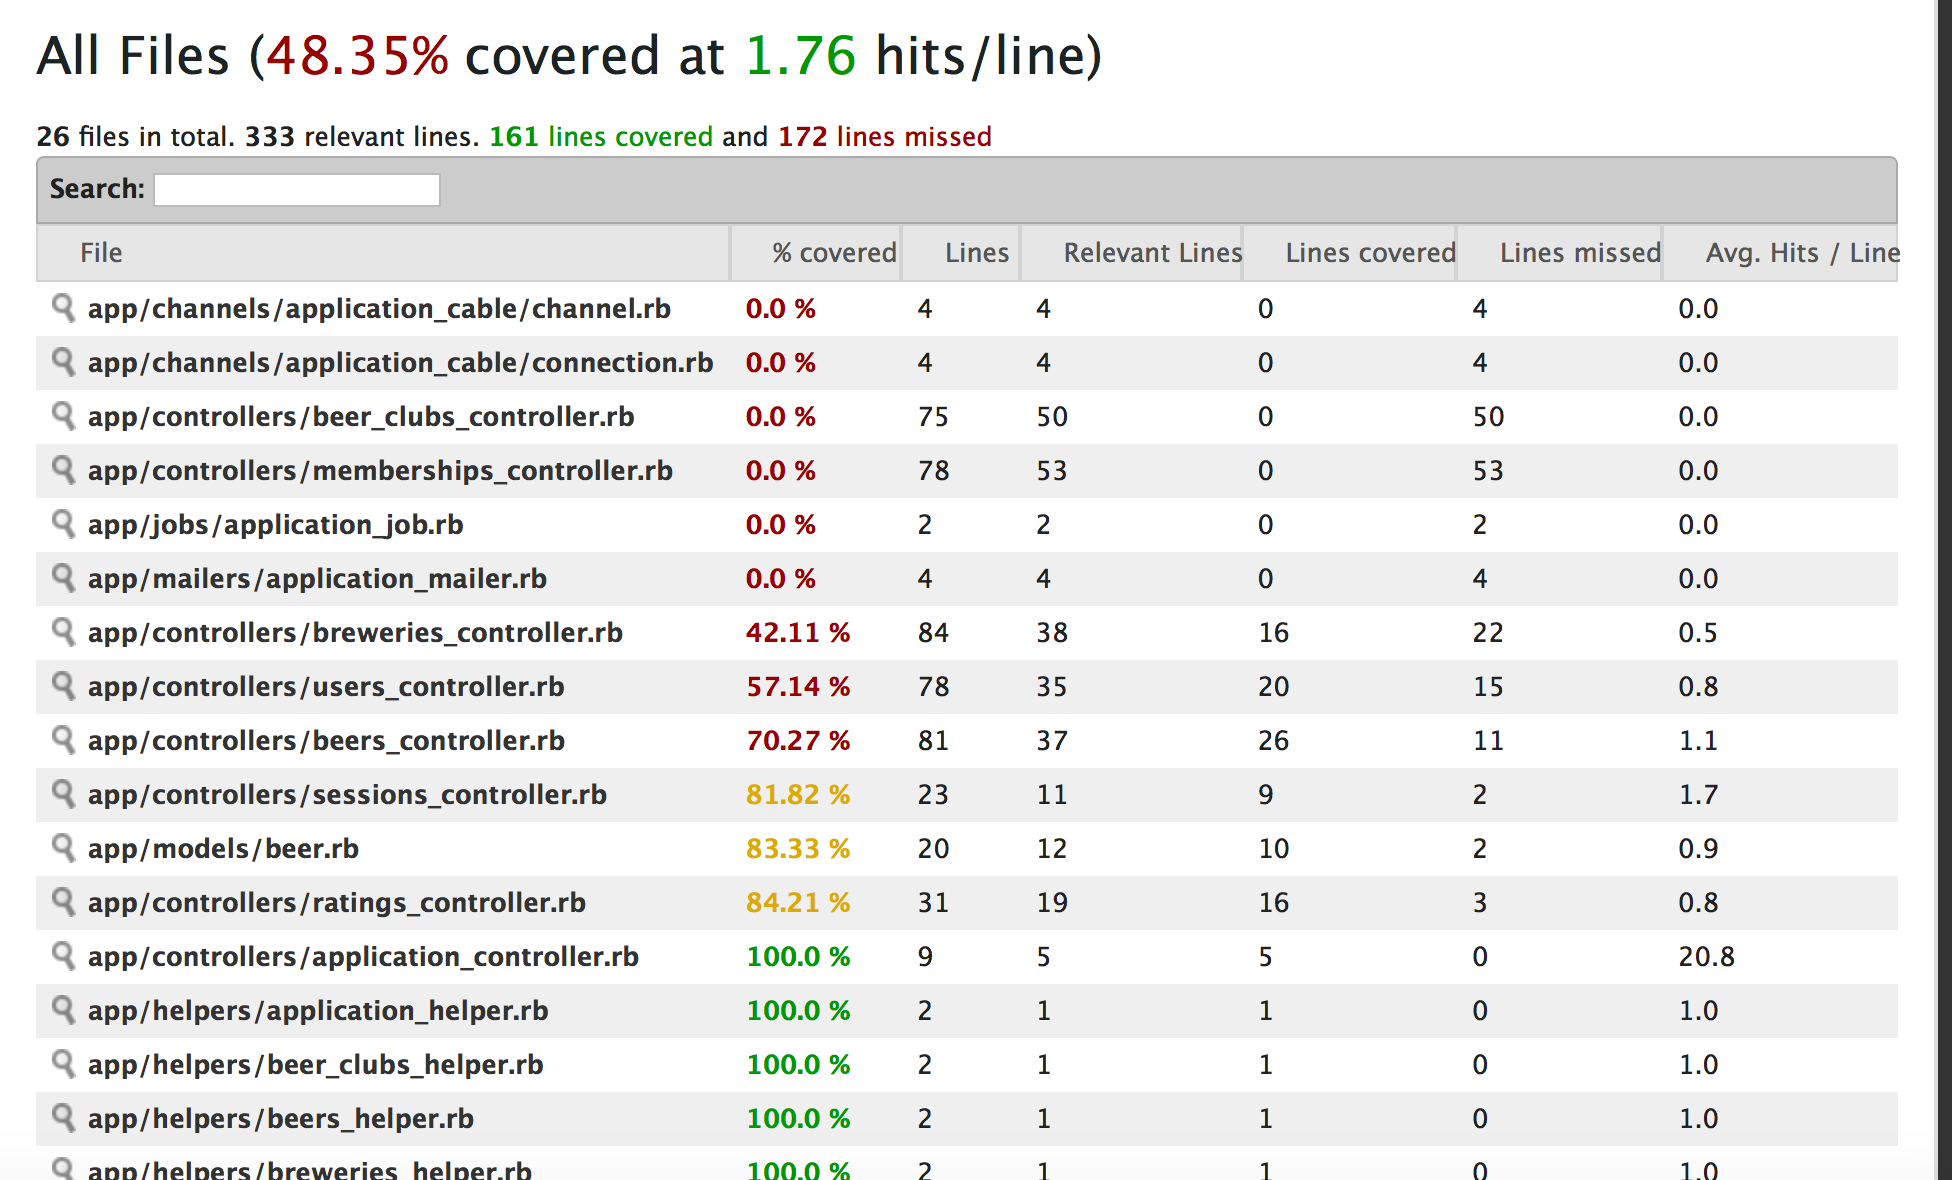
Wide-ranging tests does not mean that you are testing smart things, of course. Because it is easy to measure, it is better than nothing and it shows the most evident issues, at least.
Start to use Simplecov in your code. Examine the report (by clicking yellow and red colored classes) to see which lines of your code are not tested at all.
With the term continuous integration we mean the custom where the program developers integrate their code changes into a common development branch as often as possible. The idea is to make sure the program's development version works all the time, thus eliminating the difficult, separate integration stage. The continuous integration requires a wide-ranging group of automatic tests to work. It is common when it comes to continuous integration to use a centralized server, which pays attention to the repository where the development version is located. When developers integrate their code in the developing version, the integration server sees the change, builds the code, and runs the tests. If the tests fail, the integration server reports this in a way or in another to whom it may concern.
GitHub offers Github Actions for developers' use. GitHub Actions has gained much ground among other CI services. Notable motivations for using GitHub Actions is that it is directly integrated to GitHub and the Actions marketplace which contains more actions that can be implemented to your CI. More on these later.
Projects stored in GitHub are easy to set under GitHub Actions' watch.
Doing this and the couple following exercises is not vital for continuing the week. You can also do these after the other exercises.
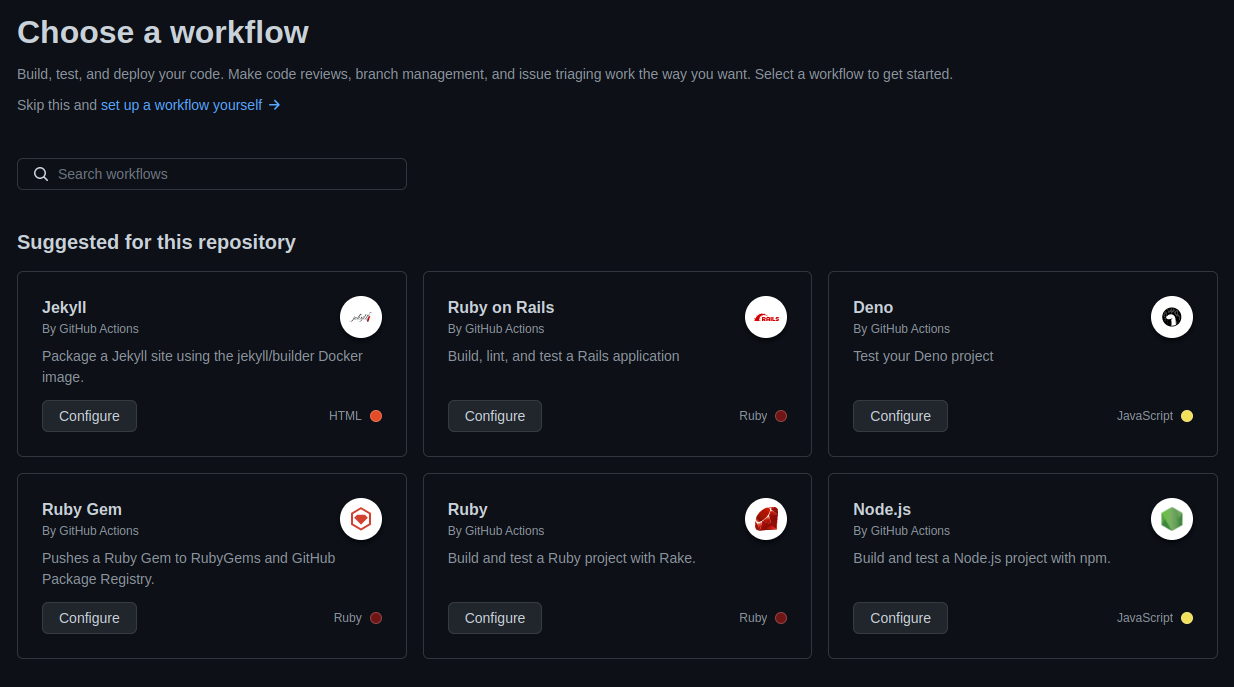
Go to your project repository and press Actions from the topbar. If you have no pre-existing actions, github will take you directly to a page which suggests ready templates.
Select Ruby on Rails by pressing the Configure button. Github will redirect you to a page where you'll edit a file called
rubyonrails.yml. This workflow file tells GitHub Actions what the CI should do.However, the file contents won't work as they are so to begin with, let's change the contents to following:
# This workflow uses actions that are not certified by GitHub. They are
# provided by a third-party and are governed by separate terms of service,
# privacy policy, and support documentation.
#
# This workflow will install a prebuilt Ruby version, install dependencies, and
# run tests and linters.
name: "Ruby on Rails CI"
on:
  push:
    branches: [ "main" ] # Jos repositoriosi päähaara ei ole main, muuta nämä
  pull_request:
    branches: [ "main" ]
jobs:
  test:
    runs-on: ubuntu-22.04
    services:
      postgres:
        image: postgres:11-alpine
        ports:
          - "5432:5432"
        env:
          POSTGRES_DB: rails_test
          POSTGRES_USER: rails
          POSTGRES_PASSWORD: password
    env:
      RAILS_ENV: test
      DATABASE_URL: "postgres://rails:password@localhost:5432/rails_test"
    steps:
      - name: Checkout code
        uses: actions/checkout@v3
      # Add or replace dependency steps here
      - name: Install Ruby and gems
        uses: ruby/setup-ruby@v1
        with:
          bundler-cache: true
      - name: Run tests
        run: bundle exec rspec
The difference to the default version is that we are using newer versions of actions that set-up both Ubuntu and Ruby to make the compatible with Ruby version 3.1.2.
After changing the contents, select Start commit and add the file to your version control. GitHub Actions will start automatically and execute tests.
If some tests fail in GitHub Actions, fix them!
Let's also add Rubocop to GitHub Actions. Let's take advantage of an action already found at the marketplace. We can add it to our own actions.
Add the following to
rubyonrails.yml:lint: runs-on: ubuntu-22.04 steps: - name: Checkout code uses: actions/checkout@v3 - name: Install Ruby and gems uses: ruby/setup-ruby@v1 with: bundler-cache: true - name: RuboCop Linter Action uses: andrewmcodes-archive/[email protected] env: GITHUB_TOKEN: ${{ secrets.GITHUB_TOKEN }}GITHUB_TOKEN row uses an automatic token provided by GitHub which enables authenticating GitHub applications
Now GitHub should be able to run both the tests and Rubocop everytime changes are committed to the repository.
Continuous delivery is a practice one more step beyond the continuous integration (see http://en.wikipedia.org/wiki/Continuous_delivery). A part of it is continuous deployment, that is the idea to deploy the code to a production-like environment or even straight to production in the best case, every time that the code is integrated.
Especially for Web application, continuous deployment can be an operation which does not require too much effort.
Doing this exercise is not vital for continuing the week. You can also do it after the other exercises.
Implement a continuous deployment of your application to Heroku or Fly.io.
Instructions for Fly.io: https://fly.io/docs/app-guides/continuous-deployment-with-github-actions/
Instruction for Heroku: https://devcenter.heroku.com/articles/github-integration
Attention: If using Heroku, remember to choose "Wait for CI to pass before deploy".
You can check if your CI/CD pipeline works by making some change to your application, committing the changes to GitHub and seeing whether that change happens also in your application in Heroku/Fly.io. In Heroku, from tab Latest activity you can a find logs on what happens in your pipeline.
In addition to the test coverage, you should also pay attention to the code quality. Codeclimate (https://codeclimate.com) is a SaaS which allows you to generate various quality metrics for your Rails code.
Doing this exercise is not vital for continuing the week. You can also do it after the other exercises.
Codeclimate is free for opensource projects. Sign in to Codeclimate at https://codeclimate.com/login/github/join and add your project in the Open source section.
Codeclimate will complain about the repetitions in your code. It refers however to the somewhat bad code created by Rails scaffold, so you can leave it where it is.
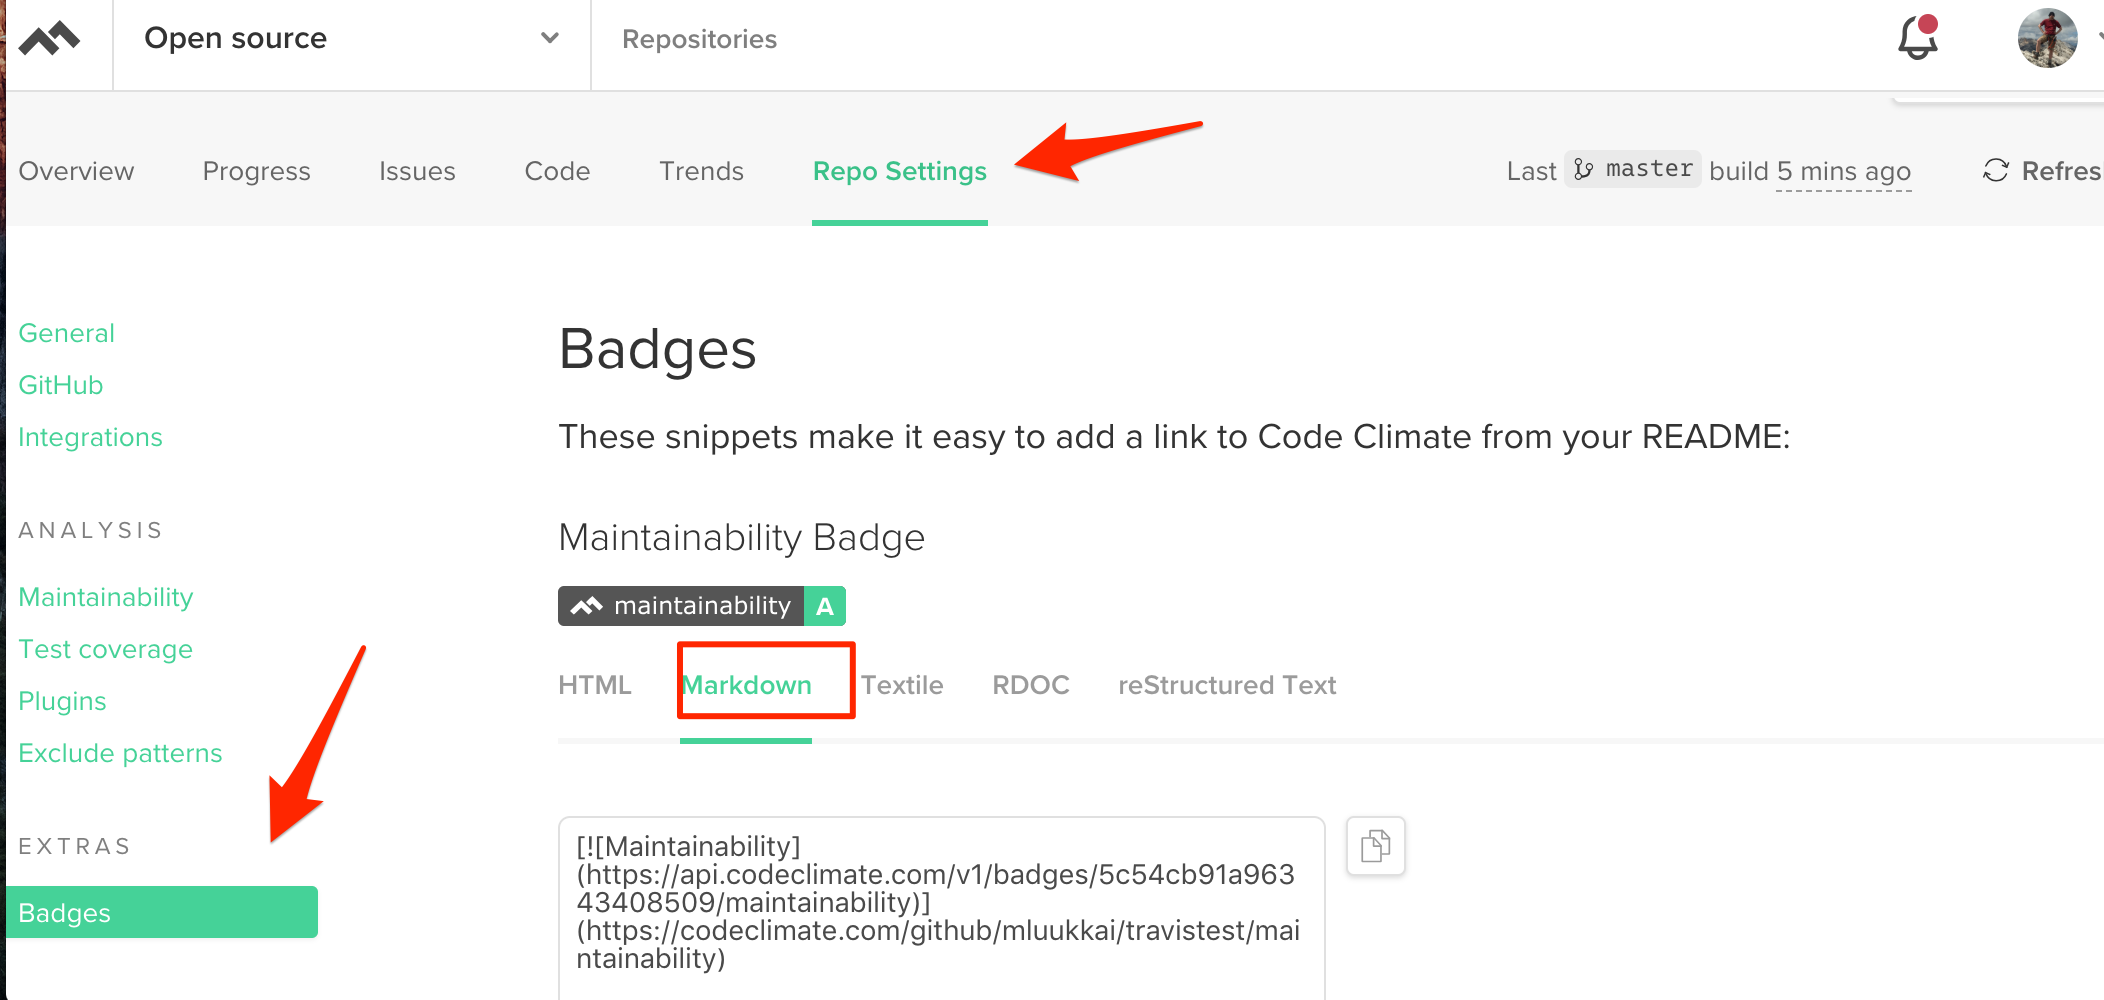
Link the quality metric report to your repository README file, too:
To find the link:
Now codeclimate will also put enough pressure on you as the application developer to keep high quality code all the time!
The amount of services to help the application developer's life increases from day to day. Instead of or in addition to Simplecov, you can delegate the test coverage report to Coveralls https://coveralls.io/ cloud service. This time we will skip that.
Leave tests for a moment and go back to a couple of the previous themes. In week 2, you defined your application with http basic authentication so that users could delete breweries only with the admin password. In week 3 you defined your application functionality so that deleting ratings was not possible for others than the user who created that rating. Instead, things like creating, removing, and editing beer clubs and beers are possible even without signing in, so far.
Put http basic authentication aside, and change your application so that beers, breweries, and beer groups can be created, edited and deleted only by signed-in users.
Get started by removing the http basic authentication. So remove the following line from the brewery controller
before_action :authenticate, only: [:destroy]
as well as the method authenticate. Anyone can again remove breweries, now.
Start to add a protection.
It is easy to remove beers, beer clubs, and breweries editing and creation links from the sight if users are not signed in the system.
For instance, you can remove the beers creation link for non-signed-in users from the end of the page of the view views/beers/index.html.erb:
<% if not current_user.nil? %>
  <%= link_to "New beer", new_beer_path %>
<% end %>
So the creation link is shown only if the current_user is not nil. And you can make use of the more compact form of if:
<%= link_to('New Beer', new_beer_path) if not current_user.nil? %>Now, the link_to method will be executed – that is, the link code will be rendered – only if the if condition is true. 'If not' conditions don't make a too good Ruby code, a better option would be using unless:
<%= link_to('New Beer', new_beer_path) unless current_user.nil? %>So the link is rendered unless the current_user is nil.
Actually, unless would be useless now, because nil is interpreted as false in Ruby, so the neatest form for the command would be
<%= link_to('New Beer', new_beer_path) if current_user %>You will remove the adding, removing, and editing links soon, before doing it however, have a look at the protection at controller level. In fact, even though you removed all links to restricted actions, nothing prevents users from making a straight HTTP request to the application, and in this way doing an action which should be restricted to signed-in users.
So you will still have to make sure at controller level that if users try for some reason to do a forbidden action straight with HTTP, the action will not be executed.
We decide to direct users to the signed-in page if they try to do restricted actions.
Define the following method for the class ApplicationController:
def ensure_that_signed_in
  redirect_to signin_path, notice: 'you should be signed in' if current_user.nil?
end
So if users call the method without being signed-in, they are redirected to the signed-in page. Because the method is located in the class ApplicationController and all the controllers inherit this class, the method will be available for all controllers.
Add the method as a "before" filter (see http://guides.rubyonrails.org/action_controller_overview.html#filters and https://github.com/mluukkai/WebPalvelinohjelmointi2023/blob/main/english/week2.md#a-simple-protection) for beer, brewery, and beer club controllers for all the methods except for index and show:
class BeersController < ApplicationController
  before_action :ensure_that_signed_in, except: [:index, :show]

  #...
end
For instance, when a beer is being created Rails executes the filter ensure_that_signed_in before the method create, so the filter redirects to the sign-in page users who did not sign in. If the user had signed in the system, the filter would not have done anything, and the new beer would have been created normally.
Try out that the changes work with your browser. So non-signed-in users are redirected to the sign-in page when they do any action which is restricted with the "before" filter, but signed-in users can access the page smoothly.
Using "before" filters, prevent non-signed-in users from doing any action connected to breweries and beer clubs except listing them and showing the information of singular resources (so the methods
showandindex)When you have made sure that the functionality works fine, remove from the views all superfluous creating, removing, and editing links for non-signed-in users.
The extensions done before exercise 15 have broken some of you tests. Fix the tests
If you want, you can polish the application views. For instance, you can remove the creating, deleting and editing links from non-signed-in users. These changes are not compulsory and are not excepted to have been done in the following weeks.
Commit all your changes and push the code to Github. Deploy to the newest version of Heroku or Fly.io, too.
Mark the exercises you have done at https://studies.cs.helsinki.fi/stats/courses/rails2023.
And towards next week: week 5