[BioImage Analysis]: Cell segmentation #42
Comments
|
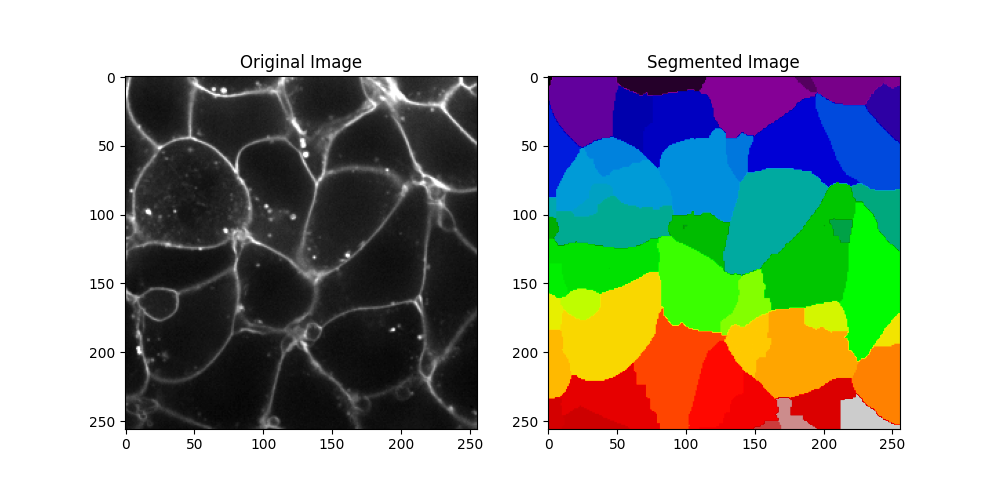
This message was generated by git-bob (version: 0.11.0, model: gpt-4o-2024-08-06, log), an experimental AI-based assistant. It can make mistakes and has limitations. Check its messages carefully. To tackle the issue of cell segmentation using a seeded watershed algorithm without pre-existing seeds, we can utilize local minima detection within the image to generate seeds for segmentation. Here's a proposed Jupyter Notebook code that employs the mentioned libraries for this purpose: import numpy as np
from skimage.io import imread
import napari_simpleitk_image_processing as nsitk
import napari_segment_blobs_and_things_with_membranes as nsbatwm
import stackview
import matplotlib.pyplot as plt
# Load the image
image_url = "https://github.com/user-attachments/assets/3b813c91-e001-4df0-84e2-3ca1045fdc1b"
image = imread(image_url)
# Pre-process the image using a Gaussian blur to smoothen out noise
smoothed_image = nsbatwm.gaussian_blur(image, sigma=1)
# Detect local minima to be used as seeds
seeds = nsitk.regional_maxima(smoothed_image)
# Perform the watershed algorithm with local minima as seeds
segmented_image = nsbatwm.local_minima_seeded_watershed(smoothed_image, spot_sigma=3, outline_sigma=1)
# Display the original and segmented images using stackview
stackview.insight(image)
stackview.imshow(segmented_image, labels=True)
# Optionally, display images side by side using matplotlib for comparison
fig, axes = plt.subplots(nrows=1, ncols=2, figsize=(10, 5))
axes[0].imshow(image, cmap='gray')
axes[0].set_title('Original Image')
axes[1].imshow(segmented_image, cmap='nipy_spectral')
axes[1].set_title('Segmented Image')
plt.show()This code will automatically segment the membrane-like structures and display the results, allowing for further exploration and refinement of the segmentation process. |
|
Ok cool! Create a notebook and make sure it saves a visualization of the label image as .png file. git-bob try to implement this |
|
This message was generated by git-bob (version: 0.11.0, model: gpt-4o-2024-08-06, log), an experimental AI-based assistant. It can make mistakes and has limitations. Check its messages carefully. In response to Github Issue #42 regarding cell segmentation using a seeded watershed algorithm, I implemented a solution that involves processing an uploaded fluorescence microscopy image to detect cellular outlines. The solution included creating a Jupyter Notebook for performing and visualizing the segmentation using napari and scikit-image. The notebook downloaded the image, applied a Gaussian blur to smooth the noise, detected local minima to be used as seeds, and performed a watershed algorithm for segmentation. The resultant segmented images and comparisons are saved as PNG files.
|


Analysis Goal (What should be done / analysed?)
I'd like to create a notebook for segmenting the image below. I think a seeded watershed algorithm can do it. Unfortunately, I do not have seeds or any other image to derive seeds from.
Image Upload
📎 Drag & drop your microscopy image here (JPG, PNG, GIF, e.g. 512x512 pixels, 2D only).
Python Tools
Note: Your images and the text you enter here may be sent to OpenAI's online service where we use a large language model to answer your request.
Do not upload any data you cannot share openly. Also do not enter any private or secret information. By submitting this Github issue, you confirm that you understand these conditions.
git-bob comment on this.
Detailed instructions for bio-image analysis using Python (feel free to modify)
Detailed Python Bio-image Analysis instructions
If the following tasks are requested, we can adapt the code corresponding snippets:
Viewing images using stackview
When you use stackview, you always start by importing the library:
import stackview.Showing an image stored in variable
imageand a segmented image stored in variablelabelson top with animated blending. Also works with two images or two label images.stackview.animate_curtain(image, labels)
Showing an animation / timelapse image stored in variable
image.stackview.animate(image)
Save an animation / timelapse stored in variable
imagewith specified frame delay to a file.stackview.animate(image, filename="output.gif", frame_delay_ms=100)
Display an image stored in a variable
image(this also works with label images). Prefer stackview.insight over matplotlib.pyplot.imshow!stackview.insight(image)
Display an image as a label image explicitly.
stackview.imshow(image, labels=True)
Processing images using the napari-simpleitk-image-processing (nsitk) Python library.
When you use nsitk, you always start by importing the library:
import napari_simpleitk_image_processing as nsitk.When asked for specific tasks, you can adapt one of the following code snippets:
Apply a median filter to an image to remove noise while preserving edges.
nsitk.median_filter(image, radius_x=2, radius_y=2)
Applies Otsu's threshold selection method to an intensity image and returns a binary image (also works with intermodes, kittler_illingworth, li, moments, renyi_entropy, shanbhag, yen, isodata, triangle, huang and maximum_entropy instead of otsu).
nsitk.threshold_otsu(image)
Computes the signed Maurer distance map of the input image.
nsitk.signed_maurer_distance_map(binary_image)
Detects edges in the image using Canny edge detection.
nsitk.canny_edge_detection(image, lower_threshold=0, upper_threshold=50)
Identifies the regional maxima of an image.
nsitk.regional_maxima(image)
Rescales the intensity of an input image to a specified range.
nsitk.rescale_intensity(image, output_minimum=0, output_maximum=255)
Applies the Sobel operator to an image to find edges.
nsitk.sobel(image)
Enhances the contrast of an image using adaptive histogram equalization.
nsitk.adaptive_histogram_equalization(image, alpha=0.3, beta=0.3, radius_x=5, radius_y=5)
Applies a standard deviation filter to an image.
nsitk.standard_deviation_filter(image, radius_x=5, radius_y=5)
Labels the connected components in a binary image.
nsitk.connected_component_labeling(binary_image)
Labels objects in a binary image and can split object that are touching..
nsitk.touching_objects_labeling(binary_image)
Applies the Laplacian of Gaussian filter to find edges in an image.
nsitk.laplacian_of_gaussian_filter(image, sigma=1.0)
Identifies h-maxima of an image, suppressing maxima smaller than h.
nsitk.h_maxima(image, height=10)
Removes background in an image using the Top-Hat filter.
nsitk.white_top_hat(image, radius_x=5, radius_y=5)
Computes basic statistics for labeled object regions in an image.
nsitk.label_statistics(image, label_image, size=True, intensity=True, shape=False)
Computes a map from a label image where the pixel intensity corresponds to the number of pixels in the given labeled object (analogously work elongation_map, feret_diameter_map, roundness_map).
nsitk.pixel_count_map(label_image)
Processing images using napari-segment-blobs-and-things-with-membranes (nsbatwm)
If you use this plugin, you need to import it like this:
import napari_segment_blobs_and_things_with_membranes as nsbatwm.You can then use it for various purposes:
Denoise an image using a Gaussian filter
nsbatwm.gaussian_blur(image, sigma=1)
Denoise an image, while preserving edges:
nsbatwm.median_filter(image, radius=2)
Denoise an image using a percentile (similar to median, but free in choosing the percentile)
nsbatwm.percentile_filter(image, percentile=50, radius=2)
Determine the local minimum intensity for every pixel (also works with maximum)
nsbatwm.minimum_filter(image, radius=2)
Enhance edges
nsbatwm.gaussian_laplace(image, sigma=2)
Remove background from an image using the Top-Hat filter
nsbatwm.white_tophat(image, radius=2)
Remove background from an image using the Rolling-Ball method
nsbatwm.subtract_background(membranes, rolling_ball_radius=15)
Uses combination of Voronoi tesselation and Otsu's threshold method for segmenting an image
nsbatwm.voronoi_otsu_labeling(blobs, spot_sigma=3.5, outline_sigma=1)
Apply a Gaussian blur, Otsu's threshold for binarization and returns a label image
nsbatwm.gauss_otsu_labeling(blobs, outline_sigma=1)
Binarize an image using a threshold determined using Otsu's method (also works with li, triangle, yen, mean methods)
nsbatwm.threshold_otsu(blobs)
Split touching objects in a binary image
nsbatwm.split_touching_objects(binary, sigma=3.5)
Identify individual objects in a binary image using Connected Component labeling
nsbatwm.connected_component_labeling(binary)
Apply a Watershed algorithm to an an image showing membrane-like structures and a label image that serves as seeds for the watershed
nsbatwm.seeded_watershed(membranes_image, labeled_seeds)
Apply a Watershed algorithm to an image showing membrane-like structures. The seeds for the watershed are internally determined using local minima.
nsbatwm.local_minima_seeded_watershed(membrane_image, spot_sigma=10, outline_sigma=0)
Dilate labels to increase their size
nsbatwm.expand_labels(label_image, distance=1)
Smooths outlines of label images by determining the most popular label locally
nsbatwm.mode_filter(label_image, radius=10)
Remove labels that touch the image border
nsbatwm.remove_labels_on_edges(label_image)
Skeletonize labels
nsbatwm.skeletonize(labels)
Working with Pandas DataFrames
In case a pandas DataFrame, e.g.
dfis the result of a code block, just writedf.head()by the end so that the user can see the intermediate result.
Processing images with scikit-image (skimage)
Load an image file from disc and store it in a variable:
from skimage.io import imread
image = imread(filename)
Save an image file to disc:
from skimage.io import imwrite
imread(filename, image)
Expanding labels by a given radius in a label image works like this:
from skimage.segmentation import expand_labels
expanded_labels = expand_labels(label_image, distance=10)
Turn a label image into an RGB image, e.g. for saving as png:
from skimage import color
rgb_image = (color.label2rgb(labels, bg_label=0, kind='overlay')*255).astype('uint8')
Measure properties of labels with respect to an image works like this:
import pandas as pd
from skimage.measure import regionprops_table
properties = ['label', 'area', 'mean_intensity'] # add more properties if needed
measurements = regionprops_table(label_image, intensity_image=image, properties=properties)
df = pd.DataFrame(measurements)
The text was updated successfully, but these errors were encountered: