A libOBS filter plugin that detects faces and draws masks with the detected data.
-
Download cmake:
-
Get Visual Studio 2015 (vc14). When you install it, make sure you include the C++ stuff. libOBS is fixed at this version, so other versions of Visual Studio will not work.
-
Download dlib:
-
Download our fork of OBS Studio:
-
Download freetype:
-
Build obs-studio
- Follow the build instructions here:
-
Configure freetype.
You will need to turn off a bunch of options in freetype, because we don't need them.
- Edit freetype/include/freetype/config/ftmodule.h, and comment out all the lines, except for the truetype driver, names, and rendering modules:
FT_USE_MODULE( FT_Module_Class, autofit_module_class )
FT_USE_MODULE( FT_Driver_ClassRec, tt_driver_class )
//FT_USE_MODULE( FT_Driver_ClassRec, t1_driver_class )
//FT_USE_MODULE( FT_Driver_ClassRec, cff_driver_class )
//FT_USE_MODULE( FT_Driver_ClassRec, t1cid_driver_class )
//FT_USE_MODULE( FT_Driver_ClassRec, pfr_driver_class )
//FT_USE_MODULE( FT_Driver_ClassRec, t42_driver_class )
//FT_USE_MODULE( FT_Driver_ClassRec, winfnt_driver_class )
//FT_USE_MODULE( FT_Driver_ClassRec, pcf_driver_class )
//FT_USE_MODULE( FT_Module_Class, psaux_module_class )
FT_USE_MODULE( FT_Module_Class, psnames_module_class )
//FT_USE_MODULE( FT_Module_Class, pshinter_module_class )
//FT_USE_MODULE( FT_Renderer_Class, ft_raster1_renderer_class )
FT_USE_MODULE( FT_Module_Class, sfnt_module_class )
FT_USE_MODULE( FT_Renderer_Class, ft_smooth_renderer_class )
//FT_USE_MODULE( FT_Renderer_Class, ft_smooth_lcd_renderer_class )
//FT_USE_MODULE( FT_Renderer_Class, ft_smooth_lcdv_renderer_class )
//FT_USE_MODULE( FT_Driver_ClassRec, bdf_driver_class )
- Edit freetype/include/freetype/config/ftoption.h, and comment out the lines:
//#define FT_CONFIG_OPTION_USE_LZW

...

//#define FT_CONFIG_OPTION_USE_ZLIB

...

//#define FT_CONFIG_OPTION_MAC_FONTS
-
Run cmake in the facemasks folder. When you hit
CONFIGURE, you will get errors on fields you need to fill in:PATH_DLIB Path to the Dlib folder
PATH_OBS_STUDIO Path to the obs-studio folder.
PATH_FREETYPE Path to the freetype folder.
You will also want to turn on AVX:
USE_AVX_INSTRUCTIONS
It will default to SSE2, but setting to SSE4 or AVX is much faster.
You'll probably want to set these too:
DLIB_NO_GUI_SUPPORT - don't need it
DLIB_USE_CUDA - turn it off.
BUILD_SLOBS - Distributes to slobs instead of OBS Studio
DLIB_GIF_SUPPORT - don't need it DLIB_JPEG_SUPPORT - don't need it
If you have the Intel Math Kernel Library installed on your system, you might have DLIB_USE_BLAS or DLIB_USE_LAPACK turned on. Keep in mind that dlib links dynamically with these libs, so the MKL and TBB dlls will need to be found by slobs when it runs (for instance, by copying them into the slobs-client folder). I don't reccommend using these libs for this reason.
-
Once you have successfully configured and generated your Visual Studio project with cmake, you can compile the plugin, which will give you a distribution folder structure that mimics the structure in slobs. For example, if you built your files in the build64 folder:
build64/distribute/slobs/RelWithDebInfo/You can copy the files in manually, or set up symbolic links so you can easily hit F5 and debug from Visual Studio.
The plugin is an OBS filter plugin. It can be broken down into 2 main parts; the plugin, and the face detection. The face detection runs in its own thread, separate from OBS.
The plugin portion performs the following duties:
- Render the current frame to a texture
- Make 3 copies of the current frame, and add them to a circular buffer to be consumed by the face detection thread.
- Receive new face detection data from another circular buffer fed by the face detection thread.
- Using smoothing algorithms, the current state of faces is updated.
- According to the user's parameters, the current faces are rendered.
The face detection portion runs in its own thread. It consumes frame data from the circular buffer, does the face detection computation, then feeds the resulting face data to a circular buffer that is consumed by the rendering.
The process of face detection consists of four main operations:
-
Face Detection The faces are detected using the histogram of oriented gradients method (HOG) in Dlib. HOG's are trained feature descriptors used for detecting objects.
-
Tracking Once we have detected the faces we then use a cheaper method of object tracking to follow the face. This Dlib object tracking method takes an arbitrary rectangle in an image and follows it.
-
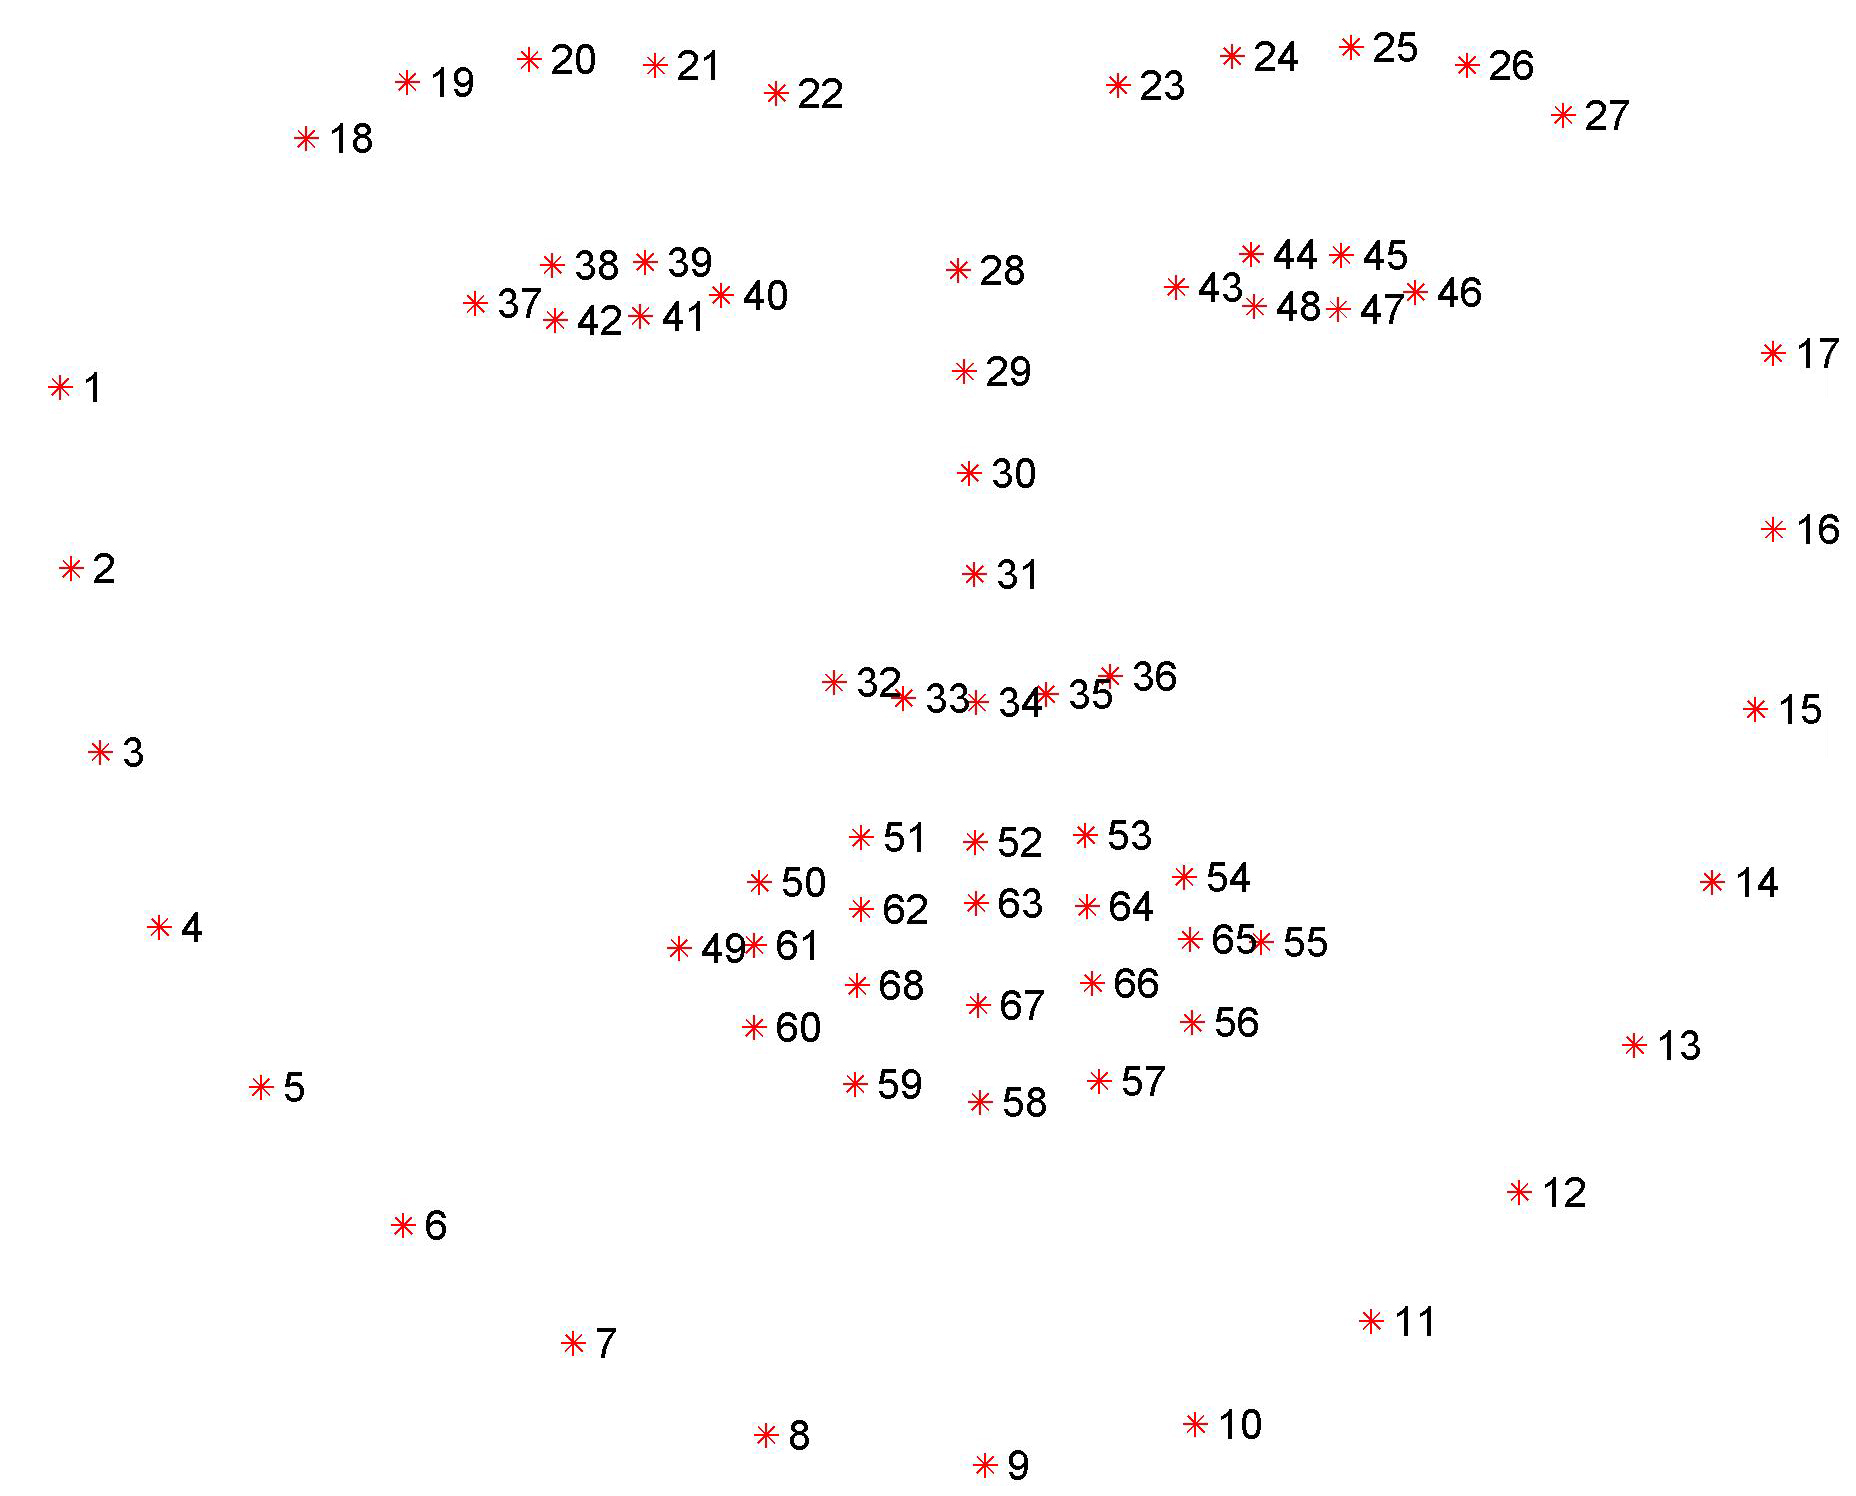
Facial Landmarks Given a rectangle that locates a face, we can then use Dlib's landmark detection algorithm which uses a trained regression tree solver to find 68 2D facial landmark points, corresponding to the Multi-PIE definition (see links below).
-
3D Pose Estimation A subset of key points are taken from the 2D facial landmark points, and using 3D points for an arbitrary rest pose, we use openCV's solvePnP method to obtain a 3D transformation. This transform can be used to render 3D objects in the scene that track the head movement.
-
Face Morphing The 68 landmark points are used to subdivide the video quad into a mesh. Another 11 points are calculated to form the head points, and then catmull rom smoothing is performed to smooth out the contours. Then the mesh is distorted to create face morphs.
The FaceDetect object manages these operations and a current state, so that it performs the face detection, then uses object tracking to follow the face, then does landmark/3d pose estimation, and then the mesh subdivision for face morphing.
-
3D Tracking of Facial Features for Augmented Reality Applications
-
Automatic filtering techniques for three-dimensional kinematics data using 3D motion capture system
-
A Collection of Useful C++ Classes for Digital Signal Processing
-
FaceWarehouse: a 3D Facial Expression Database for Visual Computing
-
3D Face Reconstruction with Geometry Details from a Single Image
-
Install FFmpeg: ffmpeg Add a Path of FFmpeg executable in the Environment Variables: The path should look like: %PATH_TO_YOUR_DIR%\ffmpeg-%VERSION%\bin
-
Install ImageMagick: ImageMagick Turn OFF the Install FFmpeg option during the instalation Turn ON the Install Legacy Utilities (e.g. convert) option during the instalation
-
Download and build giflossy: giflossy Note: Gifview is not needed Add a Path of the gifsicle executable in the Environment Variables: The path should look like: %PATH_TO_YOUR_DIR%\giflossy\src
-
Install SVN: SVN Turn ON the 'Command Line Clients Tool' option during the installation
-
Start/Restart Streamlabs-OBS
-
Add a Media Resource
- Ensure that Loop option is ON and Hide source when playback ends is OFF
- Choose video by changing properties->local file
-
Add a filter: Face Mask Plugin
-
Go to Setting of facemask-plugin:
- Set the Demo Mode Folder Path (where the masks JSON files are located)
- Turn On Demo Mode
- Turn On Generate Thumbs
- Push Done and wait, thumbnails will be generated in the Demo Folder
Note: if you want to regenerate existing mask, restart the program and remove associated thumbnails from the demo folder