This open-source library allows you to integrate Draugiem into your iOS app.
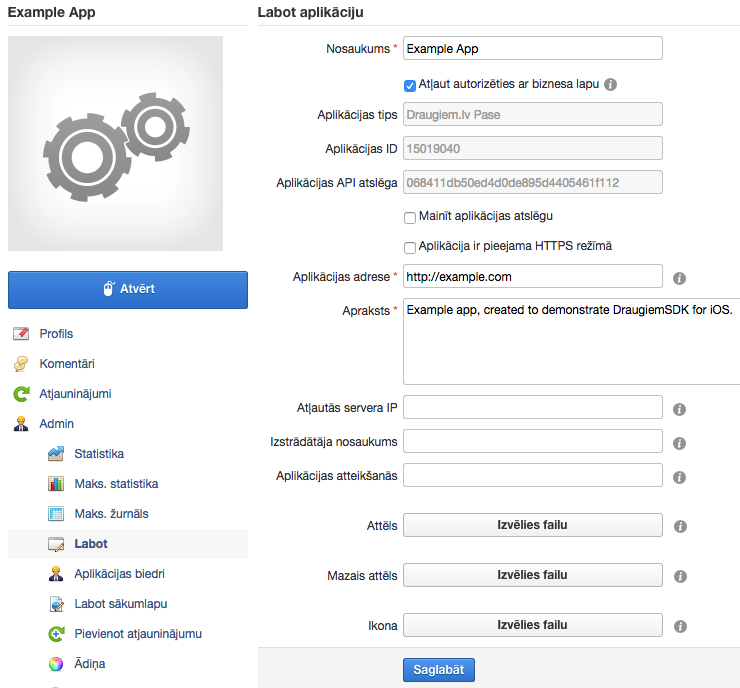
Navigate to your draugiem developer page and create a new application. Fill in the details. You should end up with something like this:
Take note of your application ID (15019040 in the example) and application API key (068411db50ed4d0de895d4405461f112 in the example).
Warning: The application ID is an 8 digit integer. If your application ID has less than 8 digits, prepend "15" followed by appropriate number of zeros to it. For instance - if your appID was "19040" you would use "15019040" as the appID in DraugiemSDK.
If you are using git for version control in your app, you may add this repo as a submodule to yours to make it easier to get future updates. You may also download this repo and add the SDK files to your project manually. DraugiemSDK is also available through CocoaPods. To install it, simply add the following line to your Podfile:
pod "DraugiemSDK"Create an array key called URL types with a single array sub-item called URL Schemes in the .plist file of your project. Give this a single item with your app ID prefixed with 'dr'. The according fragment of finished .plist should look like this:
This is used to ensure the application will receive a callback from native Draugiem iOS app or Safari web browser when performing external actions.
Your app may support multiple url schemes. DraugiemSDK will use the one, which matches the required pattern.
Assign your unique application id and application key to DraugiemSDK instance. We recommend doing this on app startup, but you may do it later in the lifetime of your application.
- (BOOL)application:(UIApplication *)application didFinishLaunchingWithOptions:(NSDictionary *)launchOptions
{
    [Draugiem startWithAppID:15019040 appKey:@"068411db50ed4d0de895d4405461f112"];
    // Override point for customization after application launch.
    return YES;
}
Call [Draugiem openURL:sourceApplication:] method from the [UIApplicationDelegate application:openURL:sourceApplication:annotation:] method of the AppDelegate for your app. It should be invoked for the proper processing of responses during interaction with the native Draugiem app or Safari as part of SSO authorization flow or Draugiem dialogs.
- (BOOL)application:(UIApplication *)application openURL:(NSURL *)url sourceApplication:(NSString *)sourceApplication annotation:(id)annotation
{
    if ([Draugiem openURL:url sourceApplication:sourceApplication] == NO) {
        //The url was not intended for the Draugiem SDK. Handle other potential calls here.
    }
    return YES;
}
Authentication is a matter of single method call:
[Draugiem logInWithCompletion:^(NSString *apiKey, NSError *error) {
    if (apiKey) {
        //Valid apiKey has been received. Client data may be requested now.
    } else {
        //Something went wrong. Refer to the error object for more information.
    }
}];
If no errors are encountered, you may request user object of the current client. We refer to the user, that is currently logged in with DraugiemSDK as a client.
[Draugiem clientWithCompletion:^(DRUser *client, NSError *error) {
    if (client) {
        //Valid user object has been received. You may display this information in your app.
    } else {
        //Something went wrong. Refer to the error object for more information.
    }
}];
You should manage the apiKey, returned by the login method yourself. Save it as you see fit and restore it upon app relaunch using the following method:
[Draugiem restoreApiKey:savedApiKey completion:^(BOOL success, NSError *error) {
    if (success) {
        //Restoration of apiKey was successful.
    } else {
        //Restoration of apiKey was unccessful. Refer to the error object for details.
    }
}];
The restoration of previously stored apiKey has to be done, so that the client wouldn't have to log in each time the app restarts. The example project shows how the apiKey could be saved using keychain. You may also store the key using your own web service.
Help: Refer to the example project provided in this repo and draugiem developer portal for more information. To run the example project, clone the repo, and run pod install from the Example directory first.
License: DraugiemSDK is available under the WTFPL license. See the LICENSE file for more info.


