-
-
Notifications
You must be signed in to change notification settings - Fork 2k
Karate Robot Windows Install Guide
To make this a comprehensive guide, this will take you through the process of installing Karate Robot on a freshly provisioned Windows box from AWS. You may be able to skip some of the steps (e.g. installing Java) depending on what already exists in your environment.
The main pre-requisites are
- a 64-bit Windows OS (32-bit may work, please let us know !)
- a Java Runtime Environment (JRE, 32-bit will work !)
- the Karate binaries (
karate.jarandkarate-robot.jar) - Visual Studio Code (with the Karate Runner plugin)
- Tesseract Data Files (optional)
It has to be 64-bit. After we created one on AWS, we installed FireFox because the stock Internet Explorer makes it hard to download files.

Before you do this, check if you already have Java installed by opening a cmd terminal and typing:
java -version
If it responds with a version that is 1.8.0_112 or greater (Java version 8) you are all set !
Here, clearly Java is not present:

So to get Java, go to https://www.java.com/download in a browser and you should see something like this. Java 8 is preferred, and you can download what is being shown here.
Note that a Java Runtime Environment (JRE) is sufficient and you do not need a JDK (Java Development Kit). But if you already have one and java.exe is in the PATH, that should be enough.

Once the Java installer EXE is downloaded, run it and go through the install process.
Once done, open a fresh cmd terminal Window and make sure that Java is installed.

Download the Karate ZIP Release and extract it to a folder of your choice.
To test that Karate is working fine you can type this command by opening a cmd terminal in the "root" of the Karate folder:
karate -h

This means that Java and Karate are installed correctly.
Note that karate.jar is already present and it came along with the ZIP Release. For the Windows Desktop Automation we need one more binary. Download karate-robot.jar from the locations provided here. The file will be suffixed with the version number.
After downloading the file, rename it to karate-robot.jar for convenience, and place it alongside karate.jar. There is one more thing we need to do which is edit karate.bat to "include" the new file we just added. Here below you can see what the folder and the edit should look like.
java -cp karate.jar;karate-robot.jar;. com.intuit.karate.Main %*

After this, you should be able to run Karate tests that operate Windows desktop applications. You can try this command:
karate src/demo/robot/calc.feature
Or if it is the "old" version of the Windows Calculator, use this:
karate src/demo/robot/calc-old.feature
Here's what the "old" calculator test in action looks like:

So at this point you can create and run Karate tests for Windows applications ! But to really get productive, we recommend that you use the Visual Studio Code IDE support.
Download it from https://code.visualstudio.com/.
After installing, open Visual Studio Code and go to "Extensions" (the bottom vertical tab on the left). You can type "karate" in the search-box to find the Karate Runner extension.

Click on "Install". After that you should see the "gear" icon, click on it to edit some extra settings needed for Karate Robot. Choose the "Extension Settings" option from the menu.

Scroll down to find this setting called "Command Line Args"

Change it to add karate-robot.jar. The whole line would be:
java -cp karate.jar;karate-robot.jar;. com.intuit.karate.Main

Now the IDE is ready to open Karate projects and files and run and even debug tests. Go to File --> Open Folder and browse to the Karate / project folder.
Here we have also opened the calc.feature (or calc-old.feature).

Note how you can click on Karate Run at the top of the file to run a test. You can try it now, but you will get this error.

This is because Visual Studio Code uses "powershell" by default instead of "cmd.exe" which is what we need. There is an easy way to set this. Click on the "Task" drop-down you see in the bottom "Terminal" tab and you should see an option to "Select Default Shell" like you see above.
If you really need to use PowerShell, you can try by modifying the Command Line Settings to have the
-cp(classpath) argument within single-quotes: e.g.java -cp 'karate.jar:karate-robot.jar;.' com.intuit.karate.Main
And now you can choose cmd.exe.

You can change this any time by going to File --> Preferences --> Settings and searching for "terminal windows". For more information on changing the default terminal on Windows, refer to this thread on Stack Overflow.

Now try clicking again on "Karate Run" in the Feature: and it should work. Note that you can see reports in the target/surefire-reports folder - which even includes screenshots if requested as part of the test-script.

This is a must for writing and maintaining tests and one of the best things about the IDE support. Try clicking on "Karate Debug". This one-time prompt to select a "Debug Configuration" will come up. You can choose Karate (debug).

You don't have to change the default "Launch Configuration" that will be created. You can close this launch.json tab now and get back to the feature file.

Now try "Karate Debug" again, but this time before you do anything, set a break-point, see the red-dot on line 12 below.

And as we expect, Karate will stop at the break-point like seen below.
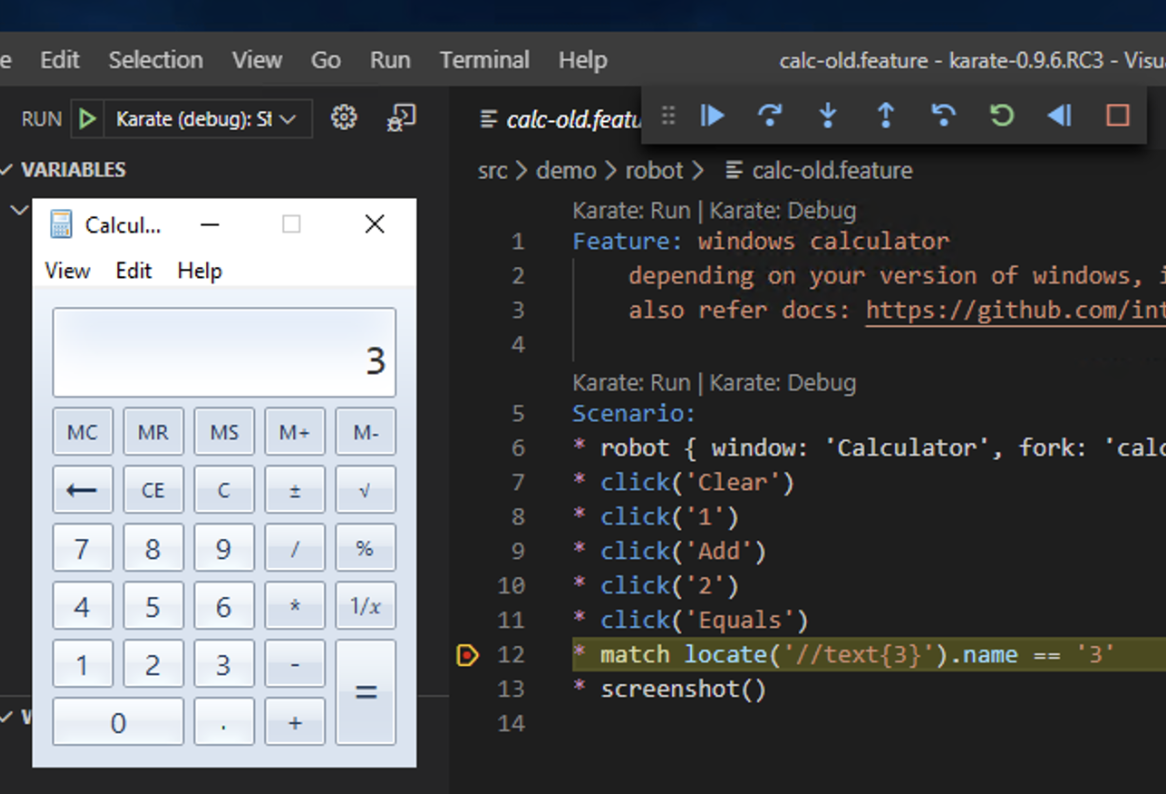
Now you can do some interesting things. Find the "Debug Console" tab in the bottom pane (click on the "..." icon if needed) and type highlightAll('//button')
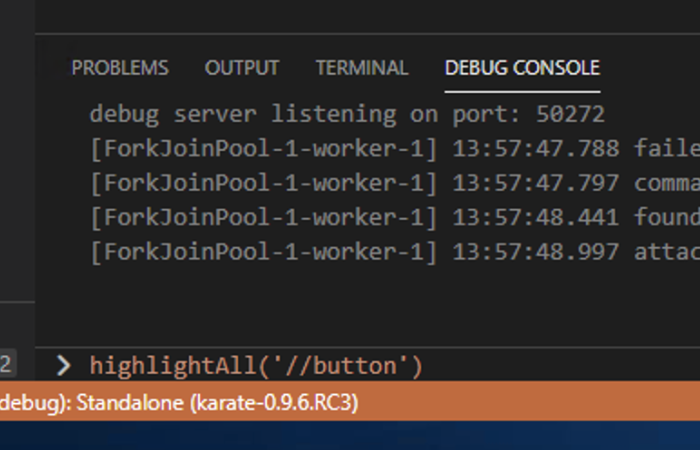
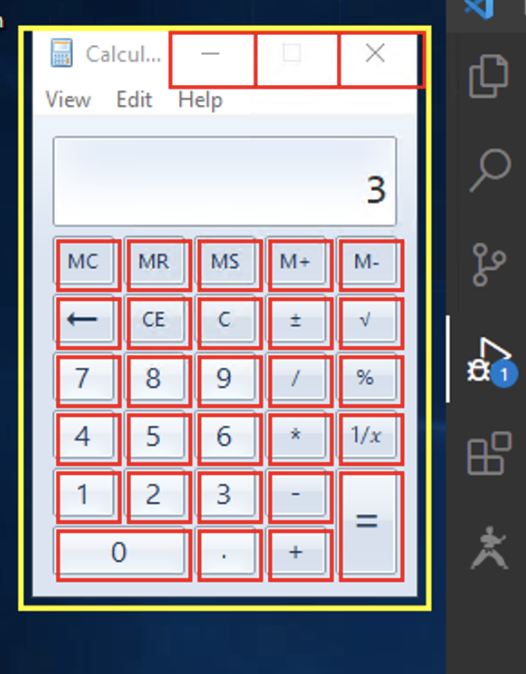
Hit ENTER and you should see this. You can try other commands such as highlight('6'). Any Karate step should work. You can see how this is extremely useful for building or troubleshooting tests.
Note that you can even step back and edit & hot-reload steps. Also see this video.
This is needed when using Karate-Robot for desktop automation and when you use the Karate-Runner in debug mode. Most of the time, Karate-Robot expects a particular application-window to be "in focus" and visible, and on top of all other windows. But when you use the debug actions such as [step-forward], [continue] etc. after hitting a break-point - the Visual Studio Code window would be the one having "focus" instead.
So there needs to be a way to tell Karate to "flip" focus back to the AUT (Application Under Test). This can be easily done - as Karate has a way to execute any arbitrary script before resuming execution when in debug mode. And typically, the most effective way is to trigger an ALT+TAB input sequence.
The Visual Studio Code Launch Configuration (.vscode/launch.json) for the Karate Debug Server takes an optional debugPreStep parameter. For example, this is the configuration that can switch focus to the previously most recently focused window:
{
  "type": "karate",
  "name": "Karate (debug): Standalone",
  "request": "launch",
  "feature": "${command:karateRunner.getDebugFile}",
  "karateOptions": "",
  "karateCli": "${config:karateRunner.karateJar.commandLineArgs} -d",
  "debugPreStep": "input(Key.ALT + Key.TAB)"
}
Note that the step-prefix (e.g. *, Given, When then etc. can be omitted). Only a single step can be configured, but the good thing is that you can call any valid feature if you have a need to run a sequence of pre-step operations:
"debugPreStep": "call read('some.feature')"
The "Inspect.exe" tool can be used to figure out how to select UI elements. One way to acquire this is to install the Windows SDK (selecting "Windows SDK for Desktop C++ x86" should be sufficient).
It seems that there may be better options such as Accessibility Insights for Windows so you could try that - or any other similar tool instead.
Besides image-driven navigation, Karate Robot has experimental support for OCR (Optical Character Recognition) that can be useful in case there is no other way you could find to "select" an element or control, possibly because it is a UI framework that Windows has limited support for.
For the OCR support to work, you need to separately download some data files. You can read the documentation for details, but for now we will just use the defaults for "English" and just add a single data-file in a pre-defined (default) directory.
-
Download
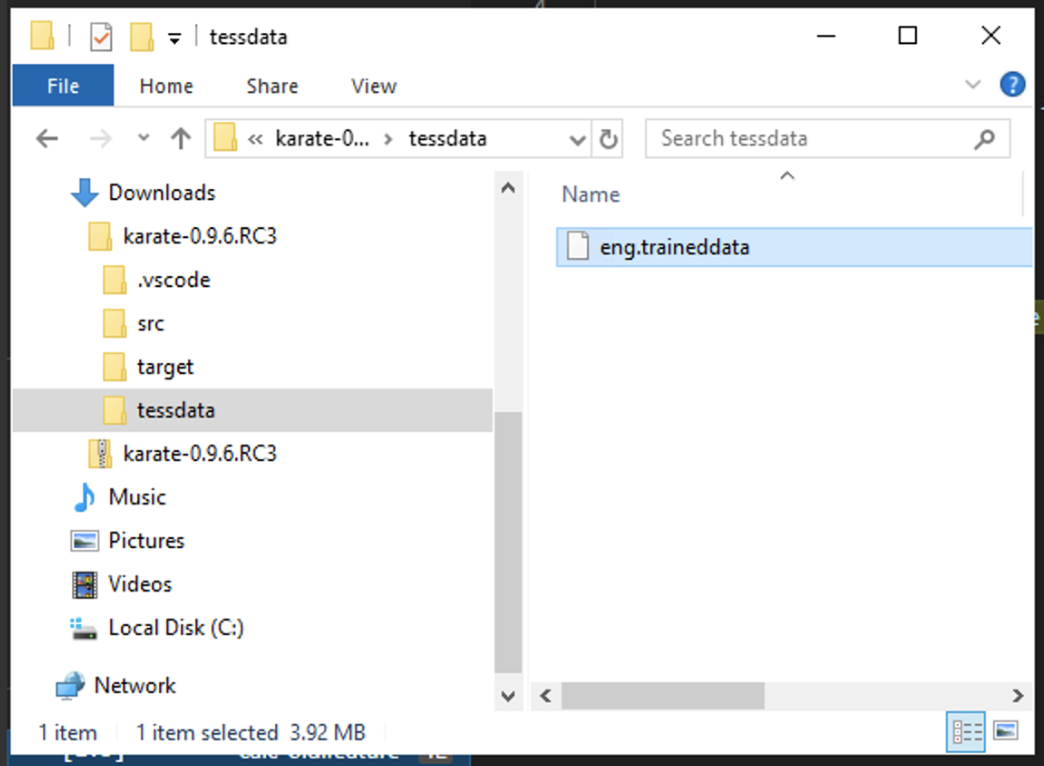
eng.traineddatafrom the tessdata_fast data-set. -
Place this in a
tessdatafolder in the root of your Karate project folder. This is how it should look.
Now you can enter this command in the Debug Console (when a debug / breakpoint session is in progress) and hit ENTER.
robot.active.debugExtract()
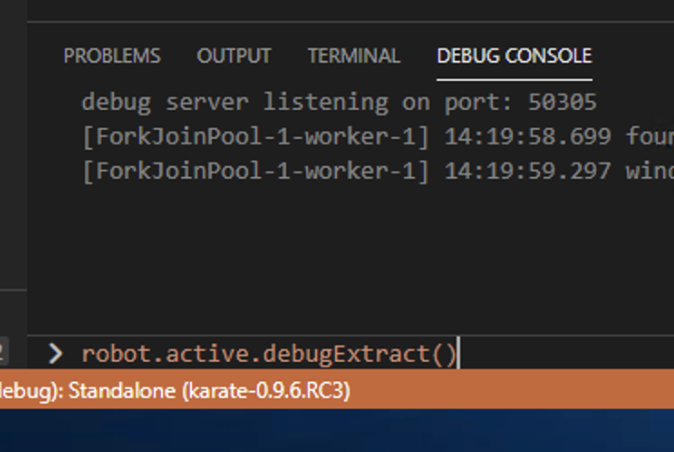
You should see Karate attempt to OCR-scan the "active" window for text:
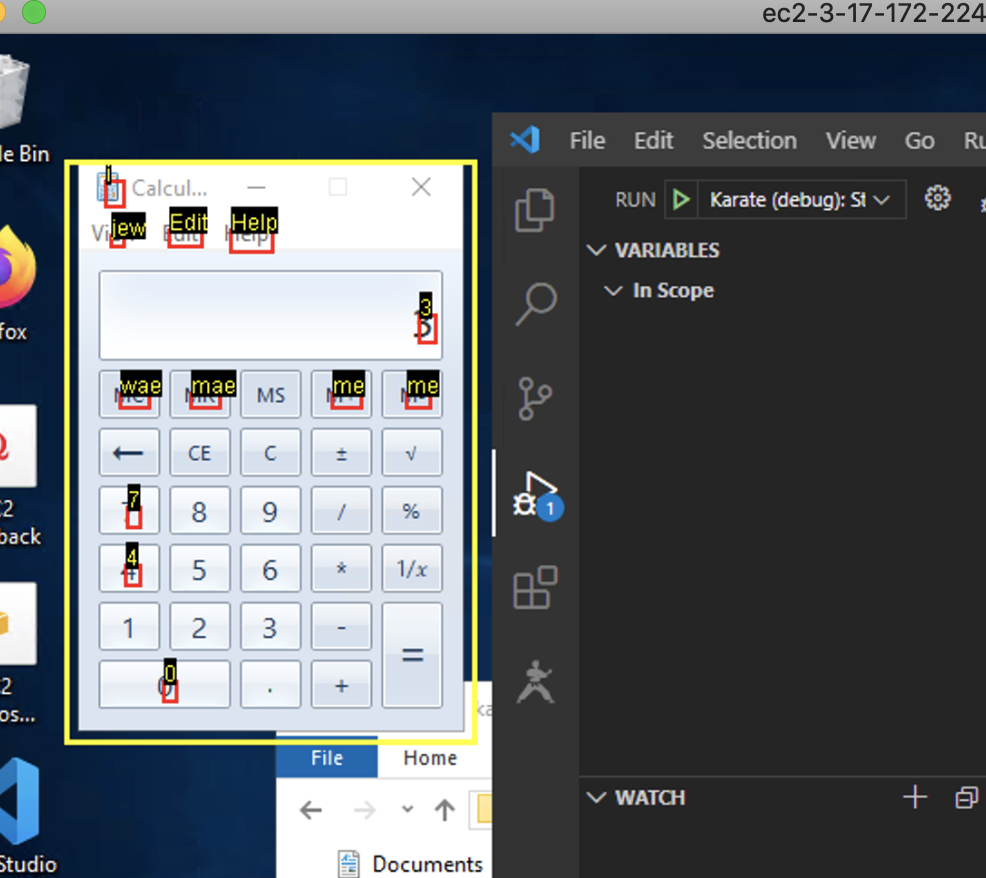
For convenience an additional Window will appear with details so that you can study it at leisure.
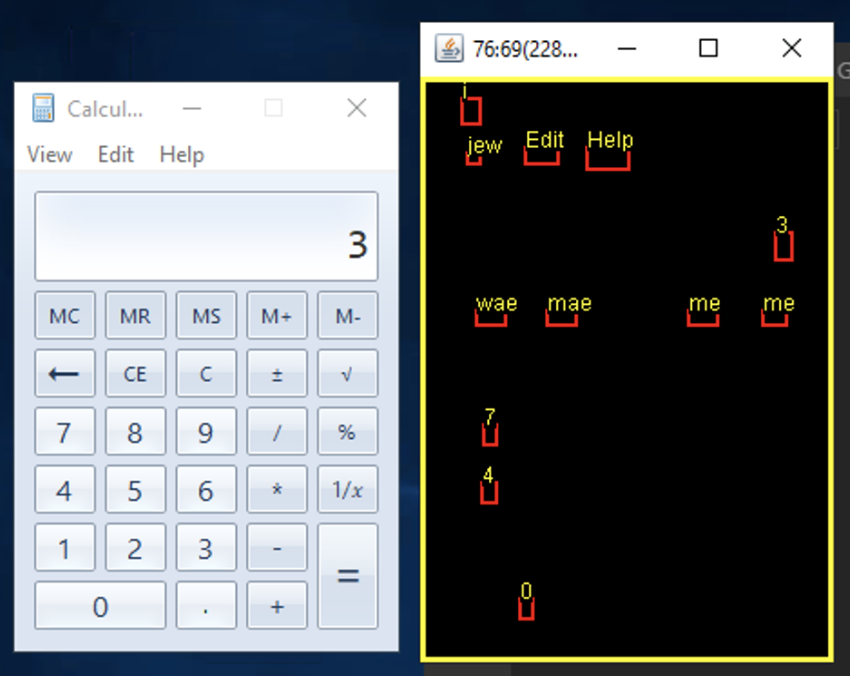
There may be some more work needed to make the OCR capabilities more accurate and robust, please do contribute if you can !
Note that when using an RC release, the latest documentation would be in the develop branch:
https://github.com/intuit/karate/tree/develop/karate-robot
