#Getting Started with tODE
Use the todeClient script to start up a tODE client image:
todeClientNote: the -p option allows you maintain and run multiple client images.
###tODE System Menu
The tODE System Menu:

is your entry point for setting up and controlling tODE.
- tODE Shell
- tODE Edit
- tODE Test Login
- tODE Install
- tODE Update
- tODE Workspaces
- tODE Window Layout
- Update tODE Client
- Define Web Edition Root
- Define Dev Kit Root
- Refresh tODE menu
####tODE Shell
Use the tODE Shell menu item to select the stone to log into:

and open the tODE shell console:

####tODE Edit
The tODE Edit menu items allow you to modify the session descriptions from within the client image:

The menu item brings up a client workspace:

Note that the workspace is not a file editor, so you need to execute the workspace to update the session disk.
The name of the session description file is derived from the name of the session description.
If you change the name of the description you are effectively creating a new description.
####tODE Test Login
The tODE Test Login menu item makes it possible to collect diagnostic information when you are having trouble logging into a stone. The menu item is also useful to ping a particular stone to see if it is running.

Besides the menu item the testLogin command can be invoked:
-
via the testLogin: message in a client-side workspace:
TDShell testLogin: 'gemtalk'
-
or, via the command line:


This is an example of a successful test login:

Note that while there was a successful test, the message does indicate that tODE is not installed. See the [tODE installTodeStone script][46] for installing tODE on a server.
Here's an example of an error message:

If the test login error message does not give you enough information for you to solve the problem, copy the result of the testLogin command and send mail to the GLASS mailing list.
####tODE Install
Use the tODE Install menu item to install tODE on the selected stone.
Use this menu item if you did not use the createTodeStone script to create the stone:

The menu item executes the tode script located in the file $GS_HOME/tode/client/scripts/installTode:
updateClient --clientRepo=github://dalehenrich/tode:master/repository
installServer --clientScriptPath=scripts
bu backup tode.dbf
mount --todeRoot home /
bu backup home.dbf
cd
Note that the script starts by updating the client-side code and then updates the server-side code.
You can customize installTode script to perform additional commands, if needed.
The server-side load scripts can be found in the $GS_HOME/tode/server/scripts directory.
You are encouraged to use the [installTodeServer][46] shell script to install tODE into your Dev Kit server.
####tODE Update
Use the tODE Update menu item update the tODE project on the selected stone:

The menu item executes the tode script located in the file $GS_HOME/tode/client/scripts/updateTode:
updateClient --clientRepo=github://dalehenrich/tode:master/repository
updateServer --clientScriptPath=scripts
bu backup home.dbf
You can customize updateTode script to perform additional commands, if needed.
The server-side load scripts can be found in the $GS_HOME/tode/server/scripts directory.
You are encouraged to use the project load Tode command in the tODE shell to perform updates of the tODE project.
####tODE Window Layout
Use the tODE Window Layout menu item to choose a window layout for your client image:

The window layout is scaled based on the size of the Pharo client window, so you need to re-select a window layout whenever you change the size of the Pharo client window.
Here are samples of three of the available window layouts:
| layout | sample |
|---|---|
| standard-small |  |
| standard-medium |  |
| standard-large |  |
####Define Dev Kit Root
The Define Dev Kit Root menu item:

tells the Pharo client where to find the $GS_HOME/tode directory.
The scripts and session descriptions used by the pharo client are found in the $GS_HOME/tode directory.
A todeClientImage can be retargeted to a different GsDevKit installation by changing the directory.
####Refresh tODE menu
The Refresh tODE menu menu item:

rebuilds the tODE system menu. The menu should automatically update.
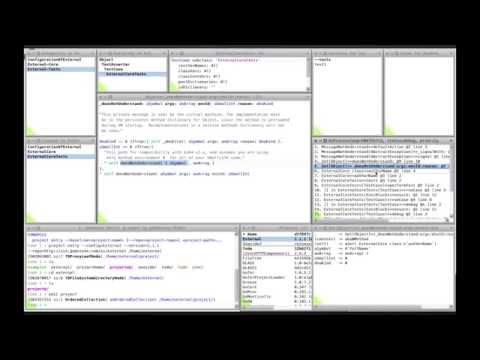
This short video describes how to add your own project to tODE. It also serves as an introduction to the tODE development environment:
While you are in the Pharo client window, it is a good time to choose a new font. tODE works best with a mono-spaced font and you can choose a font from those installed on your system using the Pharo System Settings menu item:

which opens the Settings browser:

- Click on the
Default font buttonand choose a font from those listed in the window that pops up. You may need toUpdateto get the system fonts loaded into the Pharo client. - Click on the
Force All buttonto get your font choice propogated to the other choices.
Don't forget to save the image after making client-side changes.
Now is also a good time to change the size of the Pharo client window.
When you change the size of the Pharo client window, you need to use the tODE Window Layout menu item to reset or change the window layout.
The initial layout (standard-small) is probably not a good choice for high resolution displays.
standard-medium or standared-large are better choices depending upon the resolution of your display and the size of the font that you have chosen.
Don't forget to save the image after making client-side changes.