VTube Studio Settings
After clicking the settings icon (gear icon) in the main menu, the settings screen will be shown. It has several tabs, a help icon (links to this manual) and a language selector button that lets you change the interface language (app restart needed).
Global (not related to a specific model) setting are saved in this file:
<VTS-App-Path>/VTube Studio_Data/StreamingAssets/Config/vts_config.json
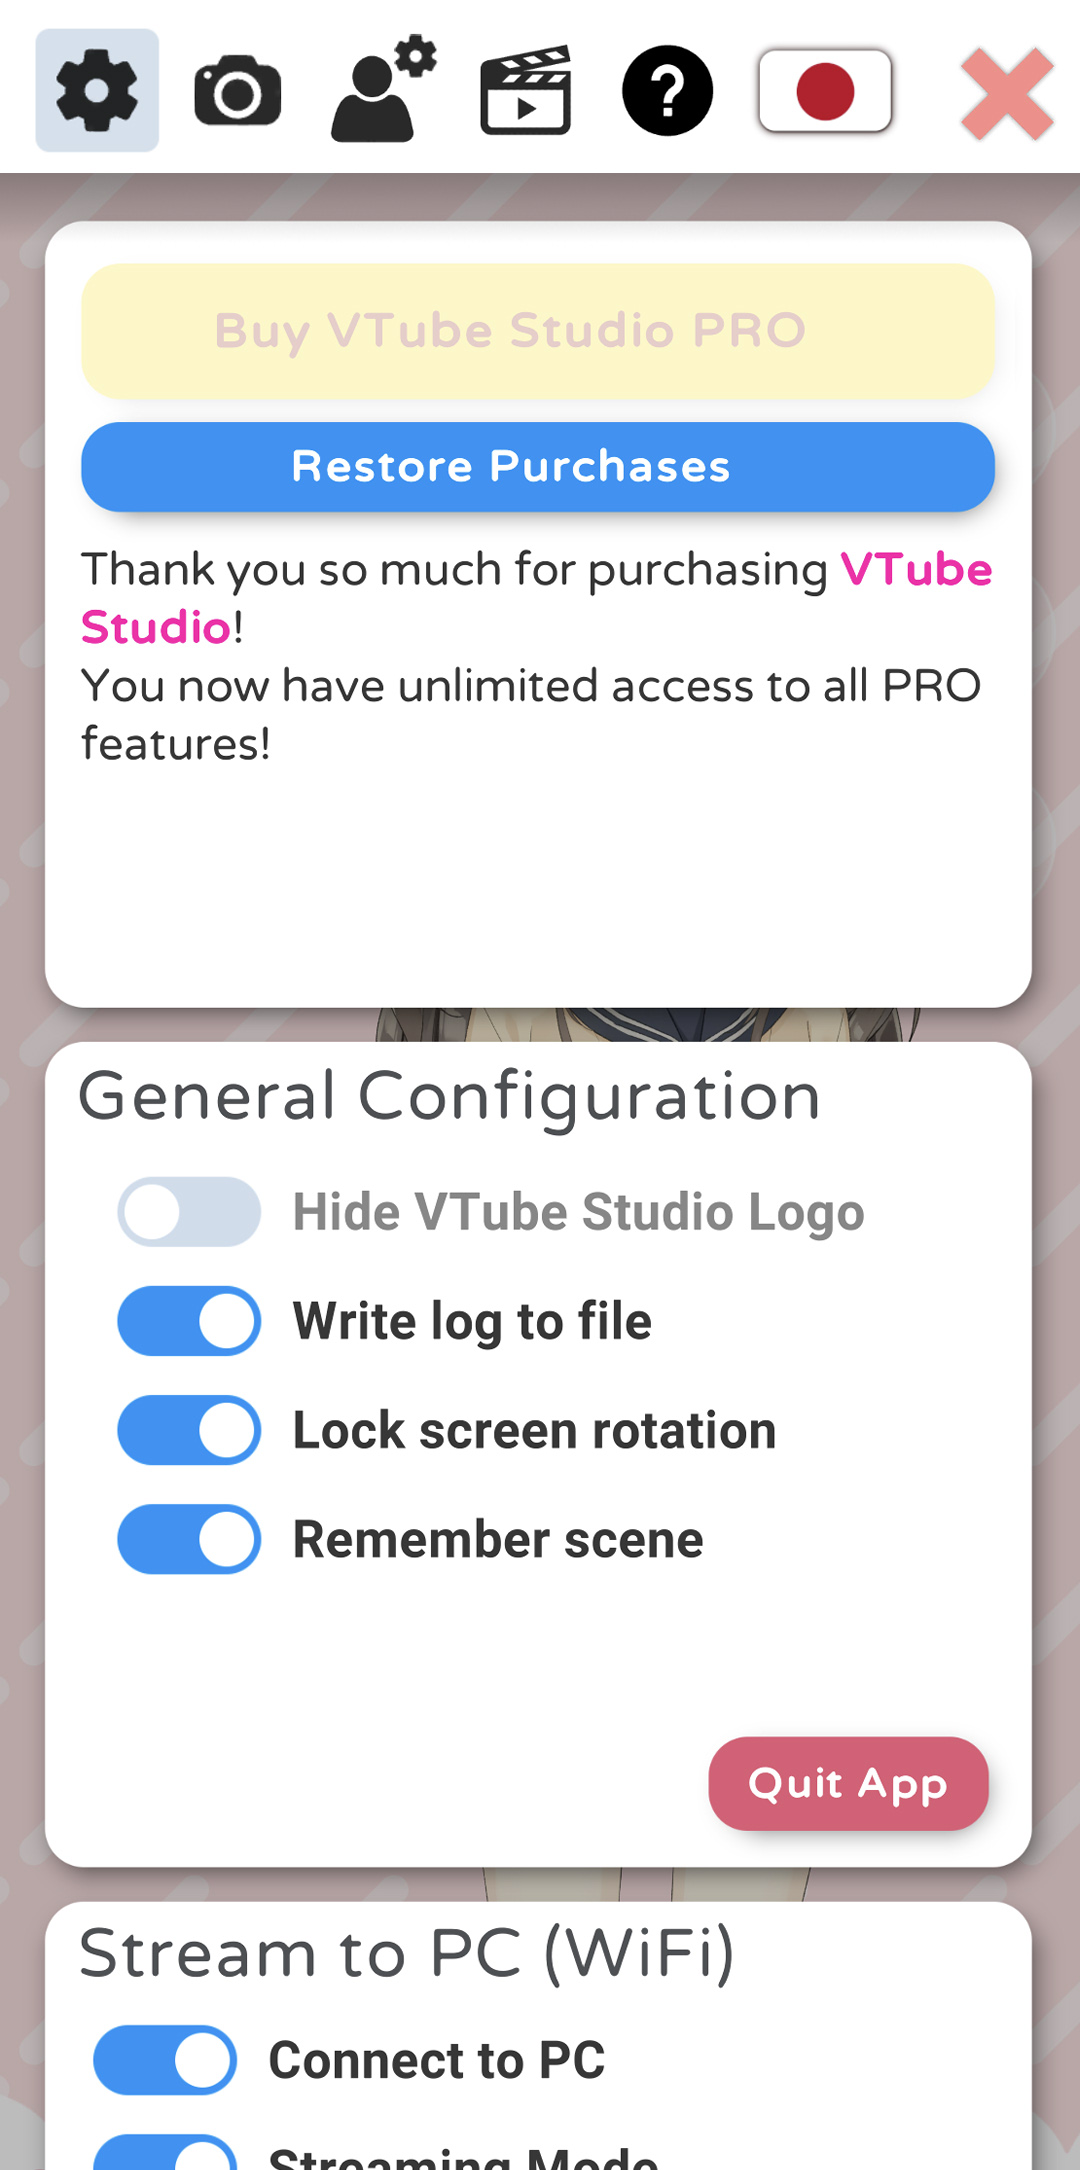
From here, you can purchase VTube Studio PRO (iOS/Android only). On iOS, there is also a button to restore purchases on this screen.
Furthermore, there are some general settings for hiding the VTS logo, remembering the scene (save open background and model when restarting), etc.
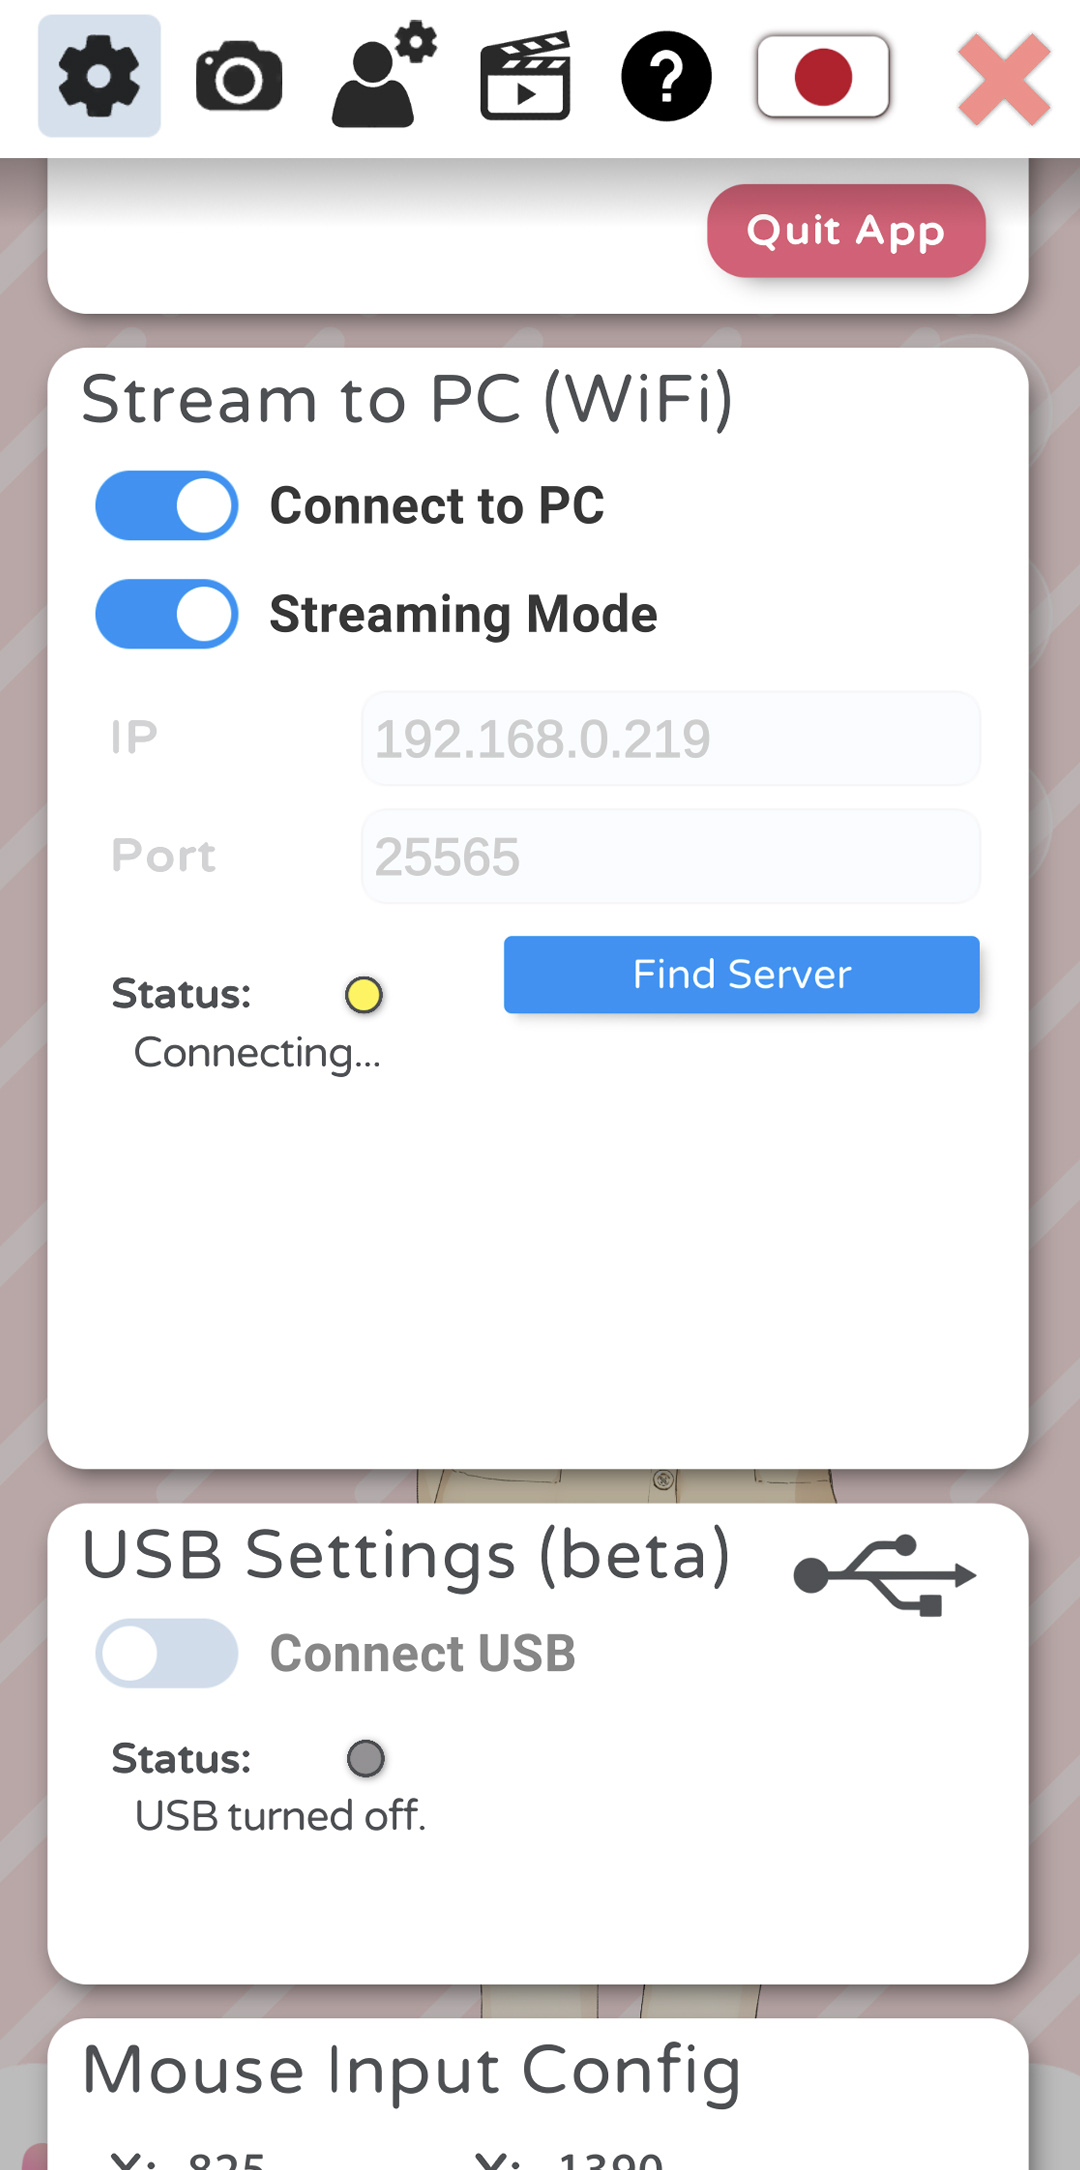
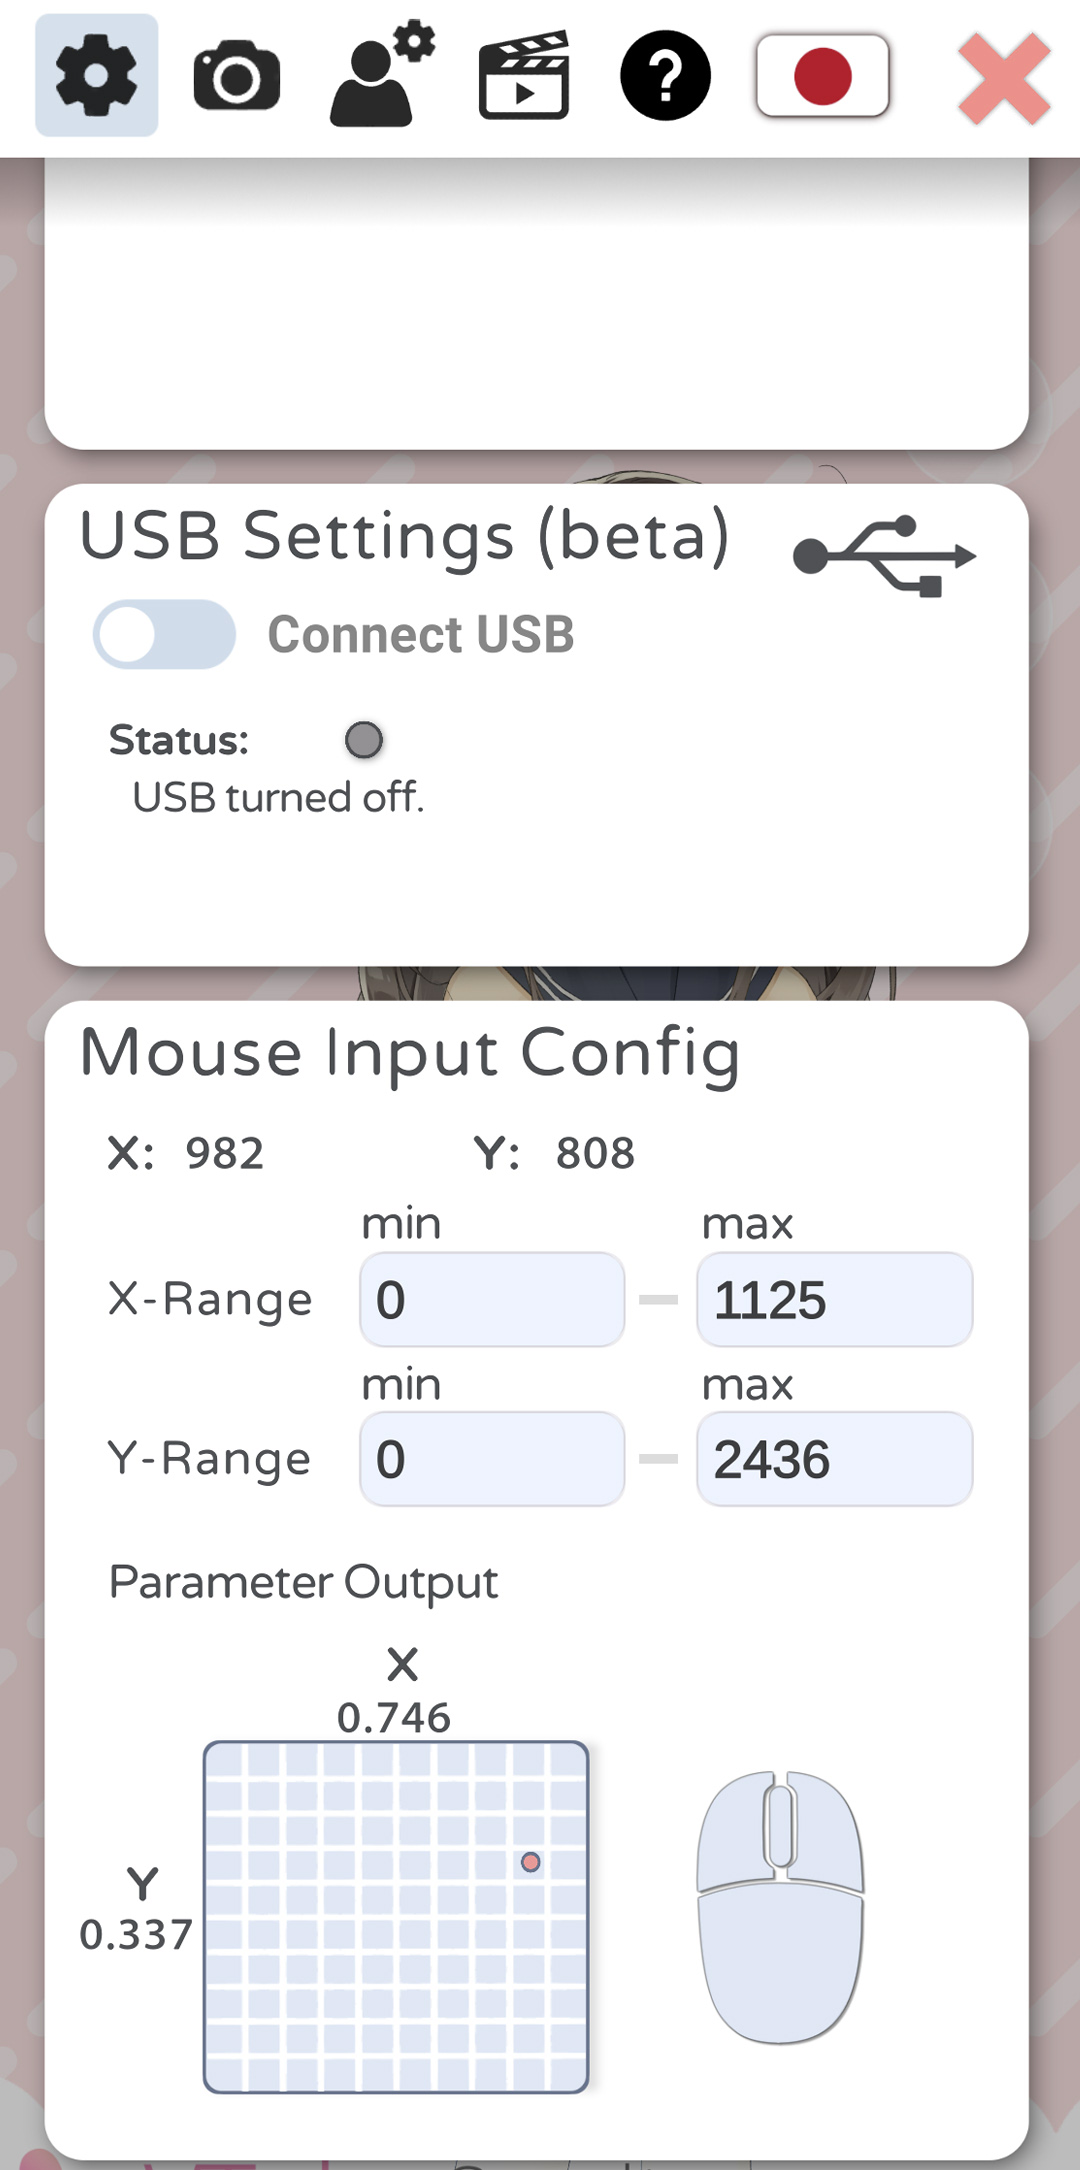
Next, there’s the "Stream to PC" setup. This is for connecting your phone to your PC to stream the face tracking data to the PC app. This will be covered in the chapter "Connecting your Smartphone to your PC/Mac". On iOS devices, you can also start an USB connection as alternative to WiFi here. This is recommended as it seems to be more reliable/stable than WiFi. On Android, this option is unfortunately not available.
Finally, there's the "Mouse Input Config". This allows you to use the mouse/finger position as input parameter to animate your model in addition to face tracking. You can select an X-Range and Y-Range in pixels. This range will be mapped to [-1, 1] for X and Y. With this setting, you could for example make your model follow your finger or mouse pointer with its eyes. This will also show mouse-clicks (right, left, middle) that can be used to trigger hotkeys. In the smartphone app, these mouse-clicks can be triggered by touching the screen with one finger (left-click), two fingers (right-click) and three fingers (middle-click).
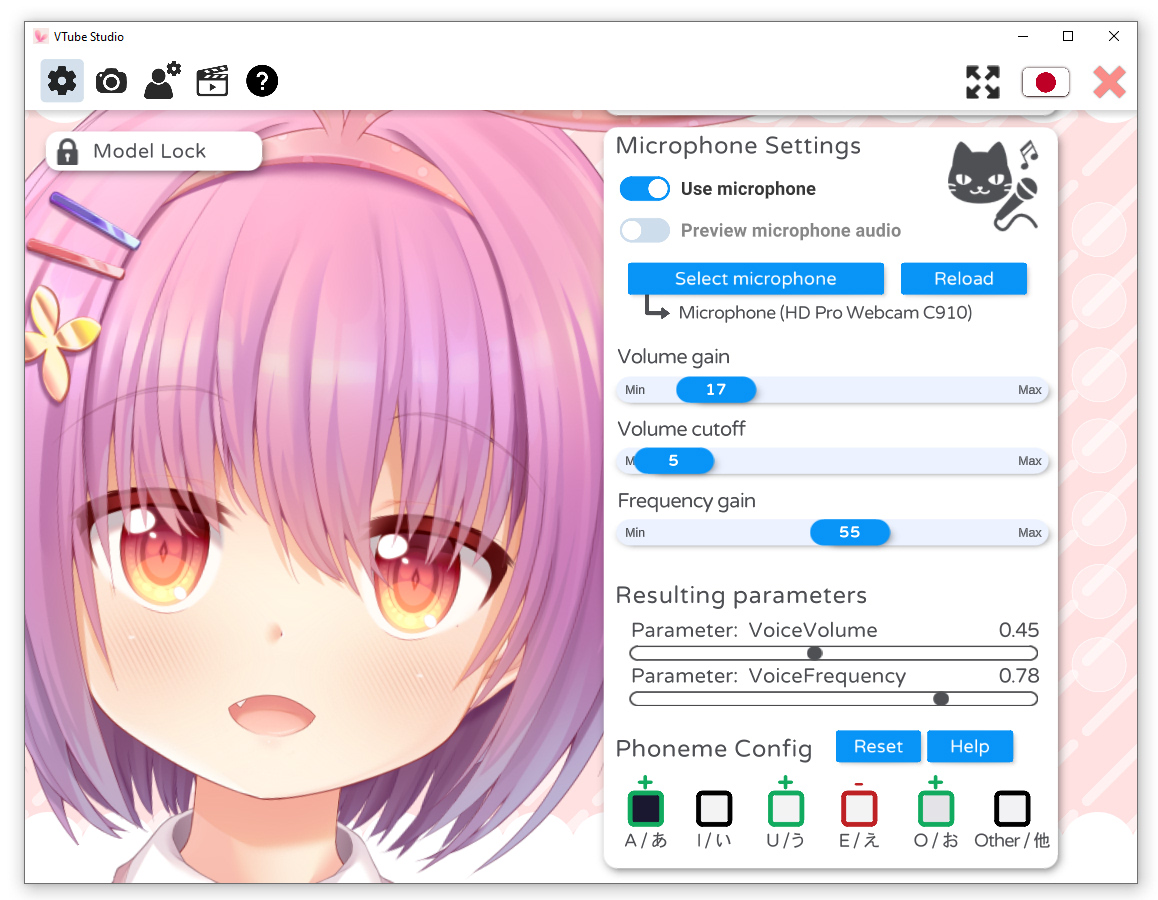
The voice-based lipsync options are only available on Windows and MacOS (except M1/Silicon Macs), you cannot use them on smartphones.
Voice-based lipsync enables you to do two things:
- Open/Close mouth (or any Live2D parameter) based on current microphone volume.
- Change mouth shape (or any Live2D parameter) based on detected frequencies in voice.
If microphone audio lags behind the values shown on the UI, use the "Reload" button to reload the selected microphone. Alternatively, you can use a hotkey to reload the microphone.
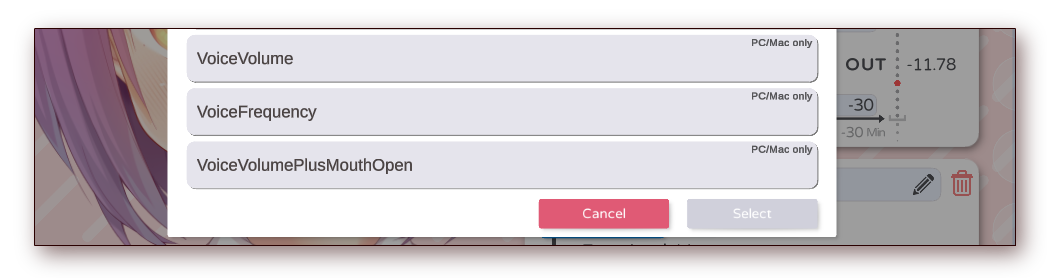
When enabled ("Use microphone" switch), you will be able to use three additional parameters in your VTube Studio model:
-
VoiceVolume: Parameter between 0 and 1 depending on microphone sound volume.
- Volume Gain Slider controls how strongly the volume affects this parameter.
- Volume Cutoff Slider controls the minimum volume to still be picked up by the microphone. You can filter out background noise with this.
- VoiceVolumePlusMouthOpen: Combines VoiceVolume parameter with value from tracking. With this, you could for example make your mouth open when there's sound and when the face tracking sees the mouth as open. This parameter is also between 0 and 1.
-
VoiceFrequency: This parameter is between 0 and 1 and sits at 0.5 per default. It goes up and down depending on the frequencies found in your voice. You can use this to control your mouth form.
- Frequency Gain Slider controls how strongly the detected frequencies affect this parameter.
When you speak, VTube Studio analyzes your speech and extracts the phonemes (A, I, U, E, O, Other) from your speech. You will see the squares at the bottom (see image above) turn dark when a specific phoneme is detected.
You can click each phoneme to turn it red (-), green (+) or neutral. Depending on that, when this specific phoneme is detected, it will push the **VoiceFrequency **parameter up or down (and with that also your mouth shape, if you use this parameter).


There are no recommendations on how you should set the phonemes up. Just try around a bit and see what works for you. It may take some trial and error, but if set up correctly, this can look really good especially when singing. ♪ ♫ ♬
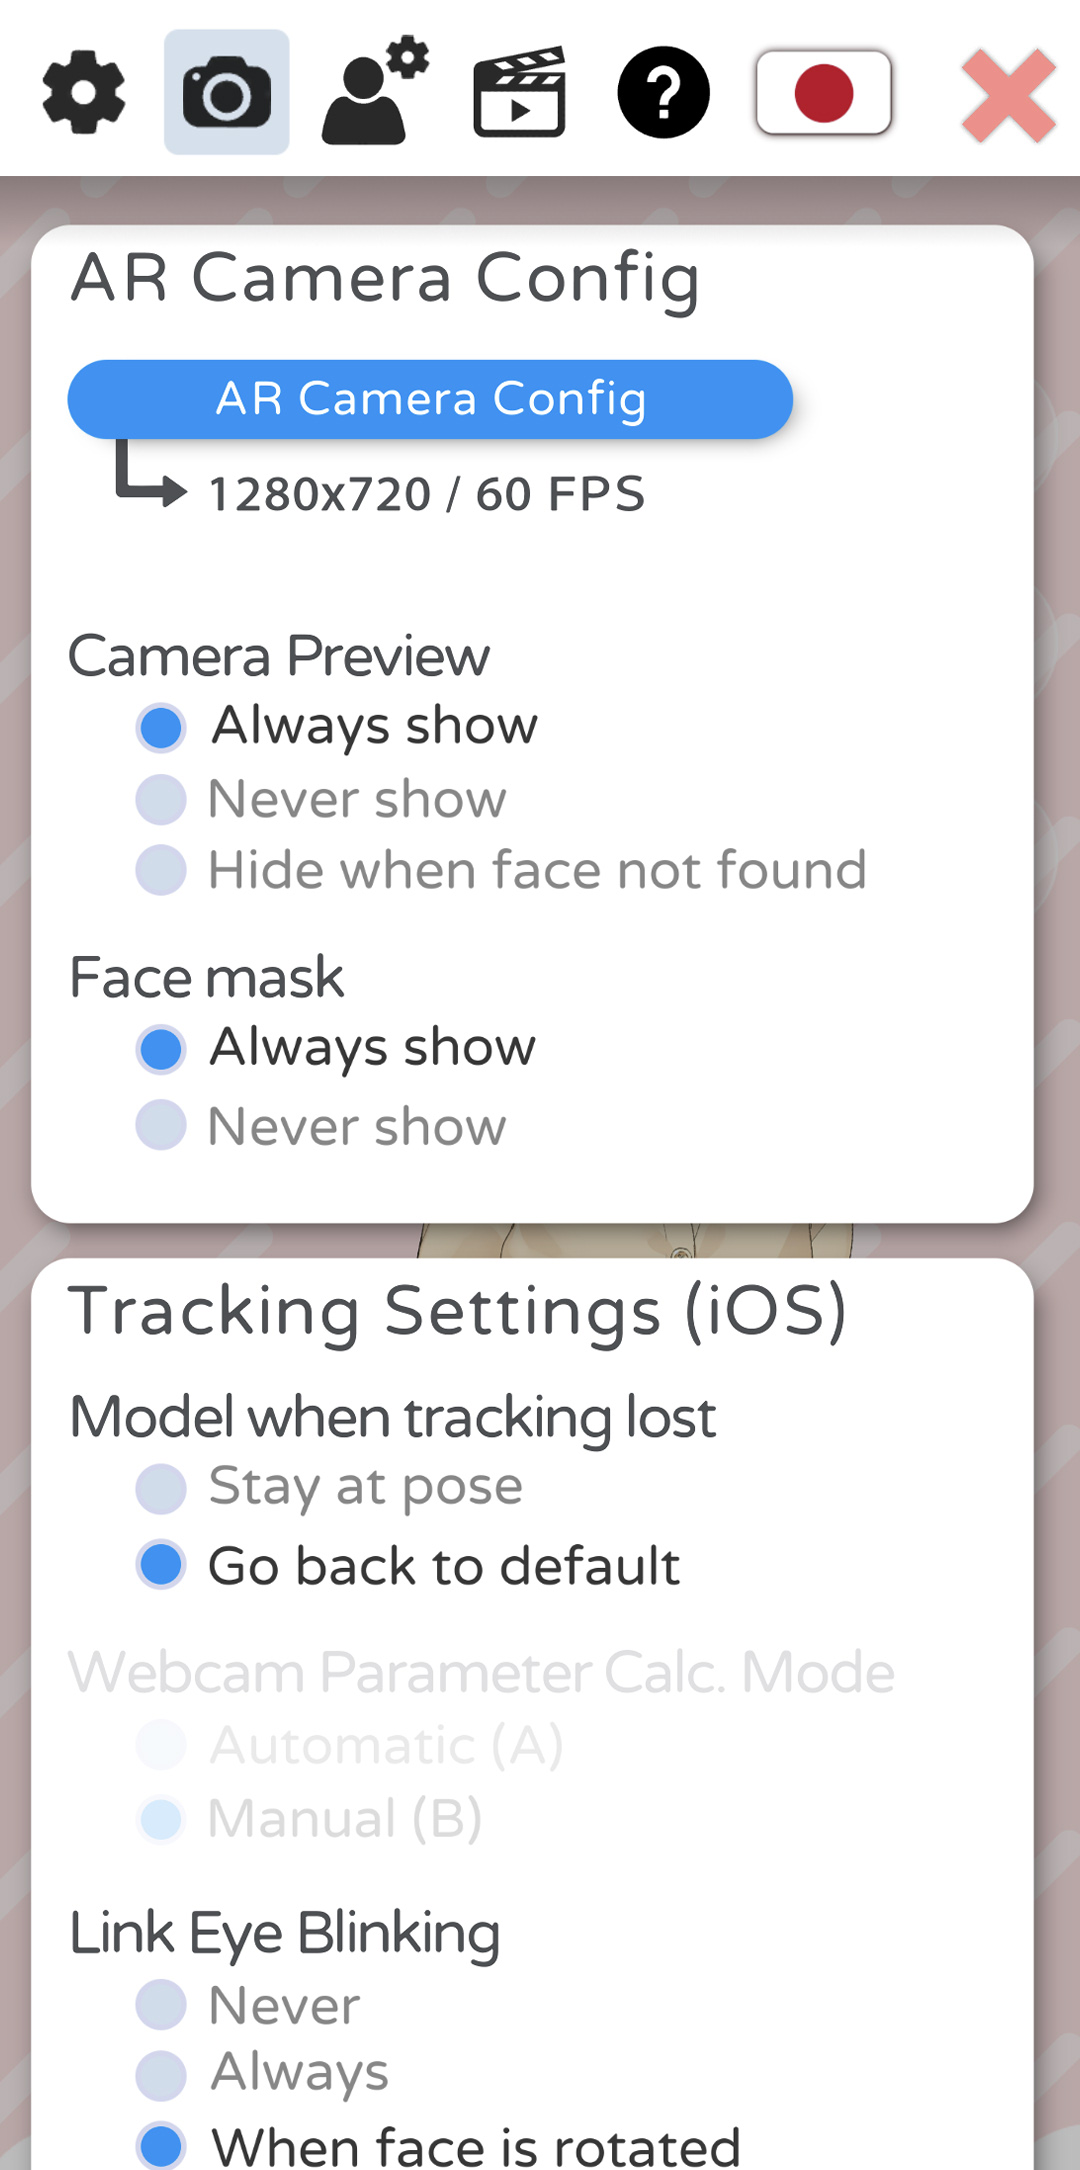
This config tab will let you change settings related to rendering and the camera:
-
AR Camera Config
- Change face tracking camera FPS. This does not affect the app framerate.
- Change whether the camera preview is shown. If you want to make sure your face is never shown on your smartphone screen, you can configure that here (see third picture).
- Change whether face mask is shown over your face.
-
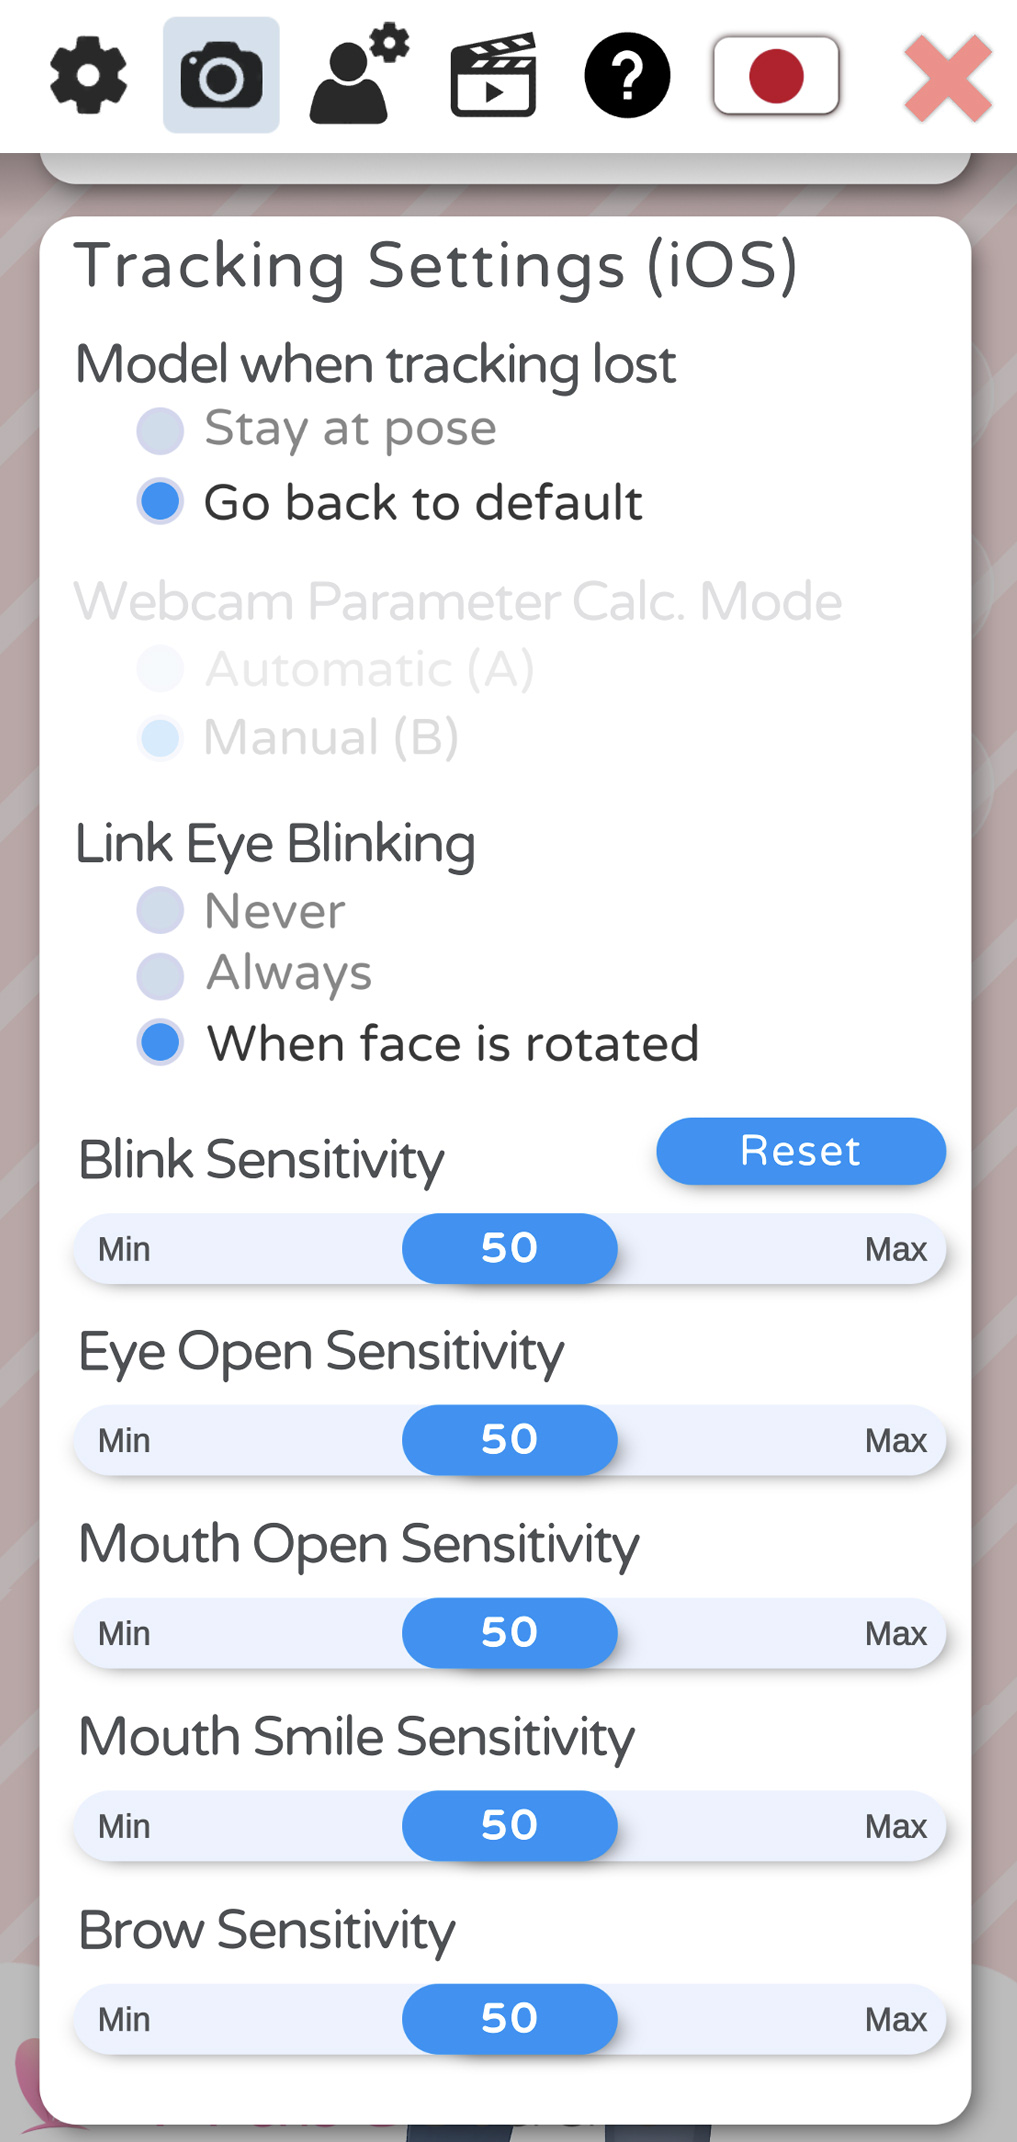
Tracking Config
- Change behavior of model when face tracking is lost. You can either have the model freeze in place when your face is lost or have it return to its default pose.
- Change eye-blink linking behavior
- If "Always" is rotated, the EyeOpen values of your left and right eye will be always set to the average of both.
- If "When face is rotated" is selected, the EyeOpen value of your eyes will be linked when your head is rotated too much to the side. This will use the value of the eye that is still visible when your head is rotated to one side.
- Various sensitivities for the iOS/Android face tracker. If (for example) your mouth doesn’t open enough, a quick fix might be to increase the sensitivity here.
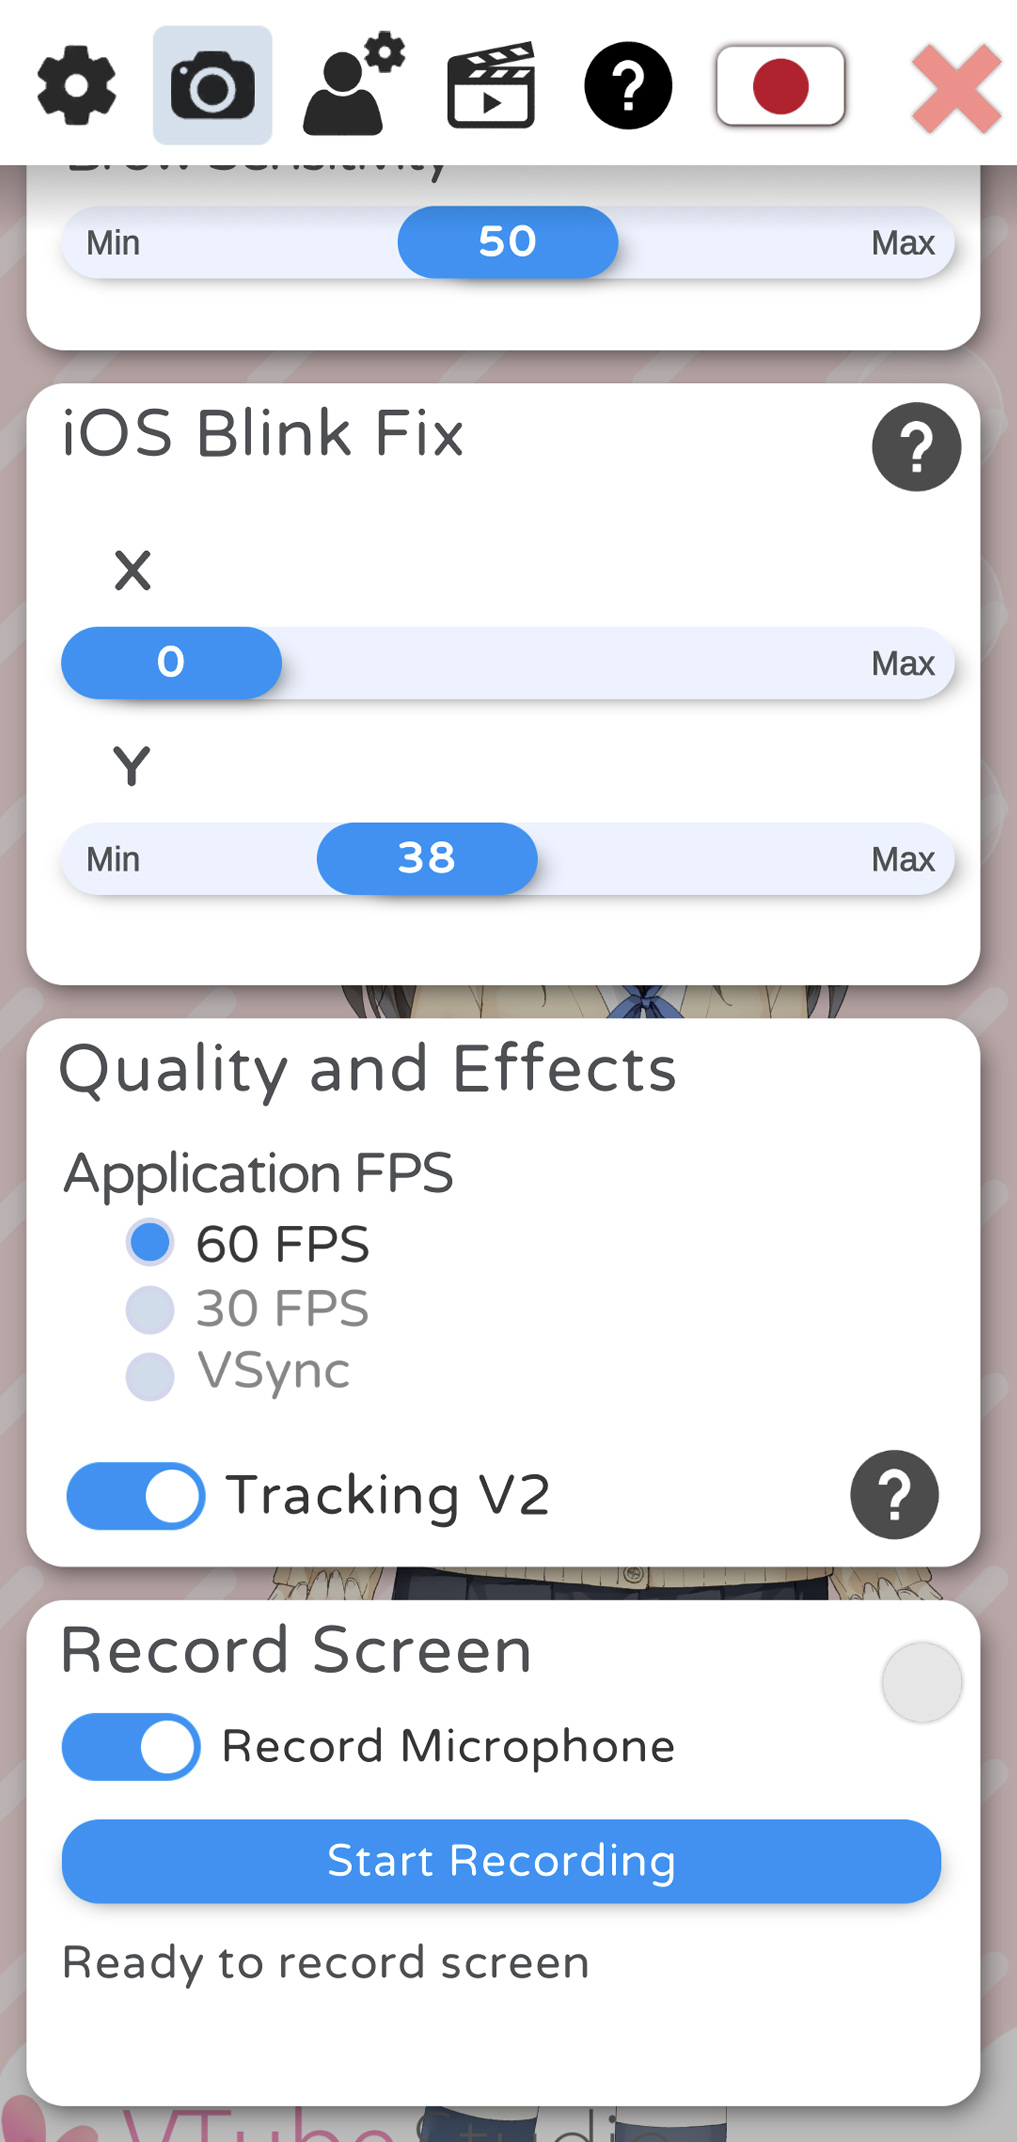
-
iOS Blink Fix
- Due to a recent bug in iOS face tracking, your HeadY parameter will twitch upward very slightly when blinking. This can be counterbalanced using those sliders until it is fixed officially by Apple (hopefully soon). A value for Y of around 30-45 is recommended, but check what works well for you. X can be left at 0 usually. Depending on your Live2D model, you may not need this setting at all because the effect is very subtle.
-
Quality and Effects
- Turn on Anti-Aliasing (smoother model edges but costs performance, not recommended on mobile)
- Change app FPS. VSync means the FPS will be synced to your display update rate. This is recommended on PC to prevent screen-tearing.
-
Tracking V2: Adds various experimental iOS tracking improvements. Use with caution!
- Better winking: When one eye is fully closed and the other one isn’t, this will force the partially open eye a bit more open. This makes winking easier/better.
- Better frowning: Automatically frown more by lowering your brows. This is done by detecting when the brows are down and subtracting a certain value of MouthSmile in that case.
-
Record Screen
- Smartphone-only. Lets you directly record your screen including microphone sound. A small red dot will be shown at the bottom-right while recording. Tap it to stop the recording at any time
![]() If you have any questions that this manual doesn't answer, please ask in the VTube Studio Discord
If you have any questions that this manual doesn't answer, please ask in the VTube Studio Discord![]() !!
!!
![]()
- Android vs. iPhone vs. Webcam
- Getting Started
- Introduction & Requirements
- Preparing your model for VTube Studio
- Where to get models?
- Restore old VTS Versions
- Controlling multiple models with one device
- Copy config between models
- Loading your own Backgrounds
- Recoloring Models and Items
- Record Animations
- Recording/Streaming with OBS
- Sending data to VSeeFace
- Starting as Admin
- Starting without Steam
- Streaming to Mac/PC
- VNet Multiplayer Overview
- Steam Workshop
- Taking/Sharing Screenshots
- Live2D Cubism Editor Communication
- Lag Troubleshooting
- Connection Troubleshooting
- Webcam Troubleshooting
- Crash Troubleshooting
- Known Issues
- FAQ
- VTube Studio Settings
- VTS Model Settings
- VTube Studio Model File
- Visual Effects
- Twitch Interaction
- Twitch Hotkey Triggers
- Spout2 Background
- Expressions ("Stickers"/"Emotes")
- Animations
- Interaction between Animations, Tracking, Physics, etc.
- Google Mediapipe Face Tracker
- NVIDIA Broadcast Face Tracker
- Tobii Eye-Tracker
- Hand-Tracking
- Lipsync
- Item System
- Live2D-Items
- Between-Layer Item Pinning
- Item Scenes & Item Hotkeys
- Add Special ArtMesh Functionality
- Display Light Overlay
- VNet Security
- Plugins (YouTube, Twitch, etc.)
- Web-Items
- Web-Item Plugins