Check the following sections for deployment instructions for Scrapinghub and Scrapydweb.
Create an free account and create a project:

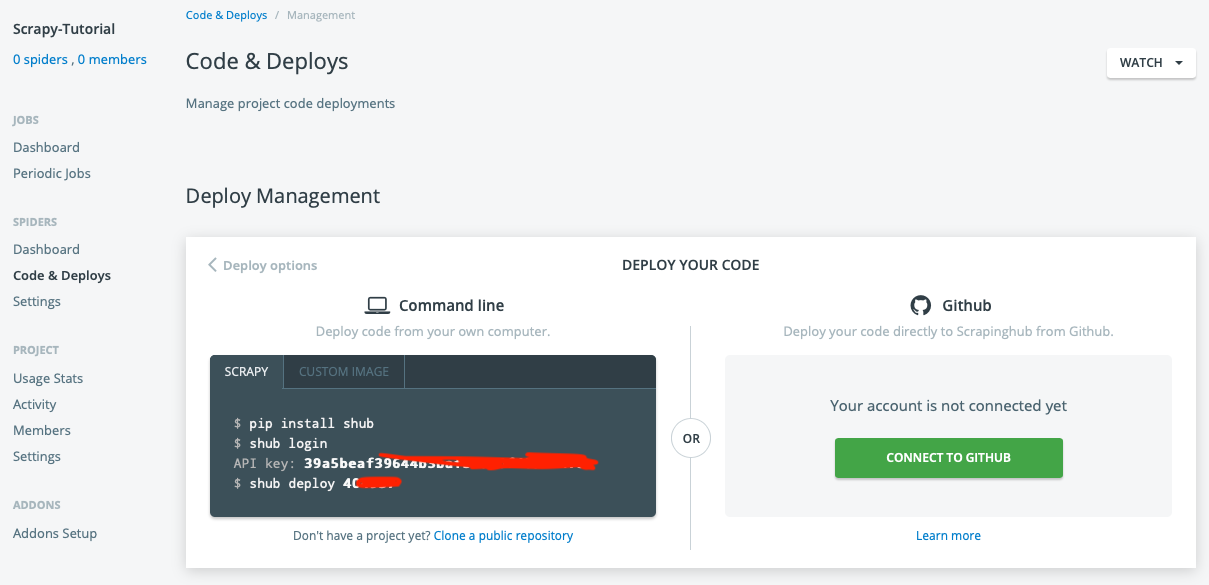
We will use the shub command line to deploy. You can find your API key and deploy number once in your project Code & Deploys page:
Go back to the root of Scrapy-tutorial (the root of the Scrapy project) and use the following command to deploy your project to Scrapyinghub.
(venv) dami:scrapy-tutorial harrywang$ shub login
Enter your API key from https://app.scrapinghub.com/account/apikey
API key: xxxxx
Validating API key...
API key is OK, you are logged in now.
(venv) dami:scrapy-tutorial harrywang$ shub deploy 404937
Messagepack is not available, please ensure that msgpack-python library is properly installed.
Saving project 404937 as default target. You can deploy to it via 'shub deploy' from now on
Saved to /Users/harrywang/xxx/scrapy-tutorial/scrapinghub.yml.
Packing version b6ac860-master
Created setup.py at /Users/harrywang/xxx/scrapy-tutorial
Deploying to Scrapy Cloud project "404937"
{"status": "ok", "project": 4xxx, "version": "b6ac860-master", "spiders": 3}
Run your spiders at: https://app.scrapinghub.com/p/404937/
Scrapinghub configuration file is created scrapinghub.yml and you need to edit it to specify:
- scrapy 1.7 running Python 3
- requirements files for other packages
project: 404937

stacks:
    default: scrapy:1.7-py3

requirements:
  file: requirements.txt
run $ shub deploy to deploy again.
We have three spiders in the project:
- quotes_spider.py is the main spider
- quotes_spider_v1.py is the version 1 of the spider that writes to files, etc.
- authors_spider.py is the spider to get author page from the official tutorial
You can see your current deployment on scrapinghub.com:

Then, you can run your spider:


Once the job is complete, you can check the results and download the items:


You can schedule periodic jobs if you upgrade your free plan.
I found this repo https://github.com/my8100/scrapydweb and follow https://github.com/my8100/scrapyd-cluster-on-heroku to setup the server.
We need a custom deployment because our scrapy project has specific package requirements, e.g., SQLAlchemy, MySQL, etc. if no special package is needed, you can follow the easy setup below.
fork a copy of https://github.com/my8100/scrapyd-cluster-on-heroku to your account, e.g., https://github.com/harrywang/scrapyd-cluster-on-heroku
create a free account at heroku.com and install Heroku CLI: brew tap heroku/brew && brew install heroku
clone the repo:
git clone https://github.com/harrywang/scrapyd-cluster-on-heroku
cd scrapyd-cluster-on-heroku/
login to Heroku
scrapyd-cluster-on-heroku harrywang$ heroku login
heroku: Press any key to open up the browser to login or q to exit:
Opening browser to https://cli-auth.heroku.com/auth/browser/3ba7221b-9c2a-4355-ab3b-d2csda
Logging in... done
Logged in as [email protected]
In this step, you should update the runtime.txt to specify the Python version and requirements.txt to include all packages your spider needs.
After changes, runtime.txt is:
python-3.6
requirements.txt is:
pip>=19.1
#Twisted==18.9.0
scrapy
scrapyd>=1.2.1
scrapy-redis
logparser>=0.8.2

mysqlclient>=1.4.4
SQLAlchemy>=1.3.6
Setup the repo and commit the changes we just made:
cd scrapyd
git init
git status
git add .
git commit -a -m "first commit"
git status
Deploy Scrapyd app
heroku apps:create scrapy-server1
heroku git:remote -a scrapy-server1
git remote -v
git push heroku master
heroku logs --tail
# Press ctrl+c to stop logs outputting
# Visit https://svr-1.herokuapp.com
Add environment variables
Timezone
# python -c "import tzlocal; print(tzlocal.get_localzone())"
heroku config:set TZ=US/Eastern
# heroku config:get TZ
Redis (optional - not in this tutorial) Redis account (optional, see settings.py in the scrapy_redis_demo_project.zip)
heroku config:set REDIS_HOST=your-redis-host
heroku config:set REDIS_PORT=your-redis-port
heroku config:set REDIS_PASSWORD=your-redis-password
Repeat this step if multiple scrapyd server is needed.
go to scrapydweb subfolder and update runtime.txt, requirements.txt, and scrapydweb_settings_v10.py if needed.
Let's enable authentication, edit the following section of scrapydweb_settings_v10.py:
# The default is False, set it to True to enable basic auth for the web UI.
ENABLE_AUTH = True
if os.environ.get('ENABLE_AUTH', 'False') == 'True':
    ENABLE_AUTH = True
# In order to enable basic auth, both USERNAME and PASSWORD should be non-empty strings.
USERNAME = 'admin'
PASSWORD = 'scrapydweb'
USERNAME = os.environ.get('USERNAME', 'admin')
PASSWORD = os.environ.get('PASSWORD', 'scrapydweb')
Otherwise, proceed as follows:
cd ..
cd scrapydweb
git init
git status
git add .
git commit -a -m "first commit"
git status
Deploy ScrapydWeb app
heroku apps:create scrapyd-web
heroku git:remote -a scrapyd-web
git remote -v
git push heroku master
Add environment variables
Timezone
heroku config:set TZ=US/Eastern
Scrapyd servers - you have to use the scrapyd server address you just setup above (see scrapydweb_settings_vN.py in the scrapydweb directory)
heroku config:set SCRAPYD_SERVER_1=scrapy-server1.herokuapp.com:80
# heroku config:set SCRAPYD_SERVER_2=svr-2.herokuapp.com:80#group1
# heroku config:set SCRAPYD_SERVER_3=svr-3.herokuapp.com:80#group1
# heroku config:set SCRAPYD_SERVER_4=svr-4.herokuapp.com:80#group2
We need to package the project and upload to the server.
First, install scrapyd-client using pip install git+https://github.com/scrapy/scrapyd-client (note: pip does not work as of writing this document see: https://stackoverflow.com/questions/45750739/scrapyd-client-command-not-found)
change the deploy setting in scrapy.cfg:
[deploy]
url = http://scrapyd-server1.herokuapp.com
username = admin
password = scrapydweb
project = scrapy-tutorial
Then, use scrapyd-deploy to package and deploy to scrapyd server:
(venv) dami:scrapy-tutorial harrywang$ scrapyd-deploy
/Users/harrywang/sandbox/scrapy-tutorial/venv/lib/python3.6/site-packages/scrapyd_client/deploy.py:23: ScrapyDeprecationWarning: Module `scrapy.utils.http` is deprecated, Please import from `w3lib.http` instead.
  from scrapy.utils.http import basic_auth_header
Packing version 1566253506
Deploying to project "scrapy-tutorial" in http://scrapyd-server1.herokuapp.com/addversion.json
Server response (200):
{"node_name": "9177f699-b645-4656-82d1-beef2898fdc1", "status": "ok", "project": "scrapy-tutorial", "version": "1566253506", "spiders": 3}
go to https://srapyd-web.herokuapp.com, you should see your project deployed:

go to the following page to run the spider:

Once the spider finishes, you can check the items in Files menu.
You can specify Timer Tasks. The following shows a task that runs every 10 minutes. This part is based on APScheduler, see document to figure out how to set the values (this could be confusing.)

- create a free account at heroku.com and login
- go to https://github.com/my8100/scrapyd-cluster-on-heroku-scrapyd-app and click "Deploy to Heroku" button to setup a scrayd server app (scrapyd-server1.herokuapp.com):

Use the following settings (No redis setting) and the app is at scrapyd-server1.herokuapp.com

- go to https://github.com/my8100/scrapyd-cluster-on-heroku-scrapydweb-app-git and click "Deploy to Heroku" button to setup a scrapydweb server app:

Use the following settings (No redis setting) and the app is at scrapyd-server1.herokuapp.com

- go to https://srapyd-web.herokuapp.com and login, you can see that one scrapyd server is ready:

We need to package the project and upload to the server.
First, install scrapyd-client using pip install git+https://github.com/scrapy/scrapyd-client (note: pip does not work as of writing this document see: https://stackoverflow.com/questions/45750739/scrapyd-client-command-not-found)
change the deploy setting in scrapy.cfg:
[deploy]
url = http://scrapyd-server1.herokuapp.com
username = admin
password = scrapydweb
project = scrapy-tutorial
Then, use scrapyd-deploy to package and deploy to scrapyd server:
(venv) dami:scrapy-tutorial harrywang$ scrapyd-deploy
/Users/harrywang/sandbox/scrapy-tutorial/venv/lib/python3.6/site-packages/scrapyd_client/deploy.py:23: ScrapyDeprecationWarning: Module `scrapy.utils.http` is deprecated, Please import from `w3lib.http` instead.
  from scrapy.utils.http import basic_auth_header
Packing version 1566253506
Deploying to project "scrapy-tutorial" in http://scrapyd-server1.herokuapp.com/addversion.json
Server response (200):
{"node_name": "9177f699-b645-4656-82d1-beef2898fdc1", "status": "ok", "project": "scrapy-tutorial", "version": "1566253506", "spiders": 3}
go to https://srapyd-web.herokuapp.com, you should see your project deployed: