Getting Started
NOTE: This document is out-of-date as of March 30, 2015. While many of the general concepts remain correct, several of the script names and technical details have changed. Please see issue #21 for details and discussion. Updated documentation is coming soon.
This document describes how to add Hovercast to your project. The integration process is summarized by the following steps:
- Attach Hovercast to the scene.
- Create the menu hierarchy, items, and actions.
- Add optional customizations for the entire menu and individual items.
- Link your navigation, customization, and input providers to Hovercast.
In a hurry? Don't need to know the details? The Quick Start guide shows how to rapidly create a scene with a Hovercast menu and Leap Motion input.
These instructions and examples are based on the "LeapVR" demo scene. This particular scene (in Unity 3D) uses Oculus Rift cameras and Leap Motion input. See the other demo scenes for variations.
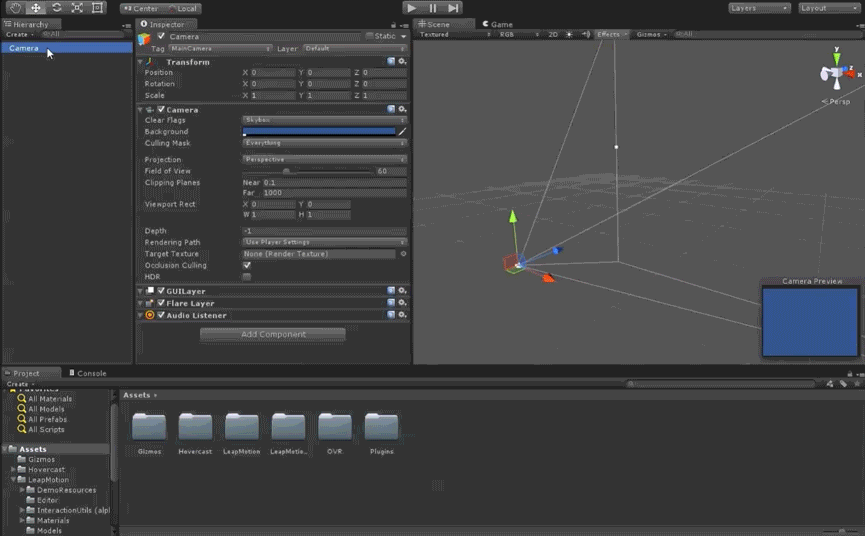
Hovercast's main script is called HovercastSetup. This script is responsible for generating and updating the menu. The first step is to attach it to the scene correctly.
When using Leap Motion input, HovercastSetup must be attached as a child of Leap Motion's "HandController" object. In general, HovercastSetup needs to be in the same coordinate system as the 3D input. This keeps Hovercast anchored in the correct position and orientation, allowing the menu's graphics to stay aligned with the 3D input.
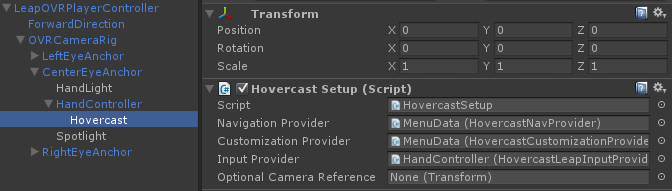
The "Hovercast" object is a child of "HandController", and contains a
HovercastSetupscript.
Hovercast supports a nested hierarchy of menu items, which you can create directly within the Unity editor.
The hierarchy begins with one one object as the menu's "root". Attach a HovercastNavProvider script to this object. Within this "root" object, add a child object for each menu item. Each of these items can also have child objects.
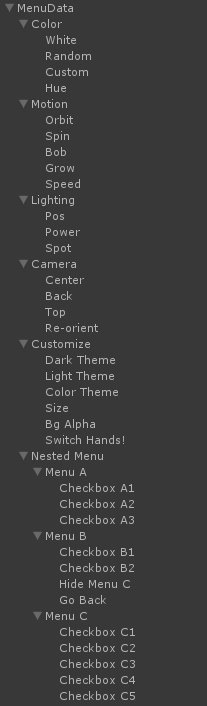
The full demo menu hierarchy, as seen in the demo video.
Add Details
Each object in this hierarchy must have a HovercastNavItem script attached to it. This script provides several editor fields, where you can enter the menu item's details. See "Types of Menu Items" for more >
Add Listeners
To handle an item's events and actions, you'll need to create a custom script. This script must inherit from HovercastNavItemListener, which provides the structure required to create the listener. See "Menu Item Listeners" for more >
Hovercast comes with a set of default renderers, which are responsible for drawing various aspects of the menu. These renderers offer a variety of settings for customization. Hovercast also provides interaction-related settings.
As a starting point, every Hovercast integration must include an object with the HovercastCustomizationProvider script attached. When used on its own, this script will use Hovercast's default renderers and settings.
Global Settings
There are four customization scripts available:
-
HovercastDefaultSegmentcontrols the appearance of the menu item "segments". -
HovercastDefaultPalmcontrols the appearance of the menu's palm "segment", where the title is displayed. -
HovercastDefaultCursorcontrols the appearance of the shape that follows the cursor's fingertip position. -
HovercastCustomInteractioncontrols settings related to menu interaction and usage, like distances and timings.
These customization scripts must be attached to the same object that contains the HovercastCustomizationProvider script. The values provided in these scripts will override Hovercast's default settings.
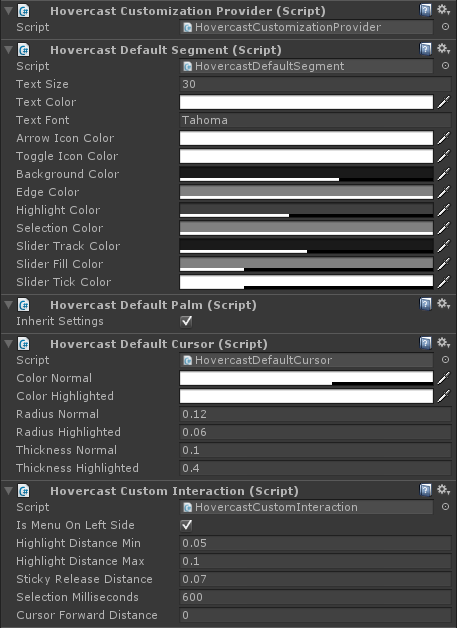
The settings used by the demo.
Menu Item Settings
To change the settings for a specific menu item, you can attach a HovercastDefaultSegment script (or any subclass of HovercastCustomSegment) to it. The demo scene does this for the "Hue" slider, which changes its highlight colors based on the slider's current value. See the DemoHueSegment script for implementation details.
Renderers
Hovercast allows you to create your own renderers, which replace the default look-and-feel with your own custom graphics. You can also extend the settings options to support renderer-specific features.
To create a custom renderers, you must implement your own versions of the classes listed above. You can review and follow the implementation of these default renderers. This is an advanced topic, and won't be discussed in detail here.
To complete this process, Hovercast needs to know where to find its navigation, customization, and input information. Returning to your HovercastSetup script, you'll find input boxes for each.
-
Navigation Provider: In step 2, you attached a
HovercastNavProviderscript to the object at the "root" of your menu hierarchy. Drag that object into the "Navigation Provider" input. -
Customization Provider: In step 3, you attached a
HovercastCustomizationProviderscript to an object. Drag that object into the "Customization Provider" input. -
Input Provider: In step 1, you found the Leap Motion "HandController" object. Attach the
HovercastLeapInputProviderscript to this object, and drag the object into the "Input Provider" input. See "Input Modules" for more > -
Optional Camera Reference: In the Leap Motion's "head-mounted" mode, the camera is already in the same position as the
HovercastSetupobject. In "table-mounted" mode, however, the camera is in a different position. When this occurs, some features (like the cursor shape's orientation) will not behave correctly. If necessary, drag the camera object into the "Optional Camera Reference" input.